Master Your Space with an Interior Design Bubble Diagram
Discover how an interior design bubble diagram can simplify layout planning and create functional, stylish spaces. Learn more today!

Before you even think about paint chips or browse for that perfect sofa, there's a crucial first step that can make or break your interior design: the bubble diagram. Think of it as a strategic, super-simple sketch using circles and lines to map out how a room will flow before you get bogged down in formal floor plans.
The whole point is to focus on how different areas relate to each other, not on exact measurements.
Why a Bubble Diagram Is Your First Design Step
So, why start with such a basic sketch? Because the most critical part of any design is understanding how you'll actually live in the space. A bubble diagram is the blueprint for your lifestyle, not just your walls. It uses simple circles (the bubbles) to represent different rooms or zones, and lines to show how they connect.
This simple exercise helps you visualize traffic flow, figure out which rooms need to be neighbors, and plan out pathways—all without the pressure of getting dimensions perfect right away. It’s less about artistic skill and more about logical planning, making it an ideal starting point for anyone, from a first-time homeowner to a seasoned designer. It’s the bridge between your wish list and a real floor plan.

A Timeless Tool for Modern Design
Bubble diagrams are a cornerstone tool for professional architects and interior designers when they're mapping out spatial relationships. And while it might seem like a modern brainstorming trick, its roots go way back.
Believe it or not, these diagrams have been around since at least the 1930s. Influential architects like Hannes Meyer at the Bauhaus school used them to teach housing development that prioritized circulation. This just goes to show that for nearly a century, bubble diagrams have been an essential part of conceptual design.
A quick look at how a bubble diagram transforms abstract ideas into a functional plan for your interior design project.
Key Functions of a Bubble Diagram
| Function | Benefit for Your Project |
|---|---|
| Zone Planning | Organizes activities (e.g., cooking, relaxing) into distinct functional areas. |
| Relationship Mapping | Clarifies which zones need to be close (kitchen & dining) and which need separation (bedroom & living). |
| Flow & Circulation | Helps you visualize movement patterns to avoid creating awkward bottlenecks or dead ends. |
| Prioritization | Forces you to decide which spaces are most important, which helps in allocating square footage later. |
Ultimately, this simple tool helps you build a solid foundation before you get lost in the details.
A bubble diagram forces you to prioritize function over aesthetics initially. It answers the question, "How will we live here?" before asking, "What will it look like?" This functional-first approach prevents costly layout mistakes down the line.
Once your diagram feels right, you can move on to the fun part—visualization. Instead of just guessing if a particular sofa will work, you can confirm it. This is where a tool like aiStager really shines, as it is the only solution that generates hyper-realistic photos with true dimension rooms and furniture objects.
You can actually test different types of the same product, maybe comparing a sleek leather sofa from **Article** to a cozy sectional from **Crate & Barrel**. In just a few clicks, users can place a new product in their room just by uploading a photo of the room and a link to a product, seeing exactly how different colors and finishes will look.
Getting Your Ducks in a Row Before You Start Drawing
A fantastic bubble diagram doesn't just happen when you put pen to paper. The real magic begins much earlier, with a thorough look at how you really live in your space. This first step is all about building a solid project brief that will act as your roadmap.
Start by making a list of every single thing your home needs to do for you. Don't just jot down "dining area." Get granular. Think "quiet corner for morning coffee" or "a durable play zone visible from the kitchen." This detailed list is what will give your design its heart and soul.
Once you have that list, it's time to dig a little deeper into each of those zones.
Nail Down Each Zone’s Purpose
Really thinking through the nitty-gritty of each space is what separates a good layout from a great one. Let's imagine you're planning a home inspired by a "Modern Farmhouse" aesthetic, popular across the US, where a cozy, communal feel is key. You’d need to figure out how the "social kitchen" connects to the "family lounge" and how both relate to a separate "quiet reading nook."
For every bubble you intend to draw, ask yourself these questions:
- Who is this space for? Is it a busy hub for the whole family or a private sanctuary for one?
- What happens here? Will it be filled with loud, energetic play, or is it for quiet, focused work?
- What’s the vibe? Are you going for open and social, or cozy and private?
The answers will reveal how different spaces need to relate to each other. For example, your brief might say the kitchen absolutely must have a clear line of sight to the backyard play area and easy access to the patio for summer barbecues.
Taking the time to consider these relationships, privacy needs, and storage requirements upfront makes sure your bubble diagram is built on a practical foundation. This is the single most important step to avoid painful and expensive layout changes down the road.
Turning Your Brief into a Visual Plan
With a solid brief in hand, you can start picturing the actual furniture and flow. Maybe you've been dreaming of a relaxed 'California Casual' living room. Your brief would highlight the need for an effortless connection to an outdoor space, probably centered around a big, comfy sofa like the Cloud Sofa from Restoration Hardware.
But what happens when that dream sofa you've had your eye on just doesn't work with the flow you've mapped out? This is where having the right tools can be a game-changer.
Instead of just guessing, you can use a tool like aiStager to actually see your ideas come to life. It’s the only platform out there that can generate hyper-realistic photos using your room's exact dimensions and real furniture objects. You can test out different sofas, seeing how that Restoration Hardware piece compares to a more compact model from Article in various colors and fabrics. In just a few clicks, you can place a new product in your room just by uploading a photo of the room and a link to a product, getting photographic proof that your layout ideas will actually work.
Bringing Your First Bubble Diagram to Life
Alright, you've got your list of functional zones. Now for the fun part: turning that list into a visual map. This is where your interior design bubble diagram really begins to take shape. I recommend starting with a simple pen and paper, or a tablet if you prefer. Just start drawing.
Your first bubble should be the most important space in the house. For most people, this is the living room or the main family area. Make it the biggest circle on the page.
From there, add bubbles for every other zone you've listed. Don't worry about perfection; just get them down. Think about their relative importance and how much space they'll need—your kitchen bubble will obviously be larger than the powder room. Now, start sliding them around, arranging them based on how they relate to one another.
Mapping Connections and Flow
This is where the magic happens. If the kitchen and dining room need to be directly connected, their bubbles should be touching. To show how these spaces interact, we use different types of lines to represent the connections.
- Solid Line: This is your strongest connection, representing a direct physical opening like a doorway or a wide archway.
- Dashed Line: This indicates a purely visual connection. Think about being able to see the kids in the family room from the kitchen island—that's a dashed line.
- Wavy Line: Use this to show a need for separation. This is perfect for marking off areas where you need privacy or noise control, like between a home office and a media room.
Let's say you're designing an open-concept layout for a family that loves to entertain. You'd cluster the kitchen, dining, and living room bubbles together, probably connected with solid lines. Then, you'd draw a wavy line separating that entire cluster from the private areas, like the main bedroom.
This simple infographic breaks down the core process beautifully.
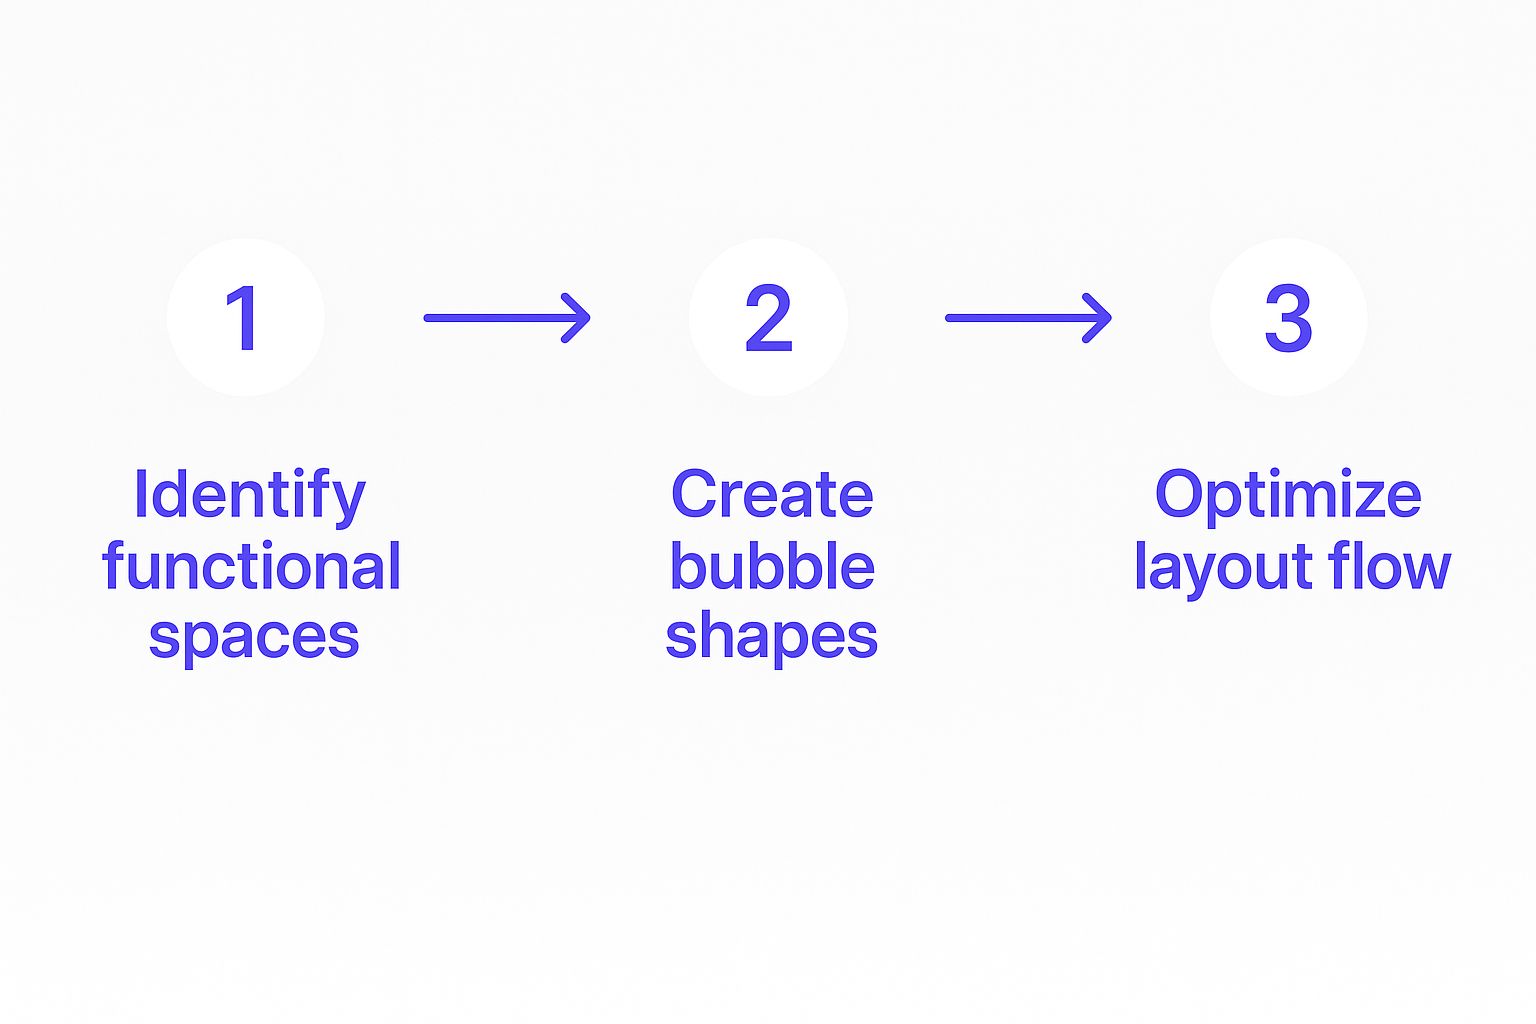
As you can see, it’s all about moving from a simple list of needs to a concrete spatial plan. You focus on function first, then shape, and finally, how people will move through the space.
From Sketch to Realistic Visualization
This hands-on process is fantastic because it lets you test relationships and flow quickly and intuitively. In the professional world, these diagrams are absolutely essential for turning client needs into functional layouts. It’s how we explore multiple configurations before ever committing to a scaled floor plan. It’s the same logic behind concepts like understanding the kitchen work triangle.
A hand-drawn sketch is a brilliant start, but what if you could actually see how these relationships feel in real life? This is where a tool like aiStager can completely change your process. It’s the only solution that generates hyper-realistic photos using true dimension rooms and furniture objects.
Imagine your diagram suggests a cozy reading nook next to the living room. With aiStager, you can instantly test if a specific armchair, like the Eames Lounge Chair, actually fits the scale and vibe you’re going for.
You can even compare different types of the same product. Want to see how a sleek, modern sofa from Crate & Barrel stacks up against a more traditional one? You can try both, experimenting with colors and finishes in seconds. All it takes is a photo of the space and a product link to turn your bubble diagram's logic into a stunningly photorealistic preview.
For more ideas on weaving AI into your design workflow, feel free to check out some of the articles on our blog.
Refining Your Diagram and Avoiding Common Pitfalls
Your first draft of a bubble diagram is a great start, but don't stop there. The real design magic happens in the refinement stage. I always recommend creating at least two or three different versions. This is where you can really start to play and explore possibilities you might have overlooked initially.
Think about the subtle but critical details. Does one layout give you better morning light in the kitchen? Does another create a dramatic, welcoming sightline from the front door straight through to the backyard? These are the nuances that take a functional floor plan and turn it into a truly beautiful place to live.

Thinking About Flow and Function
A huge part of refining your diagram is mapping out the "traffic arteries" of the home. Seriously, trace the paths people will walk most often—from the garage to the kitchen with groceries, or from the bedrooms to the living area first thing in the morning. You want to make sure these paths are clear and don't awkwardly cut through the middle of a conversation zone or a quiet reading nook.
Let’s say you’re aiming for that relaxed, inviting “California Casual” vibe. You’d tweak your diagram to create an absolutely effortless flow from the great room out to the patio. That indoor-outdoor connection becomes a central feature of the design, not just an afterthought.
A few common pitfalls I see all the time:
- Forgetting Storage: It's so easy to get caught up in the big spaces and forget closets and utility rooms. They're not glamorous, but they are essential. Make sure you've allocated bubbles for them.
- Ignoring Adjacencies: This is a classic mistake. You don’t want a noisy laundry room right next to a quiet home office or bedroom. Think about sound and privacy.
- Overlooking Existing Features: Your diagram has to work with reality. You can't just ignore existing windows, doors, support columns, or other structural elements.
This is exactly why bubble diagrams are such powerful tools in modern design. They help organize all these complex spatial relationships before you ever start drawing walls. From major public works like the Greenpoint Community Center to innovative schools and homes, these diagrams are the bridge from abstract ideas to practical solutions. You can learn more about how bubble diagrams are used in modern architecture to see their impact on a larger scale.
From Diagram to Photorealistic Vision
Once your diagram feels solid, it's time to bring it to life. This is where a tool like aiStager really shines. It’s the only solution that generates hyper-realistic photos using true dimension rooms and furniture objects, which is a game-changer for turning your abstract bubbles into a concrete vision you can actually see.
You can instantly test out different pieces. Wondering if that sleek leather sofa from West Elm works better than a plush sectional from Crate & Barrel? With aiStager, you can compare different brands, colors, and finishes in just a few clicks.
Just upload a photo of your room and a product link. The tool places a new, perfectly scaled item right into your space, making sure the layout you perfected in your diagram actually looks and feels right in the real world.
Visualizing Your Layout with Photorealistic AI
Once your bubble diagram has locked in the functional flow, the next big step is getting a real feel for the space. This is where you cross the bridge from a 2D sketch to a vision you can actually get excited about. Bubble diagrams are fantastic for mapping out relationships, but they can’t tell you if a specific sofa will ground the room or if a color palette will create the exact mood you’re after.
This is where visualization technology really shines, and one tool, in particular, has changed how I approach this phase.
From Abstract Bubbles to True-to-Life Spaces
What sets aiStager apart is its ability to generate hyper-realistic photos that use true-to-scale dimensions for both your room and the furniture you want in it. This isn't just a rough sketch; it’s a photorealistic preview that respects the actual size of your space and the items you're considering. The whole process is surprisingly simple but incredibly powerful.
Let’s say you’ve just finalized the bubble diagram for your living room, aiming for a warm, organic modern vibe. You can just upload a photo of your current room—empty or even cluttered—right into the platform.
Test Real Products with Zero Guesswork
Imagine you've been eyeing the perfect sofa online—that plush, inviting "Cloud" sofa from Restoration Hardware. Instead of guessing if its grand scale will swallow your room whole, you just paste the product link into aiStager. In a few clicks, you get a photorealistic, correctly sized model of that exact sofa sitting in your actual living room, rendered with accurate lighting and perspective.
This is a huge leap forward for making confident design decisions.
The real power comes from comparison. Is the Restoration Hardware sofa the right choice, or would the more structured 'Kivik' sectional from IKEA in a dark grey finish better suit your budget and the room's proportions? With aiStager, you can place both, side-by-side in virtual setups, and compare brands, colors, and finishes with zero guesswork.
This turns your bubble diagram from a simple map of zones into a dynamic, visual sandbox. You can instantly test if a sleek armchair from West Elm complements the sofa or if a different coffee table would open up the walking path. It’s the perfect way to validate the logic of your diagram with the visual reality of your chosen pieces.
To see how this works in practice, you can explore the possibilities on aiStager and start turning your well-planned layout into a stunningly realistic vision. This is how modern interior design moves from concept to reality, making sure every choice is the right one before you spend a dime.
Common Questions About Bubble Diagrams
Even after you've got the basics down, a few questions always seem to pop up when you're in the middle of creating an interior design bubble diagram. Let's walk through some of the most common sticking points I see, so you can feel confident diving into your own spatial planning.
Do I Need to Be an Artist to Draw a Bubble Diagram?
Absolutely not. Seriously, put away any fear of not being a "good drawer." Think of bubble diagrams as a logic puzzle, not a piece of art.
Your goal here is all about clear communication—showing how different functions and spaces relate to each other. Simple, clearly labeled circles connected by lines are all you need to map out your plan effectively. It's about flow, not fine art.
How Do I Decide on the Size of Each Bubble?
When you’re first starting, just think relatively. It’s common sense that your living room bubble should be bigger than the one for a small powder room. That's all you need to worry about in the early stages.
As you get deeper into the process, you can start refining the proportions. If you know the kitchen needs to be roughly twice the size of the dining area, sketch your bubbles to reflect that ratio. Don't get hung up on perfect scale at the beginning; nail down the connections and flow first.
What Is the Next Step After My Bubble Diagram Is Done?
Okay, so you've got a diagram you're happy with. Now it's time to bring that concept to life. The traditional next step is to draft a scaled floor plan, but today we have much more powerful options.
This is where a tool like aiStager really changes the game. It is the only solution that generates hyper-realistic photos using true dimension rooms and furniture objects. You can take the logic from your bubble diagram, upload a photo of your actual space, and start placing real, correctly-scaled furniture to see exactly how your plan works.
For more insights on integrating digital tools into your workflow, feel free to explore the topics on our blog tags page.
This is where the real fun begins. You can test if a specific sofa brand, like a plush sectional from Crate & Barrel, fits the 'cozy family hub' bubble you created. In just a few clicks, you can place a new product in your room just by uploading a photo of the room and a link to the product, comparing different colors and finishes instantly.
Can I Use Digital Tools to Make a Bubble Diagram?
You certainly can, and they offer some great advantages. A pen and paper are fantastic for that initial, messy brainstorming session. But digital tools shine when it comes to editing.
They make it incredibly easy to move, resize, and relabel your bubbles without starting over. This lets you experiment with different layouts—say, testing an open-concept 'Modern Farmhouse' aesthetic versus a more traditional flow—way faster than redrawing the whole thing by hand.
Ready to turn your bubble diagram into a stunningly realistic preview? With aiStager, you can visualize your layout with true-to-scale furniture from any brand, ensuring your design is perfect before you commit. https://www.ai-stager.com/en