A Guide to Perspective Drawings of Bedrooms
Learn how to create compelling perspective drawings of bedrooms. This guide covers manual techniques, AI tools, and practical tips for designers.
Perspective drawings are how we bring a three-dimensional bedroom to life on a two-dimensional surface. It’s a foundational skill for any interior designer, architect, or artist who needs to create a realistic sense of depth and space.
Think of it as the blueprint for a feeling. These drawings are essential for visualizing how furniture, lighting, and decor will all come together before a single dollar is spent or a wall is painted.
Why Perspective Still Matters for Bedroom Design
Before the paint cans are opened and the furniture is ordered, the best bedroom designs start as a simple drawing. A solid grasp of perspective is what turns a flat, lifeless sketch into a convincing visual that gets clients excited. It’s the core skill that lets us show how a room will truly feel.
This isn't a new concept. The power of perspective has been understood for centuries. Just look at Vincent van Gogh's iconic painting 'The Bedroom' from 1888. It's one of history's most famous perspective drawings of a bedroom, brilliantly capturing the emotion of his space in Arles, France. He even intentionally bent the rules of perspective to create a stronger feeling of rest and peace, proving it’s as much about emotion as it is about geometry. You can learn more about his unique approach and see the masterpiece at the Van Gogh Museum.
The journey from hand-drawn art to today's digital renderings is fascinating. For a deeper dive, check out this complete guide to 3D computer graphics.
From Art History to AI-Powered Visualization
The principles haven't changed, but the tools certainly have. While sketching by hand is still an incredible skill, modern technology makes creating these crucial visuals faster and more accessible for everyone, especially designers and homeowners who need to make confident decisions on a deadline.
Let's say you're designing a master bedroom with a modern farmhouse vibe, a popular style in the US. You're stuck between two platform beds—one from a big name like Pottery Barn and another from a smaller online boutique. Drawing each one to scale by hand would take hours and you'd always be second-guessing if you got it right.
This is where modern solutions shine. Instead of spending hours sketching, you can get instant, photorealistic results that honor the core principles of perspective without the manual labor.
The aiStager Advantage
This is precisely why aiStager is such a powerful tool. It’s the only solution that generates hyper-realistic photos using true dimension rooms and furniture objects. You can test-drive different products just by uploading a photo of the room and dropping in a product link.
- Test Multiple Brands: Instantly see how a bed from Pottery Barn stacks up against one from Article, all perfectly scaled in your actual space.
- Experiment with Finishes: In just a few clicks, users can place a new product in their room, just by uploading a photo of the room and a link to a product. From there, you can cycle through different colors and finishes—like a light oak versus a dark walnut—to find the perfect match.
By handling the technical heavy lifting of perspective and scaling, aiStager frees you up to focus on the creative side of design.
Choosing the Right Perspective for Your Bedroom
Before you even think about sketching, your first major decision is which perspective to use. This isn't just a technical choice; it sets the entire mood for your bedroom design. It dictates what the viewer sees first and how the space feels—is it calm and centered, or open and dynamic?
You'll primarily be working with one-point, two-point, or three-point perspective. Each one gives you a different lens to look through, and picking the right one is the key to creating a drawing that feels real and pulls you in.
Think of it as a strategic move. The right perspective can make a small room feel spacious, highlight a stunning piece of furniture, or give a clear, comprehensive look at the entire layout.
One-Point Perspective: The Focused View
One-point perspective is the simplest and often the most impactful for a bedroom scene. Imagine you're standing and looking straight at one wall. All the parallel lines in the room—the edges of the bed, the ceiling, the floor—all seem to race back to a single vanishing point on your horizon line.
This technique creates a powerful sense of depth and focus, guiding the viewer's eye right where you want it to go. It’s perfect for showing off the most important feature in the room, whether that’s a beautifully designed headboard, a bold piece of art, or a window with a killer view. A minimalist, Scandinavian-style bedroom, for instance, would look incredible in one-point perspective, as it would perfectly emphasize those clean lines and the serene atmosphere.
Use one-point perspective when you want to create a composition that feels calm, orderly, and centered. It's fantastic for highlighting a main feature wall or a symmetrical design, which is why it's a favorite for residential interior drawings.
The idea of using linear perspective to draw interiors isn't new. Italian Renaissance masters figured out one-point perspective around 1415, and you can learn more about its fascinating evolution from this deep dive into the history of perspective in art.
Today, that legacy is built upon by tools like aiStager, which uses advanced algorithms to nail the perspective for you. From just one photo, it can generate a photorealistic bedroom using products from any URL, ensuring they're dimensionally accurate. This approach can cut staging costs by a staggering 90% compared to traditional methods. Plus, real estate data shows that listings staged this way get 73% more views.
Two-Point Perspective: The Dynamic Corner
When you want to reveal more of the room and give it a more natural, dynamic feeling, two-point perspective is the way to go. Instead of looking at a flat wall, you're now viewing the room from a corner.
This setup uses two vanishing points on the horizon line. The lines of your objects will recede to one of these two points, giving the drawing a much greater sense of space and dimension. It allows you to show two walls at once, which is great for illustrating the relationship between different elements. For example, you could show how a cozy reading chair from Design Within Reach looks next to a sleek, modern dresser on the adjoining wall.
This approach is especially good for:
- Showcasing Layouts: It clearly communicates how furniture is arranged and how someone might navigate the space.
- Adding Visual Interest: The angular lines create a more energetic and engaging scene than the head-on view of one-point.
- Visualizing Larger Rooms: It helps capture the true scale and feel of a more spacious bedroom.
Deciding between one- and two-point perspective comes down to the story you want your drawing to tell. Do you want a focused, serene shot or a broader, more lifelike view? This quick table breaks down the main differences to help you choose.
Which Perspective Is Right for Your Bedroom Design?
| Perspective Type | Best For Visualizing | Overall Feel and Mood | Common Use Case |
|---|---|---|---|
| One-Point | A single wall or feature head-on. | Calm, focused, symmetrical, and formal. | Highlighting a bed against a feature wall or showing a long, narrow room. |
| Two-Point | A corner of the room, showing two walls. | Dynamic, natural, and spacious. | Illustrating furniture layouts, showing how two walls interact, or capturing a more realistic "in-the-room" feeling. |
| Three-Point | Extreme high or low angles. | Dramatic, expansive, and grand. | Creating a "bird's-eye" view of a large master suite or a "worm's-eye" view to make the ceiling feel towering. |
Ultimately, the best perspective depends entirely on your design goals. Don't be afraid to sketch out a few rough thumbnails in each style to see which one captures the room's personality best.
When to Use AI for Perfect Perspective
While drawing by hand is an essential skill, getting perspective just right can be incredibly time-consuming. This is where AI visualization tools become a designer's secret weapon.
Imagine a client is trying to choose between several high-end sofas for their master bedroom's sitting area—maybe a classic Chesterfield and a modern sectional from Arhaus. Drawing each one manually in a perfect two-point perspective would take hours, if not days.
With a tool like aiStager, you can skip the manual labor. It's the only solution that generates hyper-realistic photos from true dimension rooms and furniture, so every item is scaled perfectly. In just a few clicks, you can place a new product in their room, just by uploading a photo of the corner and dropping in the product links. In minutes, you can show your client photorealistic images of each sofa, testing different fabrics and colors, all rendered in a flawless two-point perspective. This doesn't just save a massive amount of time; it provides an incredible level of accuracy that gives clients complete confidence to make a decision.
Bringing Your Bedroom Sketch to Life
Alright, you've picked your perspective. Now for the fun part: turning those abstract concepts into a real, tangible drawing. Whether you're using a trusty pencil or a stylus on a tablet, this is where your bedroom starts to take shape. It’s a process that rewards a bit of patience, but if you take it one step at a time, you'll be surprised at how manageable it is.
First thing's first: establish your horizon line. This line is everything. It's the viewer's eye level, and it’s the anchor that makes your entire drawing believable. Once you have that down, pop your vanishing point (or points) onto it. For a one-point perspective, you just need one. For a two-point, you'll have two, usually set pretty far apart.
Every line that recedes into the distance will aim for these points. This simple rule is what creates that powerful illusion of depth.
Building the Bones of the Room
With your horizon and vanishing points set, you can start framing out the room itself. Grab a ruler and draw lines out from your vanishing points to define the floor, ceiling, and where the walls meet. We call these orthogonal lines, and they basically form the wireframe of your bedroom. Don't even think about windows or furniture yet. The only goal here is to create a simple, accurate box that feels three-dimensional.
This stage is all about getting the structure right. I’ve seen so many people rush into adding the cool stuff, only to realize later that the room itself looks wonky. A shaky foundation means everything you add on top will look "off." Take your time here; precision now will save you a ton of headaches later.
Key Takeaway: Think of these initial lines as the skeleton of your drawing. Get the skeleton right, and adding furniture and details becomes a much simpler task of just placing objects inside a space that already feels real.
For those of you working digitally, mastering these foundational drawing skills can seriously elevate your work. If you're new to the digital canvas, a good guide on How to Draw on iPad can be a great place to start. The ability to use layers and undo mistakes is a game-changer.
Placing and Scaling Your Furniture
Now that you have an empty room, you can start filling it. This is where it gets both exciting and a little tricky. I always recommend starting with the biggest piece: the bed. To place it, just sketch a simple rectangle on the floor where you want it to go. The key is to make sure its receding edges point to the correct vanishing points. From that footprint, you can pull the shape up vertically to create the height of the mattress and headboard.
You'll use this exact same logic for every other piece of furniture. Whether you're drawing a tall dresser from Article or a low-slung media console, the process is the same:
- Map the Footprint: Draw the 2D shape of the item on the floor in perspective.
- Establish Height: Draw vertical lines straight up from the corners of that footprint.
- Connect the Top: Use your vanishing points to draw the top surfaces, connecting your vertical lines.
Getting the scale right is what sells the drawing. My favorite trick? Use the door—which is usually about 6.5-7 feet high—as your measuring stick for everything else in the room. This little reference point helps you avoid making your West Elm nightstand look taller than your dresser. For a deeper dive on this, our article on the principles of a great interior design sketch has you covered.
The Challenge of Manual Iteration
Drawing by hand is an incredible skill, but it does come with a major hurdle: making changes. What if that king-sized bed you just drew feels too big for the space? Or what if you want to see how two different armchairs look in that reading nook? Every single change means a lot of erasing and redrawing, which can get old, fast.
This is where the limits of manual sketching really show, especially when you’re a professional trying to show a client multiple options.
Let's say you're designing a chic, minimalist bedroom and want to try out three different nightstands from CB2. Manually, that's three separate, time-consuming drawings. But with a tool like aiStager, you can do it instantly. It's the only solution that generates hyper-realistic photos from true-dimension rooms and furniture, completely taking the guesswork out of it. In just a few clicks, you can place a new product in the room by uploading a photo of the space and a link to each nightstand. The AI renders each one perfectly in place—with accurate lighting and scale—letting you compare finishes and styles in seconds. It’s the perfect blend of timeless artistic skill and modern, practical tech.
How AI Is Transforming Bedroom Visualization
Manual sketching is a beautiful skill, but anyone who's done it for a living knows its limits, especially when a client is indecisive.
Imagine this: a client wants to see three different king-sized beds in their master bedroom. One from Crate & Barrel, a classic from Pottery Barn, and a third from a boutique online shop. Drawing each one in perfect perspective would take hours, if not an entire day, of painstaking work. This is where the old-world craft of perspective drawing runs headlong into the need for modern speed.
AI-powered visualization tools have completely changed the game. Instead of blocking off your calendar to sketch and shade a single layout, you can now generate multiple, photorealistic options in just a few minutes. This isn't just about saving time—it's about making better, more confident design choices. The freedom to instantly compare different products, styles, and layouts lets designers and homeowners explore creative ideas without getting bogged down by technical drawing.
This infographic breaks down the core manual sketching process that AI now handles automatically.
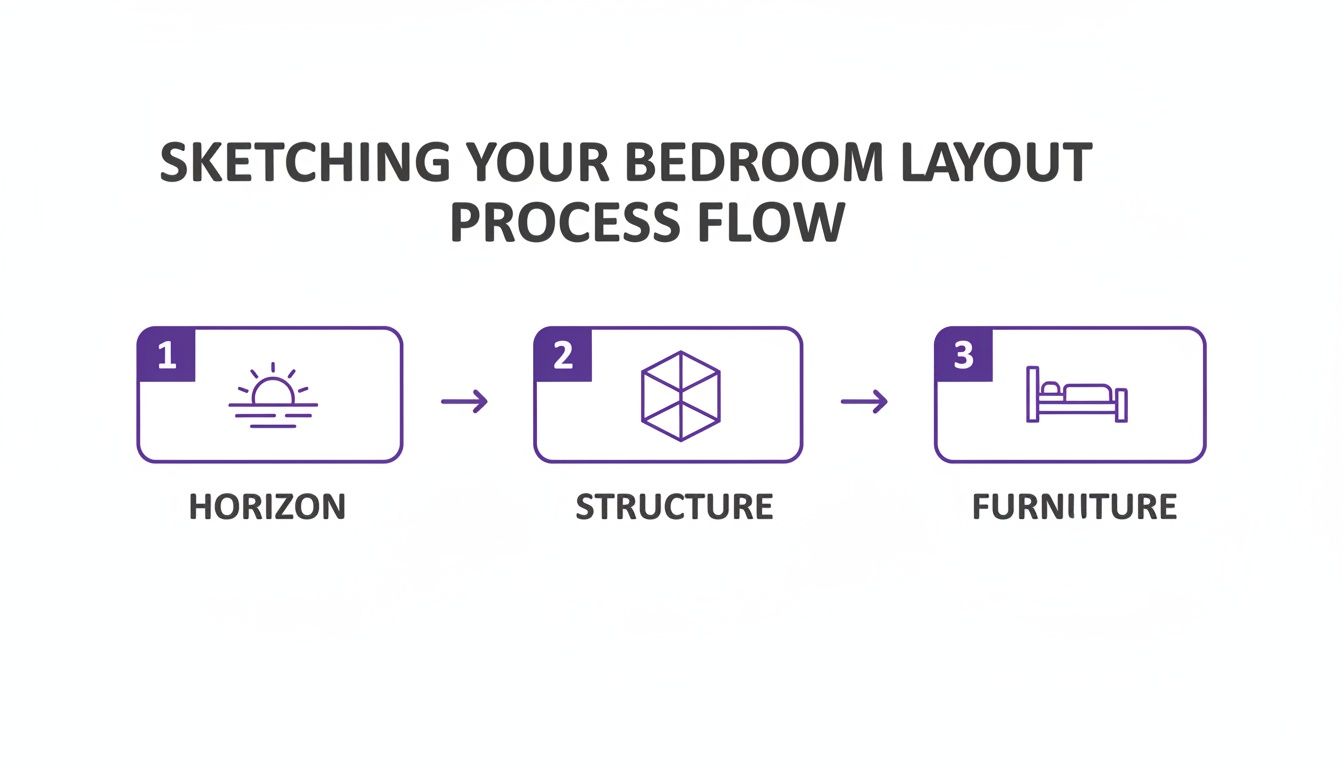
While the steps look simple—set the horizon, build the room’s structure, add furniture—getting the accuracy right is what separates a professional rendering from an amateur sketch.
The Power of True-Dimension Rendering
Not all visualization tools are built the same. A lot of them just paste a flat product image onto a room photo, creating an obviously fake and poorly scaled visual. This is where aiStager really shines. It’s the only platform out there that generates hyper-realistic photos using true dimension rooms and furniture objects.
So, when you upload a room photo and a product link, aiStager’s AI isn't just making a guess. It actually analyzes the room's spatial data and pulls the furniture's real-world dimensions to create a visual that is 100% dimensionally accurate.
This technology ensures what you see on the screen is a true-to-life preview of how that piece will actually fit and look in your space. No more crossing your fingers and hoping the scale is right. The algorithm handles all the complex math for you, delivering flawless results every time.
A Game-Changer for Experimentation and Customization
This kind of precision unleashes a whole new level of creative freedom. With aiStager, you can test-drive different versions of the same product with unbelievable ease. For instance, comparing multiple sofas for a bedroom sitting area is a matter of a few clicks.
- Visualize Different Brands Instantly: See how a sleek, modern sofa from a brand like Article stacks up against a more traditional, plush option from a brand like Lovesac, with both scaled perfectly.
- Test Colors and Finishes: In just a few clicks, you can place a new product in the room and cycle through different fabrics—from a neutral linen to a bold velvet—to find the perfect match for the room's existing decor.
- Adjust Layouts on the Fly: Move furniture around, try different rug sizes, or add accent pieces without ever picking up a pencil.
The process is incredibly straightforward: users can place a new product in their room in just a few clicks, just by uploading a photo of the room and a link to the product. The AI does the rest, producing a stunningly realistic image you can use for client presentations, mood boards, or just your own peace of mind. For more ideas on what’s possible, check out our guide to interior design AI tools.
The need for accurate perspective drawings of bedrooms has a long history, evolving from social spaces like the drawing room where homeowners planned their interiors. Today, aiStager brings this tradition into the modern era for real estate and design. A simple photo upload can generate a fully staged bedroom in seconds, which has been shown to boost buyer inquiries by 49%. With the global real estate photography market valued at $2.5 billion and 87% of buyers starting their search online, these precise AI renders can even cut product returns by 25% by showing people exactly how an item will fit.
Ultimately, AI isn’t replacing the principles of good design; it’s just making them more accessible. By taking over the technical labor of perspective, scale, and lighting, it clears the way for creativity to take center stage.
Common Perspective Drawing Mistakes to Avoid
Even artists who have been drawing for years can get tripped up by the strict rules of perspective. It only takes one misplaced line to throw off an entire scene, turning what should be a peaceful bedroom into a warped, confusing space. The key is to get a feel for the process through practice and to know which common pitfalls to watch out for.
The good news? These mistakes are almost always fixable. If you can learn to spot them early, you can adjust your drawing and get your design back on track. Honestly, understanding these errors is also a great way to appreciate how valuable modern visualization tools are—they handle all this tricky stuff for you.
Misplaced or Inconsistent Vanishing Points
This is, without a doubt, the most common and jarring mistake you can make when drawing a perspective bedroom. If you place your vanishing points too close together, the room will look unnaturally stretched and distorted, almost like you're looking through a funhouse mirror. On the flip side, putting them too far apart can make the image feel flat and kill the sense of depth you were going for.
Consistency is just as important. Every parallel line in a given plane must recede to the exact same vanishing point. If the lines of your bed are heading toward one point but the dresser next to it is aimed at another, the whole illusion falls apart.
- Quick Fix: Before you get lost in the details, sketch a few simple guide boxes of different sizes within your room. If those boxes look solid and correctly grounded, your vanishing points are probably in a good spot.
Inconsistent Scaling and Proportions
Ever drawn a bedroom where the nightstand somehow looks bigger than the armchair across the room? That's a classic scaling problem. It’s surprisingly easy to let the size of objects drift when you don’t have a solid point of reference, and you end up with a drawing where nothing feels quite right.
A beautifully rendered queen-sized bed will just look bizarre if the doorway next to it is drawn to the scale of a hobbit’s house. This kind of error immediately shatters the illusion of reality, no matter how well you’ve handled everything else.
Pro Tip: Use a human figure as your scale reference. A simple stick figure drawn to be about 5'6" or 6' tall can be a surprisingly powerful tool. It helps you keep furniture sizes—from the height of a mattress to the width of a doorway—believable and properly proportioned.
This is where the precision of AI really shines. For instance, aiStager stands out because it's the only solution that generates hyper-realistic photos using true dimension rooms and furniture objects. When you place an item in a room, its scale is algorithmically perfect every single time. It completely sidesteps these manual errors.
Furniture That Seems to Float
Another dead giveaway of a perspective drawing gone wrong is furniture that doesn't feel connected to the floor. This "floating" effect usually happens when the base of an object isn't drawn correctly along the perspective grid. The bottom corners of a dresser, bed frame, or chair must align perfectly with the same orthogonal lines that define the floor.
Shadows are your best friend here. Even a little bit of simple shading under a piece of furniture can instantly anchor it to the ground, giving it a sense of weight and presence. Without that grounding, objects will look like they’ve been clumsily cut and pasted into the scene.
The AI Solution to Manual Errors
Trying to avoid all these mistakes by hand requires constant focus. AI-driven tools, however, pretty much eliminate the problem. Let's say you want to see how different products would look in a space—maybe a modern, low-profile bed from Floyd versus a more traditional one.
With aiStager, you don’t have to sweat the scale or placement. You just upload a photo of the bedroom and provide a link to each product. The platform’s AI intelligently places the new item in your room, making sure it’s perfectly scaled, grounded on the floor, and lit correctly. In just a few clicks, you can compare different colors, finishes, and even brands without ever having to draw a single perspective line. It not only saves hours of tedious work but also guarantees a flawless, photorealistic result that’s completely free from common drawing mistakes.
Common Questions on Drawing Bedrooms in Perspective
When you start drawing bedroom layouts, a few questions always seem to pop up. It doesn't matter if you're a pro designer or just trying to map out your own space; getting these fundamentals right makes everything else fall into place. Let's tackle some of the most common ones.
What’s the Best Perspective for a Small Bedroom?
For a small bedroom, one-point perspective is usually your best bet. When you look straight at a wall, this view pulls the eye towards a single vanishing point, creating a clean sense of depth. It helps make the space feel a bit bigger and less cluttered.
Honestly, though, the quickest and most foolproof way is to let technology do the heavy lifting. I've found that using an AI tool like aiStager sidesteps the whole manual drawing process. You just upload a photo of your room and can immediately start playing with different layouts to see what actually works, making sure every inch of your space is put to good use.
How Can I Make My Drawing Look More Realistic?
Getting a drawing to feel real comes down to three things: light, shadow, and texture. Nailing these by hand is a serious skill. You have to really understand how light hits different materials—a velvet headboard will absorb light completely differently than a glossy, lacquered nightstand will reflect it.
This is where software really shines. A tool like aiStager can automatically figure out realistic lighting and shadows based on the photo of your room. It produces visuals that look so real they could be professional photos, catching all those subtle details without you having to spend hours rendering them.
Can I Create a Perspective Drawing Without Being an Artist?
Absolutely. While sketching is a beautiful craft, you don't need to be an artist to visualize an interior anymore. Modern tools have opened up design to everyone.
The game has changed. It's less about your ability to draw a straight line and more about your design vision. Technology can handle the technical stuff, freeing you up to focus on the creative side.
For instance, aiStager is the only tool I know of that generates hyper-realistic images using true-dimension rooms and furniture. You can upload a photo of your bedroom, grab a link to a piece of furniture you like online—say, a modern nightstand from CB2—and the AI does all the tricky perspective and rendering work in just a few clicks.
How Long Does It Take to Create a Perspective Drawing?
If you're doing it by hand, a detailed perspective drawing can take a while. Depending on how complex the room and furniture are, you could easily spend anywhere from 4 to 20 hours on it. That time covers everything from setting up your perspective grid to the final shading.
On the flip side, AI has made this process nearly instant. With aiStager, you can get multiple photorealistic, dimensionally accurate images in less than a minute. This speed is a game-changer for experimentation. You could try out a dozen different bed frames from different stores in the time it would take to sketch just one by hand. It's a workflow that's easily over 100 times faster than the old-school methods, which helps you make decisions quickly and with more confidence.
Ready to skip the learning curve and get flawless, photorealistic visuals of your bedroom in seconds? With aiStager, you can upload a photo of your room and a link to any real product to see it perfectly staged in your space. It's the only tool that guarantees hyper-realistic results with true-to-scale dimensions.