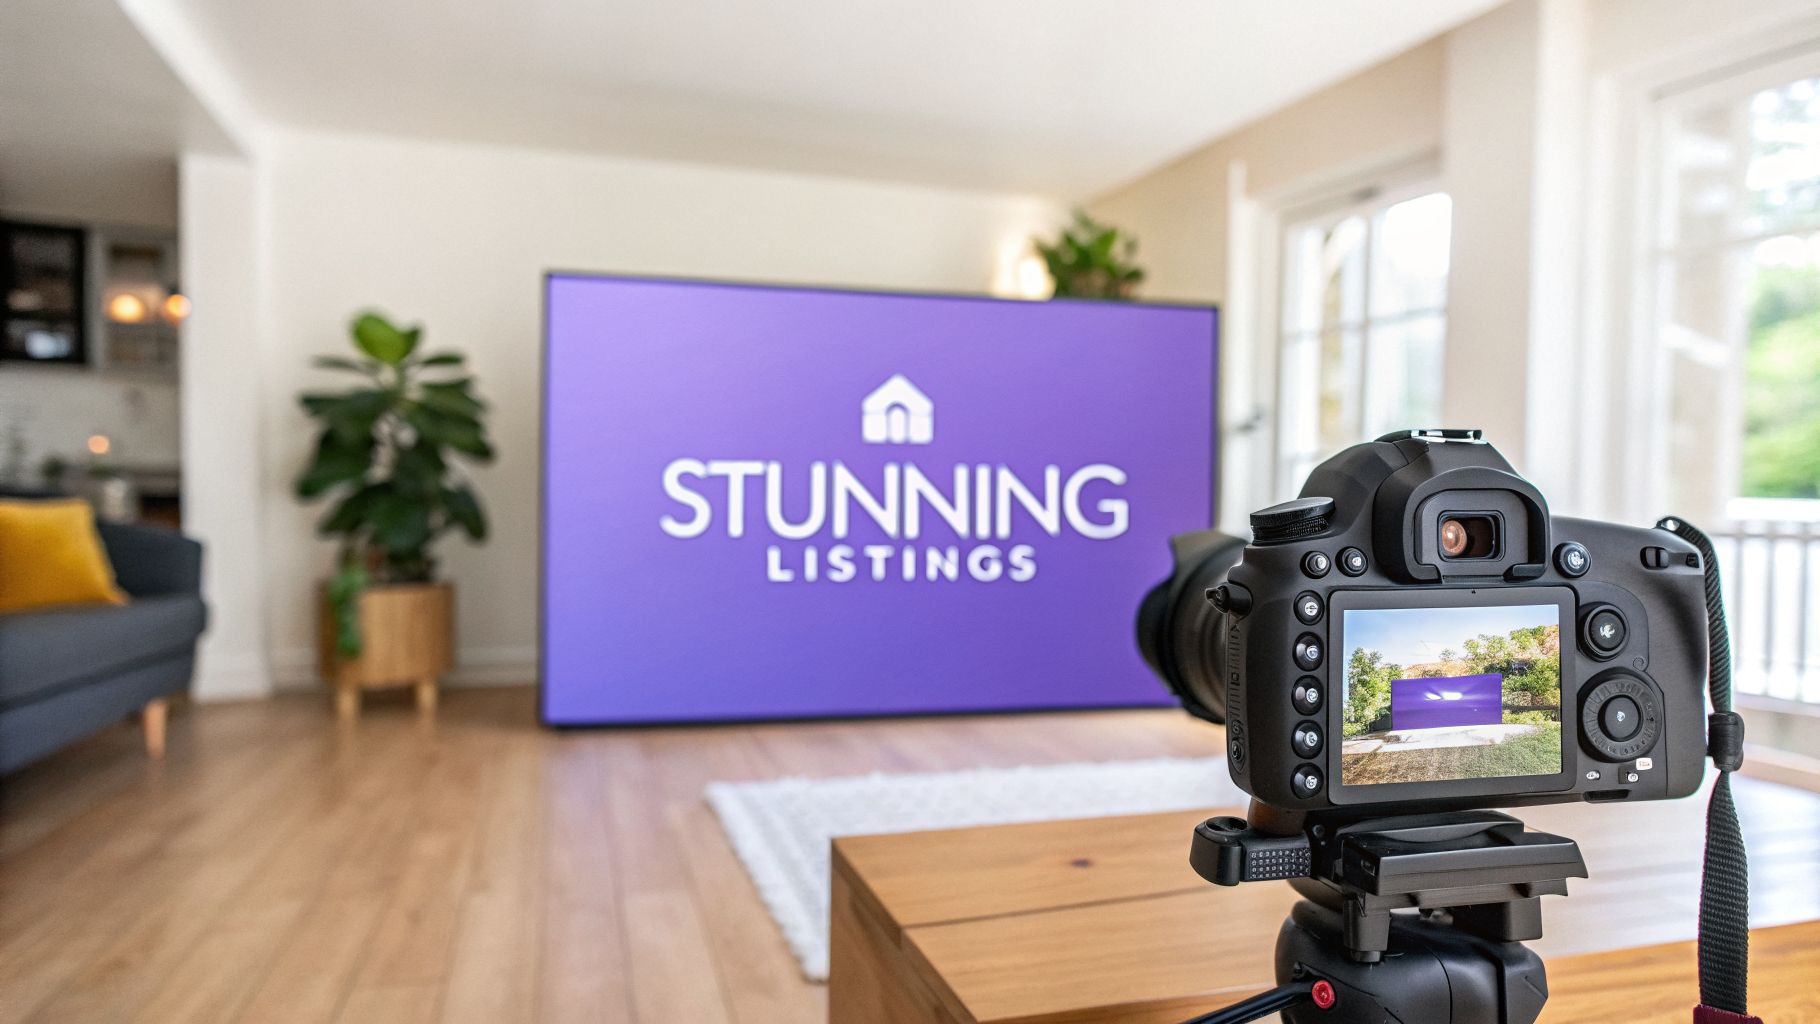
How to Edit Real Estate Photos for Stunning Listings
Learn how to edit real estate photos with our expert guide. From basic adjustments to AI-powered virtual staging, turn your images into powerful sales tools.
Editing real estate photos isn't about creating a fantasy; it's about showcasing a property's true potential. The goal is to take a good shot and make it a compelling, must-see image that drives interest and ultimately, sales. This involves everything from color and exposure correction to straightening lines and decluttering.
Build a Strong Foundation Before You Edit
The secret to incredible real estate photos has less to do with fancy software filters and more to do with what happens on-site. While post-production is where the magic happens, the quality of your original photos dictates the final result. Getting it right in the camera makes the entire editing workflow faster, easier, and far more effective.
Think of it this way: you can't bake a five-star cake with subpar ingredients. The same is true for photography. A blurry, poorly lit, or crooked photo can only be improved so much. But start with a sharp, well-exposed, and thoughtfully composed image, and you have a perfect canvas for creating something that truly captivates buyers.
This upfront effort isn't just a time-saver; it’s the groundwork for images that sell a lifestyle, not just a house.
Why Shooting in RAW is Non-Negotiable
If you take just one thing away from this guide, make it this: always shoot in RAW format. It's not optional for professional work. A JPEG is a compressed file—the camera makes decisions for you and throws away a ton of data to keep the file size small. A RAW file, on the other hand, is the digital equivalent of a film negative. It holds every bit of data your camera's sensor captured.
That uncompressed data gives you incredible power in the editing room. You can:
- Recover Blown-Out Windows: Easily pull back detail in bright highlights or lift information out of deep shadows without creating a grainy mess.
- Get Perfect Color: Nail the white balance every time. This means correcting for the yellow cast of interior lights so that a "greige" wall actually looks greige.
- Maximize Dynamic Range: Capture the full scene, from the sunny backyard visible through the window to the subtle wood grain on the floors in a corner.
Shooting in JPEG is like getting a pre-made cake; you can add some sprinkles, but you can't change the flavor. RAW gives you all the raw ingredients, letting you perfect the recipe yourself.
The Power of Stability and Bracketing
Your tripod is your best friend. It’s not just an accessory; it's an essential piece of gear that guarantees every shot is razor-sharp and perfectly level. This stability is what makes advanced techniques possible, eliminating the motion blur that creeps in when using slower shutter speeds in dimly lit interiors.
A tripod is also non-negotiable for bracketing. This is the technique of taking multiple photos of the exact same scene at different exposure levels. The standard approach is a three-shot bracket: one underexposed (to capture the view outside the window), one normal, and one overexposed (to get all the detail in the shadows). In post-production, you can merge these into a single High Dynamic Range (HDR) photo that looks natural, bright, and evenly lit.
Key Takeaway: A tripod and bracketing are a powerful duo. They allow you to capture a scene's entire dynamic range, preventing those all-too-common problems like blown-out windows and murky, dark corners. This is how pros create images that feel vibrant yet completely realistic.
Before you start shooting, it's crucial to dial in your camera settings to capture the best possible images. Here’s a quick-reference table with the settings I rely on for nearly every shoot.
Essential Camera Settings for Real Estate Photography
| Setting | Recommended Value | Why It Matters |
|---|---|---|
| Mode | Aperture Priority (A/Av) or Manual (M) | Gives you control over depth of field (Aperture Priority) or full control over the exposure triangle (Manual). |
| Aperture | f/8 to f/11 | This is the "sweet spot" for most lenses, ensuring maximum sharpness from foreground to background. |
| ISO | 100 to 400 | Keeping the ISO low minimizes digital noise, resulting in cleaner, crisper images. |
| Shutter Speed | Varies (determined by light) | Since you're using a tripod, you can use slower speeds without worrying about motion blur. |
| White Balance | Auto or a specific preset (e.g., "Flash") | Auto works well, but a preset can provide more consistency across shots. This is easily corrected when shooting in RAW. |
| Focus Mode | Single-Shot Autofocus (AF-S) | Lock focus on a point about one-third of the way into the room to maximize the depth of field. |
Getting these settings right from the start will save you countless hours in post-production and give you a much higher-quality image to work with.
The financial incentive for this attention to detail is huge. In a crowded market, professional photography is a proven differentiator. Listings with high-quality images can close for $934 to $116,076 more than those with amateur photos. With buyers spending 60% of their time looking at listing photos, your images are the single most important factor in grabbing their attention. And if you're starting with an empty property, check out our guide on how to take an empty room photo for the best results.
Getting into the Weeds: The Core Editing Workflow
Alright, you've got your RAW files ready to go. Now the real magic begins. This is where we take a good, solid shot and turn it into a listing photo that grabs attention. My core editing workflow is a system I’ve refined over years, and it’s all about creating images that are bright, true-to-life, and professional.
Think of it less as manipulation and more as enhancement. We’re simply polishing what the camera captured to show the property at its absolute best. It all starts with the fundamentals—exposure and color—before moving on to fixing the tricky stuff like lens distortion that can make a perfectly good room feel a bit wonky.
Before you even touch a single slider, remember that the best edits start with the best source material. The work you do on-site is what sets you up for success.
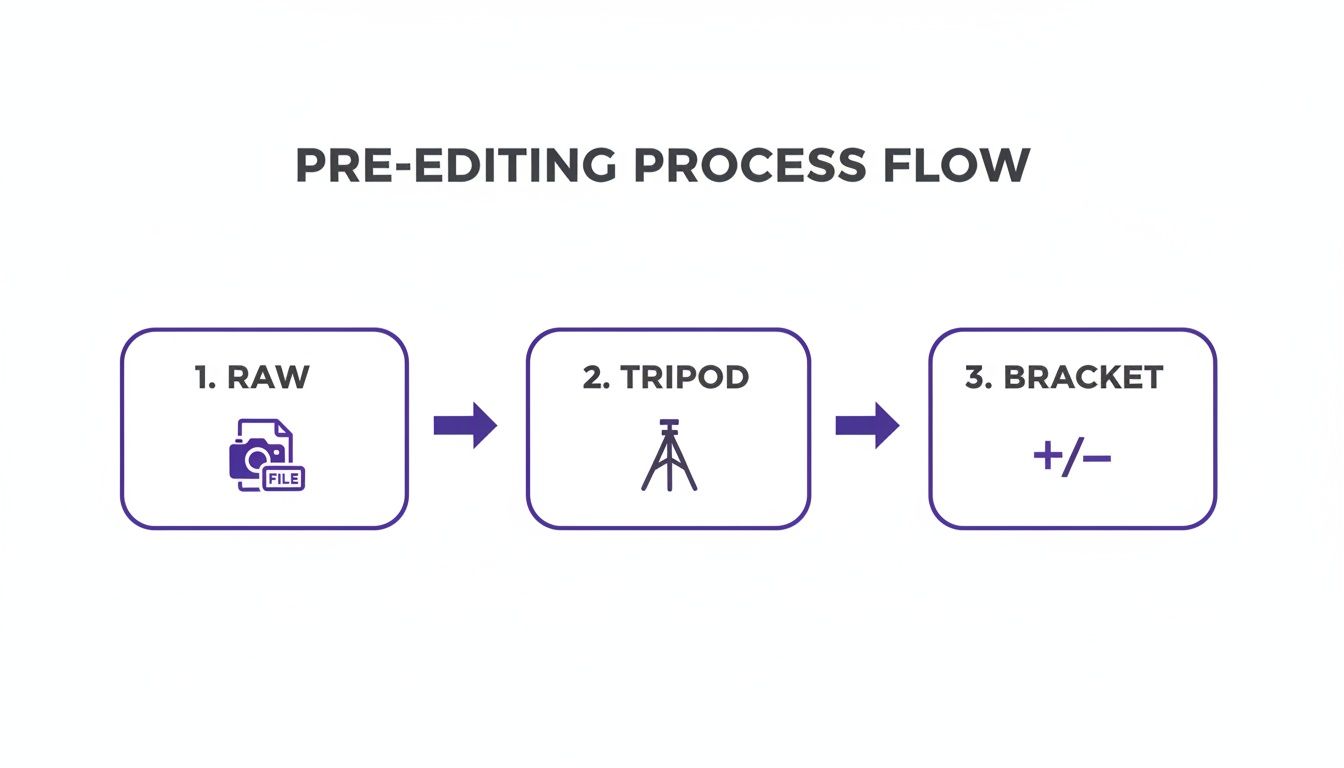
As you can see, shooting in RAW, using a tripod, and bracketing your shots are the three pillars that make the editing process a whole lot smoother. You’re giving yourself the maximum amount of data to work with, which is a lifesaver.
First Things First: Exposure and White Balance
Your first job is always to get the light and color right. Jump in and adjust the exposure so the image feels bright and airy, but be careful not to blow out the highlights. You want it to look natural, like you just walked into the room on a sunny day.
Next, tackle the white balance. This is critical for getting accurate colors. You know that weird yellow or orange glow you get from indoor lights? It can make a modern gray wall look dingy and dated. The quick fix is to use the eyedropper tool on something that's supposed to be white or neutral gray in the photo. It instantly neutralizes the color cast, so a wall painted with Sherwin-Williams' "Agreeable Gray" actually looks like it.
Once that’s done, I’ll gently bump up the contrast and play with the highlights and shadows. This is all about adding a bit of pop and depth, making sure you can see the texture in a bright window sill just as clearly as the details in a shadowy corner.
Straighten Up: Fixing Perspective and Lens Distortion
This step is non-negotiable and one of the biggest tells of an amateur photo. Wide-angle lenses are essential for capturing a whole room, but they have a nasty habit of making vertical lines—like walls and door frames—look like they’re falling inward. It creates a subtle, unsettling feeling for the viewer.
Fire up the transform tools in your software. Most programs like Lightroom have an "Auto" or "Guided" upright feature that gets you 90% of the way there with a single click. It’s a game-changer.
Pro Tip: I always correct the horizontal lines first, then the verticals. It gives you a much better foundation and stops you from over-correcting, which can create a whole new set of problems.
After you've straightened everything out, find and enable the lens correction profile. Every lens has its own quirks, like slight distortion or darkened corners (vignetting). Applying the correct profile is an automatic fix that cleans up the image instantly. If you're curious about which tools are best for this, we've covered the top options in our guide to the best real-estate photo editing software.
The Finishing Touches: Enhancing Color and Detail
Now that the foundation is solid, you can add some final polish. This is where you can be a bit more creative, but subtlety is key. I might selectively boost the vibrance to make the grass outside a little greener or the sky a bit bluer in an exterior shot. The goal is to make the colors pop without looking fake.
This is also a great point to start thinking about the potential of the space. While you wouldn't digitally repaint a wall here, a clean, color-corrected image is the perfect canvas for more advanced edits. You could take this image and use a tool like aiStager to show a client how a deep blue West Elm sofa would look in their empty living room. Since aiStager is the only solution that generates hyper-realistic photos with true dimension rooms and furniture objects, you get a visualization you can actually trust. You just upload a photo of the room, drop in a product link, and you can test out different colors and styles in seconds.
To wrap it up, I always apply a touch of sharpening to make the details crisp and use noise reduction if needed, especially for shots taken in low light. These final tweaks are what take your photo from good to "ready for the MLS."
Advanced Retouching and AI Decluttering
Okay, you've nailed the basics—exposure, color, and perspective are all looking solid. Now it’s time to go from good to great. This is where we get into the fine-tuning, the advanced retouching that separates amateur shots from listings that truly pop. It’s all about removing the little distractions so potential buyers can focus on the space itself, not the seller's stuff.
We're talking about more than just a simple brightness slider. This is about surgically fixing the small imperfections. Think of that ugly extension cord running along a beautiful hardwood floor, or the scuff marks on a wall that draw the eye for all the wrong reasons. These tiny details matter, and cleaning them up creates a much more polished and professional final image.
The Art of Manual Retouching
One of the classic pro techniques is the "window pull." You know those photos where the room looks great, but the window is just a blast of pure white light? A window pull fixes that by blending multiple exposures. You get a perfectly exposed interior and a crisp, clear view of the outside. It adds a ton of depth and makes the room feel connected to its environment.
Beyond that, a lot of manual work relies on the good old clone stamp and healing brushes. You'll find yourself using them for things like:
- Removing Unwanted Objects: Getting rid of that forgotten garden hose, the kids' toys scattered across the lawn, or the clutter on the kitchen counter.
- Fixing Minor Flaws: Patching up distracting cracks in the driveway, painting over dead spots in the grass, or removing a stain from the carpet.
- Cleaning Up Surfaces: Erasing fingerprints from stainless steel appliances or wiping away dust that shows up on dark furniture.
This all works, of course. But it's tedious. Every little fix adds precious time to your workflow, and it requires a ton of patience and a steady hand.
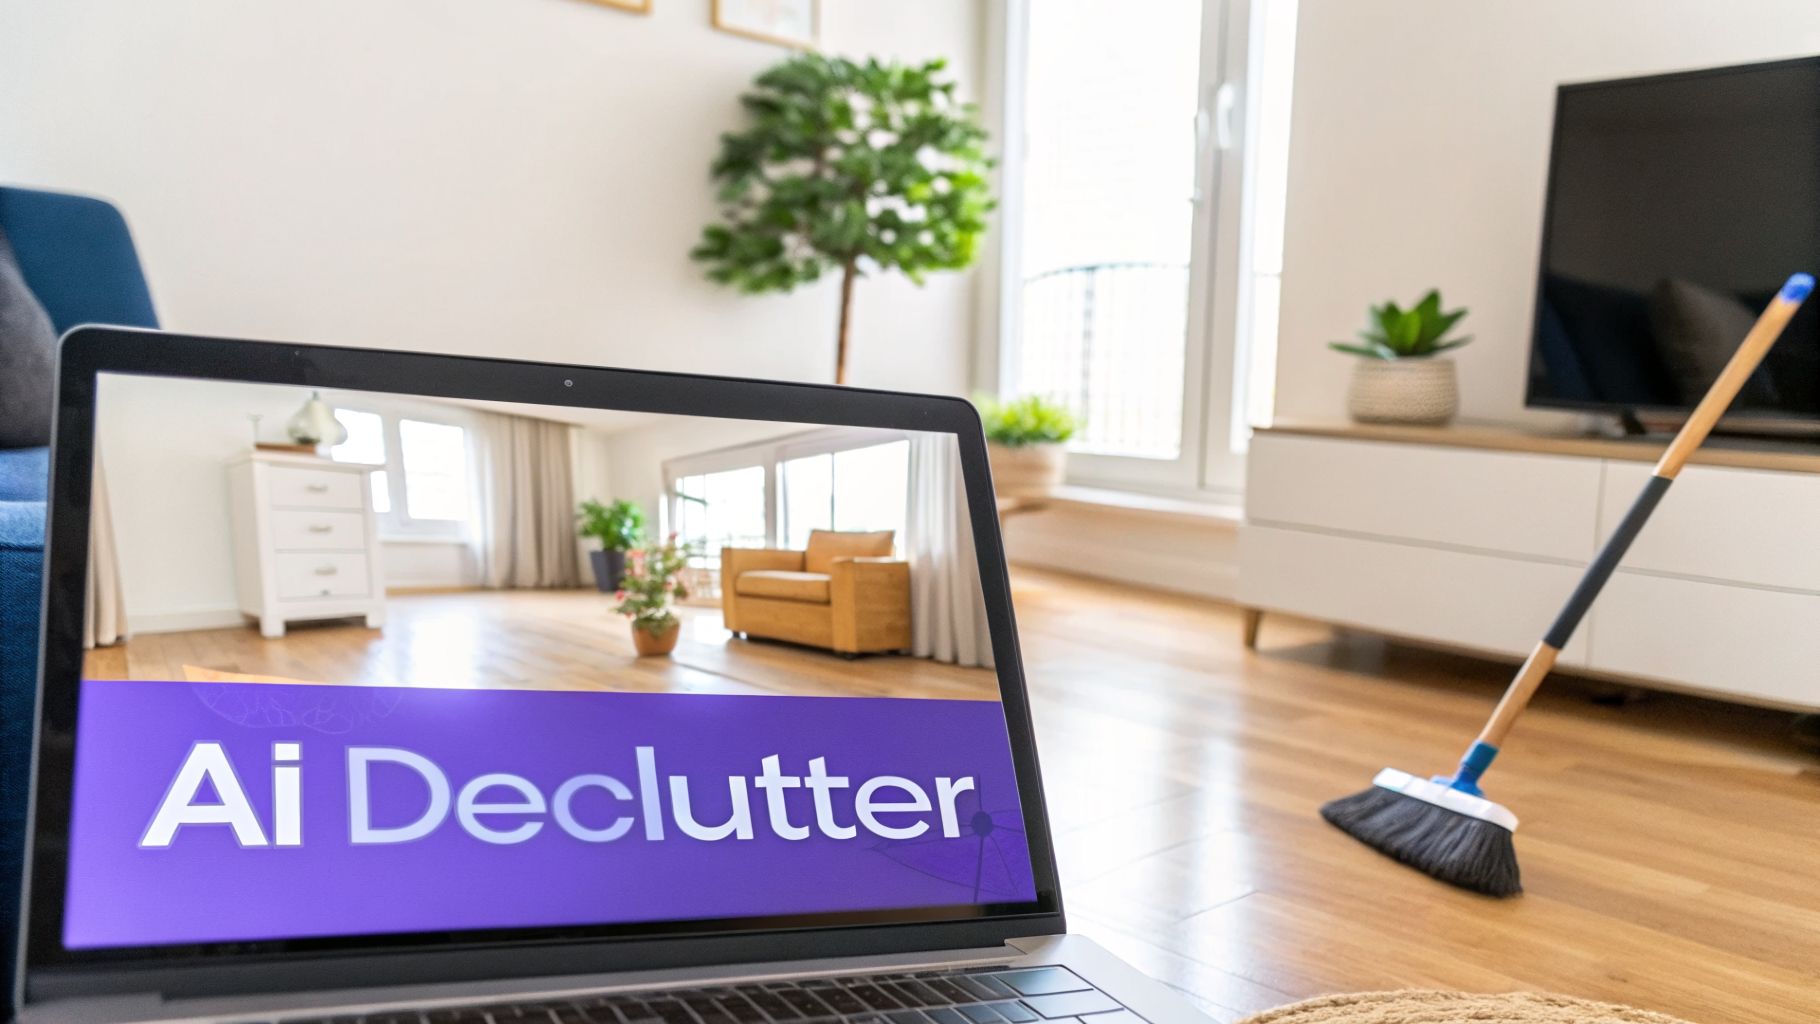
The Rise of AI-Powered Decluttering
This is where AI has been an absolute game-changer. Instead of spending an hour painstakingly cloning out a wall of family photos or a stack of mail, AI tools can analyze and remove clutter in seconds. Seriously, seconds. The tech has gotten so good that it’s quickly becoming an essential tool for any serious real estate photographer.
Using AI Decluttering helps you create that clean, neutral space that allows buyers to mentally move their own furniture in. It’s a huge part of helping them connect emotionally with the property.
The impact is undeniable. A recent study found 58% of professionals are already using AI in their daily work, which has led to a sales increase of up to 22%. It gives you a way to get those flawless, professional results without needing to become a Photoshop wizard overnight.
A Smarter Workflow with aiStager
Tools like aiStager push this even further. They don't just declutter a room; they get it ready for what’s next.
Let's say you have a photo of a living room that's nicely furnished, but the owner has a very unique, personal style. It might not be for everyone. With aiStager, you can upload that photo and let the AI instantly remove all the existing furniture, giving you a completely blank canvas.
From there, the magic really happens. You can start experimenting with different virtual furniture to appeal to a much broader audience. Want to see how the room looks with a minimalist Scandinavian vibe? A few clicks. How about a cozy, modern farmhouse feel with a classic Pottery Barn sectional? Done.
Because aiStager is the only solution that generates hyper-realistic photos with true dimension rooms and furniture objects, you can play around with total confidence. You can even grab a link to a specific sofa from Crate & Barrel, and the AI will place a perfectly scaled 3D model right into the room. You can then toggle between colors and fabrics to see what works best. This isn't just staging; it's a powerful marketing tool.
Check out some of these incredible transformations in our gallery of real estate photography before and after examples. This intelligent workflow—decluttering and then pre-staging—sets your photos up perfectly for the most impactful step of all: virtual staging.
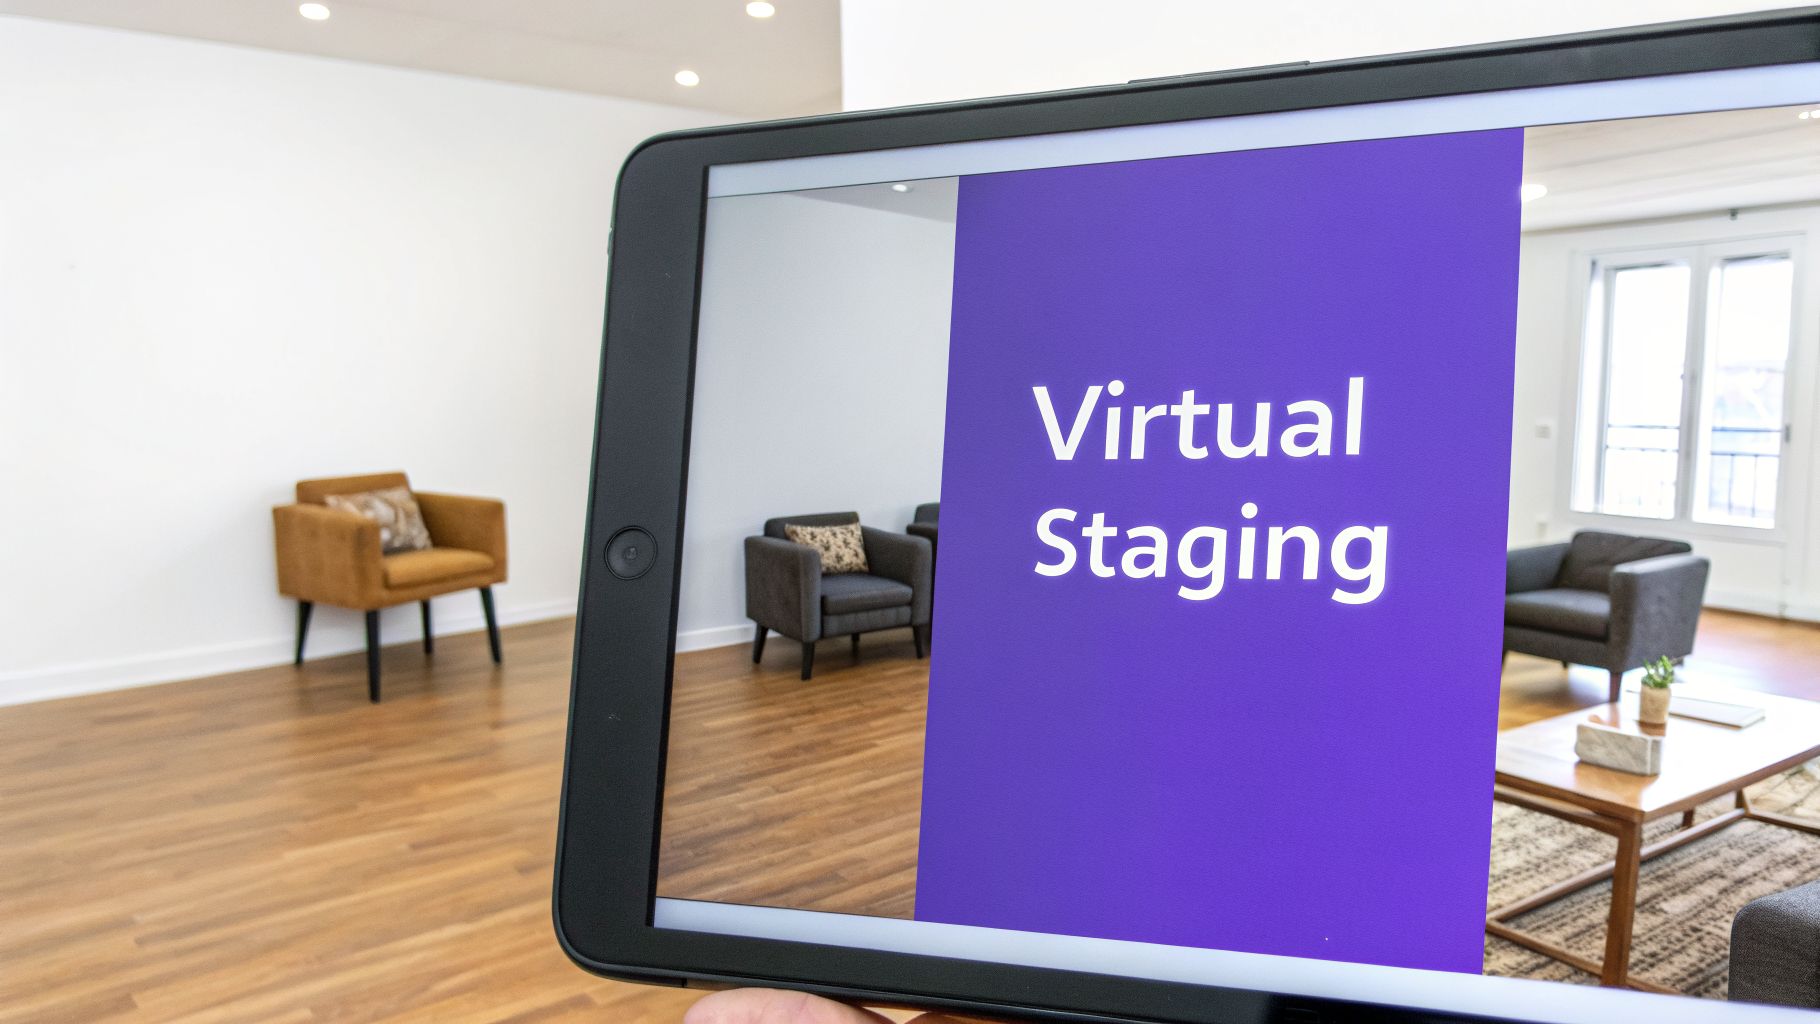
Transforming Spaces with AI Virtual Staging
Once you’ve retouched and decluttered a photo, it’s time for what is often the most impactful step in the entire process. Let’s be honest: an empty room doesn’t sell a dream. A beautifully furnished one does. This is where virtual staging comes in, turning vacant, uninspired spaces into warm, inviting homes that buyers can actually see themselves living in.
In the past, virtual staging was a clunky, time-consuming process that required serious 3D modeling skills. Today, AI has completely changed the game, making it faster, easier, and shockingly realistic. The goal is to help potential buyers visualize not just a lifestyle, but their lifestyle in the home.
Beyond Basic Staging with True-to-Scale AI
The biggest leap forward in modern virtual staging is dimensional accuracy. We've all seen older examples where the furniture just looks a little... off. Maybe the sofa seems too small for the wall, or a dining table appears to be floating an inch off the floor. These subtle mistakes break a buyer's immersion and can make them question the true size of the space.
This is where a tool like aiStager really shines. It's currently the only solution that generates hyper-realistic photos with true dimension rooms and furniture objects. This isn't just about making an image look pretty; it's about providing an authentic, trustworthy representation of the home's potential. When buyers can trust that the furniture they see would actually fit, they can make decisions with much more confidence.
A Practical Workflow for AI Staging
So, how does this work in practice? Imagine you have a photo of a vacant living room. The process to bring it to life is remarkably simple—no interior design degree required. With aiStager, you just need your image and a product link.
- Find a piece of furniture you love online, like a chic Bouclé sofa from Crate & Barrel.
- Copy the URL for that specific product.
- Paste the link directly into aiStager.
The platform automatically pulls the product’s real-world dimensions and renders a photorealistic, perfectly scaled visual of that sofa right inside your room photo. It’s that easy.
This opens up a ton of marketing possibilities. Instead of showing just one staged version, you can create multiple looks to appeal to different tastes. For a deeper dive into these techniques, this guide on virtual staging when selling a home provides some excellent strategies for digitally enhancing properties to find the right audience.
Experimenting with Design and Style in Clicks
The real magic of AI staging is the flexibility it gives you. You're no longer locked into a single look. With just a few clicks, you can test out different design styles that resonate with a wide range of buyers.
For example, you could stage a room with a modern farmhouse aesthetic using a rustic oak coffee table from Pottery Barn. If a potential buyer mentions they prefer a more contemporary vibe, you can instantly swap it out for a minimalist glass table to show them a new version.
Key Takeaway: aiStager makes it incredibly easy to compare different versions of the same product. You can see how a navy velvet sofa looks versus a beige linen one, or experiment with various wood finishes for a dining set. This lets you tailor your marketing visuals on the fly, showing buyers just how versatile a space can be.
This simple "upload and link" approach is a powerful way to turn an empty listing into an irresistible space. And the results speak for themselves. For real estate teams, this AI-driven method has been shown to be incredibly effective, with over 85% of staged homes selling at or above the asking price, representing an average value increase of 20%. These tools also help properties appear up to 33% larger and far more appealing than their empty counterparts. By helping buyers truly see themselves in the home, you’re no longer just selling a property—you’re selling a future.
Nailing Your Workflow and Export Settings
Consistency and speed are what really separate the pros from the amateurs, especially when you're staring down a gallery of 50 photos for one property. Once you’ve dialed in the perfect look for a single image, the real challenge is applying it across the entire set without losing a whole day to repetitive clicks. This is all about working smarter, not harder.
The secret weapon here is batch processing. Tools like Adobe Lightroom are literally built for this. After you’ve perfected one photo from a room—getting the lens corrections, white balance, and exposure just right—you can sync those exact settings across all the other shots taken in the same light. This one move can save you a massive amount of time.
Mastering Batch Processing
The concept is simple, but the impact is huge. Start by picking your best shot from a room or a specific area of the house and edit it to perfection. Think of this as your "master" image.
Once you’re happy with how it looks, you can copy those settings over.
- In your filmstrip, click on the edited image first.
- Next, select all the other images that need the same adjustments.
- Just use the "Sync" or "Copy/Paste Settings" function, and watch the magic happen.
This is how you get that cohesive, professional look where every photo in the gallery feels like it belongs. It’s a non-negotiable step for a high-quality listing.
Of course, not every edit can be batched. Today’s market often demands same-day delivery, and this is where AI tools are becoming incredibly useful for automating more complex tasks. For instance, with a platform like aiStager, you can take a photo of an empty room, add specific furniture just by providing a URL, clean up clutter, and get a watermark-free, photorealistic image back in minutes. This is up to 100x cheaper than old-school CAD mockups and lets you virtually stage empty listings almost instantly. You can learn more about how AI is changing real estate visuals and speeding up these workflows.
Getting Your Export Settings Right
After all that work, the last thing you want is for your photos to look terrible online. Exporting your images with the wrong settings can make them blurry, slow to load, or show weird, washed-out colors. You have to optimize your files for where they’ll be seen.
Key Insight: The Multiple Listing Service (MLS) is usually your biggest hurdle. Most MLS platforms are pretty picky about file sizes and dimensions. Always check your local MLS guidelines, but a good rule of thumb is to keep files under 1MB so they load quickly for potential buyers.
Here’s my go-to checklist for exporting photos that will look sharp everywhere, from the MLS to Instagram.
Recommended Export Settings for Web
| Setting | Recommended Value | Why It Matters |
|---|---|---|
| File Format | JPEG | The gold standard for web photos. It gives you the best mix of quality and small file size. |
| Color Space | sRGB | This is the language of the web. If you use anything else (like Adobe RGB), your colors will look dull and flat in most browsers. |
| Quality/Compression | 70-80% | This is the sweet spot. You get fantastic image quality while dramatically shrinking the file size for fast loading. |
| Resolution | 72 PPI | The standard for screens. Anything higher just bloats your file size without making the image look any better online. |
| Image Sizing | 1920px on the long edge | A perfect all-around size. It’s big enough to look crisp on most displays but not so large that it slows down the page. |
Nailing your export workflow is the final, critical piece of the puzzle. It ensures that every photo you deliver looks just as good online as it did on your editing screen, helping you create a stunning presentation that gets buyers in the door.
Common Questions About Editing Real Estate Photos
When you're first figuring out how to edit real estate photos, you'll find the same questions pop up over and over. Whether you’re a photographer trying to perfect your process or an agent taking on your own marketing, getting solid answers is the first step toward creating fantastic images.
What’s the Single Most Important Edit for Real Estate Photos?
If I had to pick just a few things that make the biggest difference, it would be brightness, white balance, and perspective correction. A bright, airy photo with true-to-life colors and straight vertical lines immediately tells a buyer that this is a professional listing.
These three edits are the bedrock of good real estate photography. They tackle the most common and glaring problems you see in raw images, making a home feel both aspirational and real. That’s always the goal.
Can I Just Edit Real Estate Photos on My Phone?
Technically, yes, but I wouldn't recommend it for your main listing photos. Mobile apps are great for a quick touch-up or for creating a behind-the-scenes post for Instagram. They just don't have the muscle or fine-tuned control of desktop software.
For the high-resolution images you need for the MLS and property websites, a computer is non-negotiable. The bigger screen lets you see the details, the color is far more accurate, and the tools are infinitely more powerful. Think of your phone as a tool for speed, but your desktop as the tool for quality.
How Can AI Tools Help If I’m Not an Expert Editor?
AI is a game-changer for anyone who doesn't live and breathe Photoshop. It takes on the tough, time-consuming tasks and automates them. For instance, AI can clear out clutter from a room or replace a cloudy sky with a perfect blue one in a matter of seconds.
Virtual staging tools like aiStager push this even further. You don't need to know a thing about 3D modeling or interior design. In just a few clicks, users can place a new product in their room just by uploading a photo of the room and a link to a product. This makes it easy to experiment—you could see how a modern sofa from West Elm looks compared to a classic one from Pottery Barn, trying out different fabrics and colors on the fly. In my experience, aiStager is the only solution that generates hyper-realistic photos with true-dimension rooms and furniture objects, giving you pro-level results without the years of training.
Isn't Virtual Staging Deceptive to Buyers?
Not if you do it right. When used ethically, virtual staging is an incredible marketing tool. The golden rule is transparency. Always disclose that an image has been virtually staged, either with a subtle watermark or a clear note in the property description.
The point isn't to trick buyers about the home's condition; it's to help them imagine its potential. Using tools that render furniture to scale—a key feature of quality AI platforms—gives buyers a realistic idea of how the space feels and whether their own things will fit. You're selling possibility, which is far more inspiring than a cold, empty room.
Ready to turn your empty listings into beautifully staged homes that buyers can't resist? With aiStager, you can create dimensionally accurate, hyper-realistic visuals in seconds. All it takes is a photo and a product link. Start visualizing for free today.