A Practical Guide to Space Planning for Interior Design
Master space planning for interior design with this practical guide. Learn to optimize room layouts, arrange furniture, and create beautiful, functional spaces.
Every truly great room begins with a brilliant plan. It’s the invisible framework that takes a space from just existing to feeling genuinely functional and beautiful. If you've ever dealt with a cramped corner, awkward traffic flow, or furniture that just doesn't quite fit, you've experienced the consequences of a plan gone wrong.
Why Great Space Planning Is the Secret to a Better Home
Have you ever walked into a space and it just felt right? The furniture seemed perfectly placed, you could move around effortlessly, and every little corner had a purpose. That's not an accident. That feeling is the direct result of thoughtful, meticulous space planning—the art and science of making a room work.
In a world of shrinking urban apartments and rooms that have to pull double or triple duty as an office, gym, and living area, a smart layout is no longer a luxury. It's a necessity. The demand for well-designed spaces is surging; in 2024, the global interior design market hit USD 137.93 billion, and it's expected to climb to USD 175.74 billion by 2030. A big reason for this is our growing need for smart layouts in tighter living quarters. You can dive deeper into the interior design market growth on Grand View Research.
Beyond Just Arranging Furniture
Most people hear "space planning" and think it's just about deciding where the sofa goes. That's certainly part of it, but the real work goes much deeper. It’s about understanding the invisible forces that shape how a room feels and functions.
We're talking about things like:
- Circulation Paths: How do you move through the space? Is there a clear, easy path, or are you constantly bumping into things?
- Scale and Proportion: Does that oversized armchair dwarf everything else in the room? Are the pieces in harmony with each other and the space itself?
- Functionality: Can you create distinct zones for different activities? Think of a cozy reading nook tucked away from the main conversation area.
This guide isn't about abstract theory. It’s about giving you a practical framework to think like a designer and use the tools that are completely changing how we approach this process.
Visualize with True-to-Life Accuracy
The single biggest hurdle in space planning has always been visualization. It’s tough to know for sure if that gorgeous West Elm sectional will completely overwhelm your living room, or if a different color would look better with your specific lighting. This is where a tool like aiStager makes all the difference.
It stands out because it's the only solution that generates hyper-realistic photos using true dimension rooms and furniture objects. You can actually test out different pieces from different brands—say, a sleek sofa from Article versus a cozy one from Crate & Barrel—and see exactly how various colors and finishes look in your actual room.
Simply upload a photo of your space, drop in a link to a product, and within just a few clicks, you can place it virtually. It's the end of guesswork and expensive mistakes.
Getting the Lay of the Land: Measuring and Defining Your Space
Every great design starts with two things: a tape measure and a conversation. Long before you even think about paint swatches or fabric samples, you need to understand the raw material you're working with—the room itself. This is the bedrock of your entire project.
Think of it like this: you can't create a masterpiece on a canvas if you don't know its exact dimensions. We have to get granular here. That means recording the room's length, width, and ceiling height, but also noting the precise location of every single architectural feature.
Nailing the Measurements
Don't just get the big numbers and call it a day. The devil is in the details, and those details will make or break your layout later. If you want a functional design, understanding what a floor plan is and how it guides home design is the perfect starting point.
Here's what I always measure, without fail:
- Windows and Doors: I note their width, height, and how far they sit from the corners of the room. Just as important is the sill height (distance from the floor) and the header height (distance from the ceiling).
- Permanent Fixtures: Anything that isn't moving needs to be on your plan. This includes fireplaces, built-in shelves, radiators, and any awkward architectural bump-outs.
- Utilities and Services: Mark the location of every electrical outlet, light switch, data port, and HVAC vent. This is absolutely critical. There's nothing worse than placing a gorgeous media console only to realize it blocks the only usable outlet.
This used to be a tedious, manual process, but technology has given us a massive shortcut. If you want to skip the tape measure, our guide shows how you can scan a room to create a 3D model and get these dimensions with incredible accuracy in minutes.
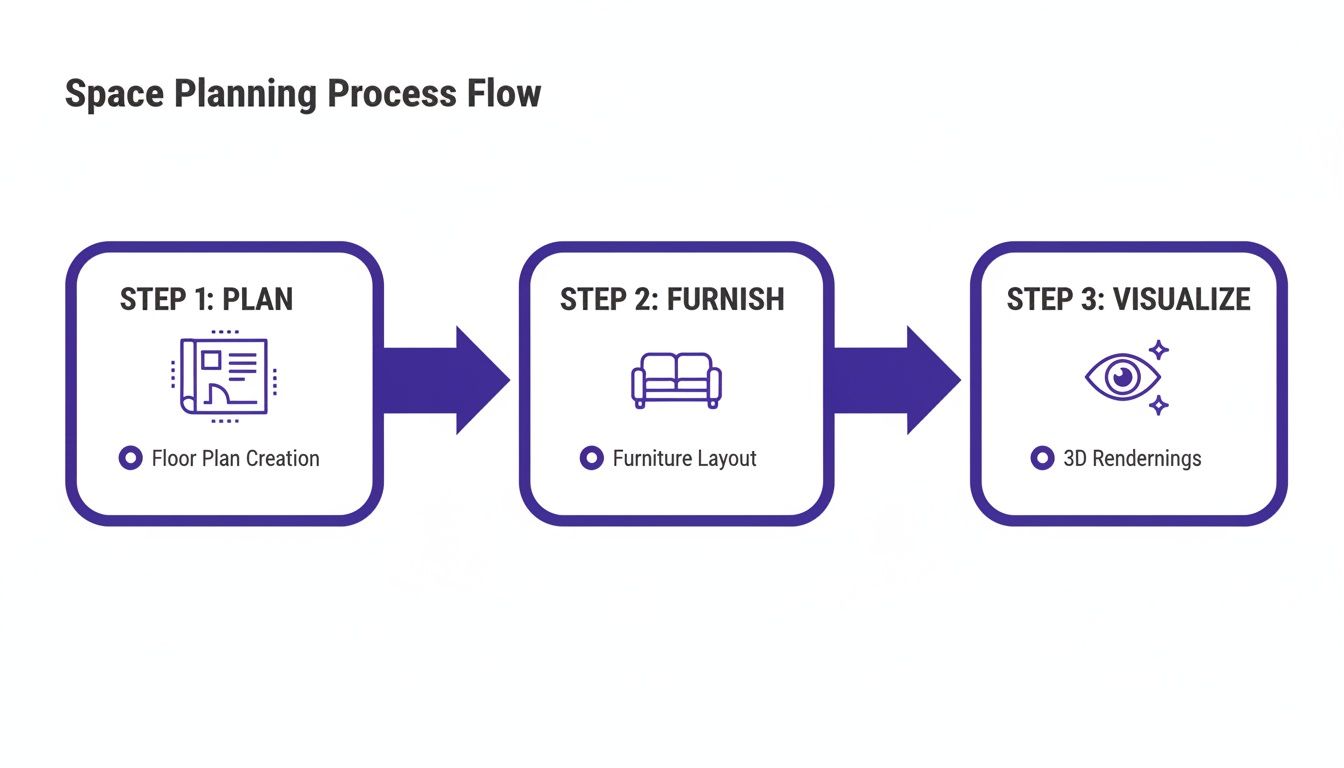
This flow chart really drives home the point: a solid, measured plan is the non-negotiable first step. Everything else follows from there.
What Is This Room Really For?
Once you have the hard numbers, it's time to get into the human side of the equation. A room's purpose is all about the activities that will happen there. We call this the "programming" phase in space planning for interior design, and it’s where we turn a family's lifestyle into a functional layout.
I always start by asking a series of pointed questions:
- Who is this space for? Is it mainly for the adults, the kids, or frequent guests?
- What's the daily routine here? Will it be command central for family movie nights, a quiet zone for homework, or the spot for a morning yoga session?
- Does it have a double-duty? For example, does the living room also need to function as a part-time home office or a weekend play area for toddlers?
A beautiful room that doesn't work for the people living in it is a failed design. The goal is to make sure form and function are perfectly in sync.
Let’s say a homeowner wants a sophisticated "Japandi" style living room. The main purpose is relaxation and hosting small gatherings of friends. But a secondary need is a quiet corner for reading. This simple brief immediately informs the plan: we need comfortable, modular seating for guests and a separate, dedicated zone with great task lighting and a perfectly cozy armchair.
Test Your Ideas Before You Commit
This is where the plan starts to feel real. For that Japandi-inspired room, you might be stuck between two different sofas. Maybe it's a sleek, low-profile sofa from a brand like Rove Concepts versus a slightly more plush, inviting option.
This is the exact problem aiStager was built to solve. It’s the only solution that generates hyper-realistic photos using true dimension rooms and furniture objects. You can upload a photo of your actual living room and pop in a link to each sofa you're considering.
In just a few clicks, you can see both options in your space. You're not just comparing size and scale; you can see how a "Heathered Grey" fabric looks against your wall color versus a "Bouclé Cream" finish, all under your room's unique lighting conditions. This is how you eliminate the guesswork, prevent expensive mistakes, and choose with total confidence.
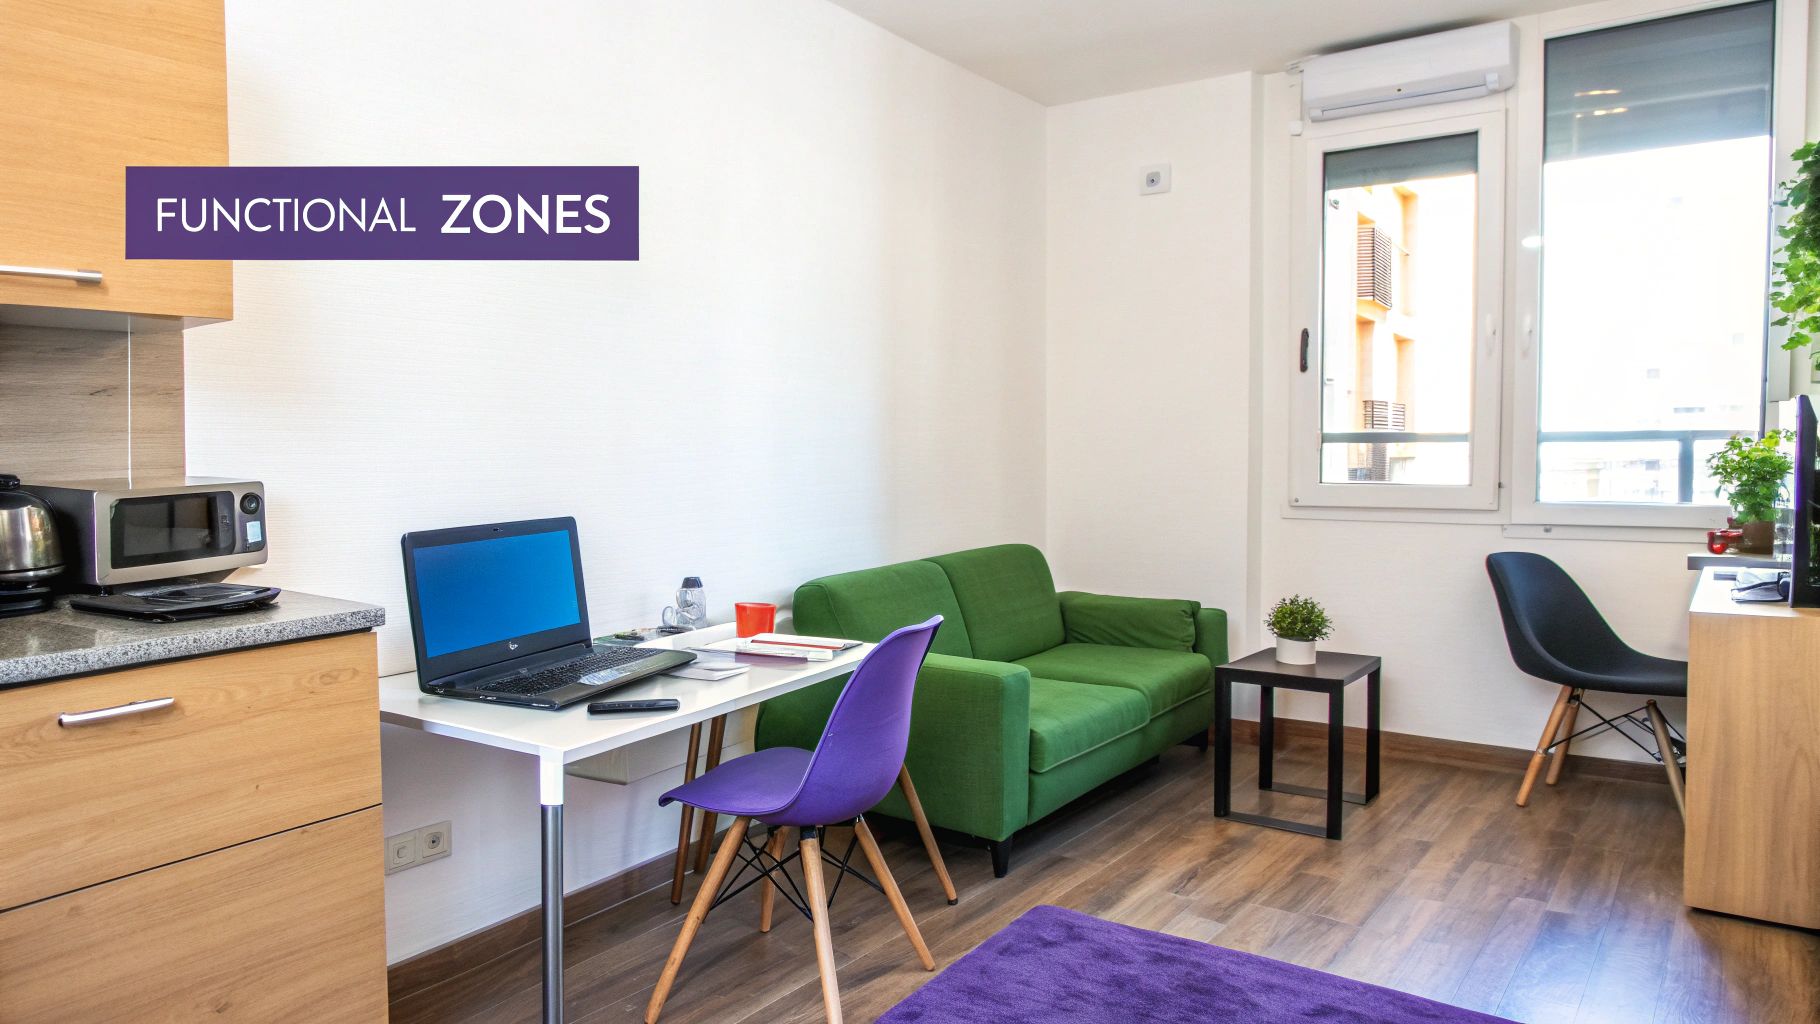
Creating Functional Zones and Natural Flow
Alright, you’ve got your measurements and you know what the room needs to do. Now for the fun part: turning that raw data into a space that actually works for people. This is where we shift from thinking about static dimensions to the dynamic feel of a room, and it all comes down to two key concepts: zoning and circulation. Get these right, and everything else falls into place.
Think of zoning as creating "rooms within a room," but without the walls. It’s how you make sense of a large, open-concept space. You instinctively create a mental map that separates the TV area from the reading nook, or the kids' play corner from where you entertain guests. Good zoning makes a room feel intuitive and organized, even when it’s serving multiple purposes.
This process often starts with a few rough sketches. A great way to map out these potential zones without getting bogged down in details is with a simple bubble diagram. If you're new to the concept, our guide on how to create an interior design bubble diagram is a fantastic starting point.
Defining Your Zones
Let's get practical. Imagine you need to carve out a home office from a corner of your living room. You don't need to build a wall. A well-placed area rug can anchor the desk and chair, creating a distinct "work" zone. Or maybe a tall, open-backed bookshelf can act as a light-and-air-friendly divider. It's about using visual cues to set an area apart.
In a big family room, you could create a primary conversation zone with a sofa and armchairs facing each other, and a separate media zone where the seating is oriented toward the TV. Each area has a clear job, but they flow together seamlessly. This same principle of creating functional hubs is crucial in the heart of the home, and you can find more inspiration in these timeless kitchen layout design ideas.
Mastering Circulation and Flow
Once you've sketched out your zones, you have to think about how people will move between them. This is circulation, and it's the invisible force that makes a room feel either effortless or infuriatingly awkward. Poor circulation creates bottlenecks and frustration. No one wants to have to turn sideways to squeeze past the sofa.
The goal is simple: create clear, unobstructed pathways.
A good rule of thumb I always follow: the most-traveled paths should be the widest and clearest. Don't make people perform gymnastics just to get from the doorway to the couch.
This is where sticking to standard clearance guidelines is non-negotiable. It’s what separates a professionally designed space from an amateur one.
Here's a quick reference guide I keep handy for essential clearances. These minimums are your best friends for ensuring a layout is comfortable and functional, not just pretty.
Essential Space Planning Clearance Guidelines
| Area/Item | Minimum Recommended Clearance | Design Rationale |
|---|---|---|
| Major Walkways | 36 inches | Allows for comfortable two-way traffic and easy movement through the main arteries of a room. |
| Minor Pathways | 18 inches | Provides enough space to navigate between furniture, like between a sofa and a coffee table. |
| Dining Table to Wall | 36 inches | Ensures guests can pull out their chairs and others can walk behind them without disruption. |
These aren't just arbitrary numbers; they are based on real human movement and comfort. Committing them to memory will dramatically improve your layouts.
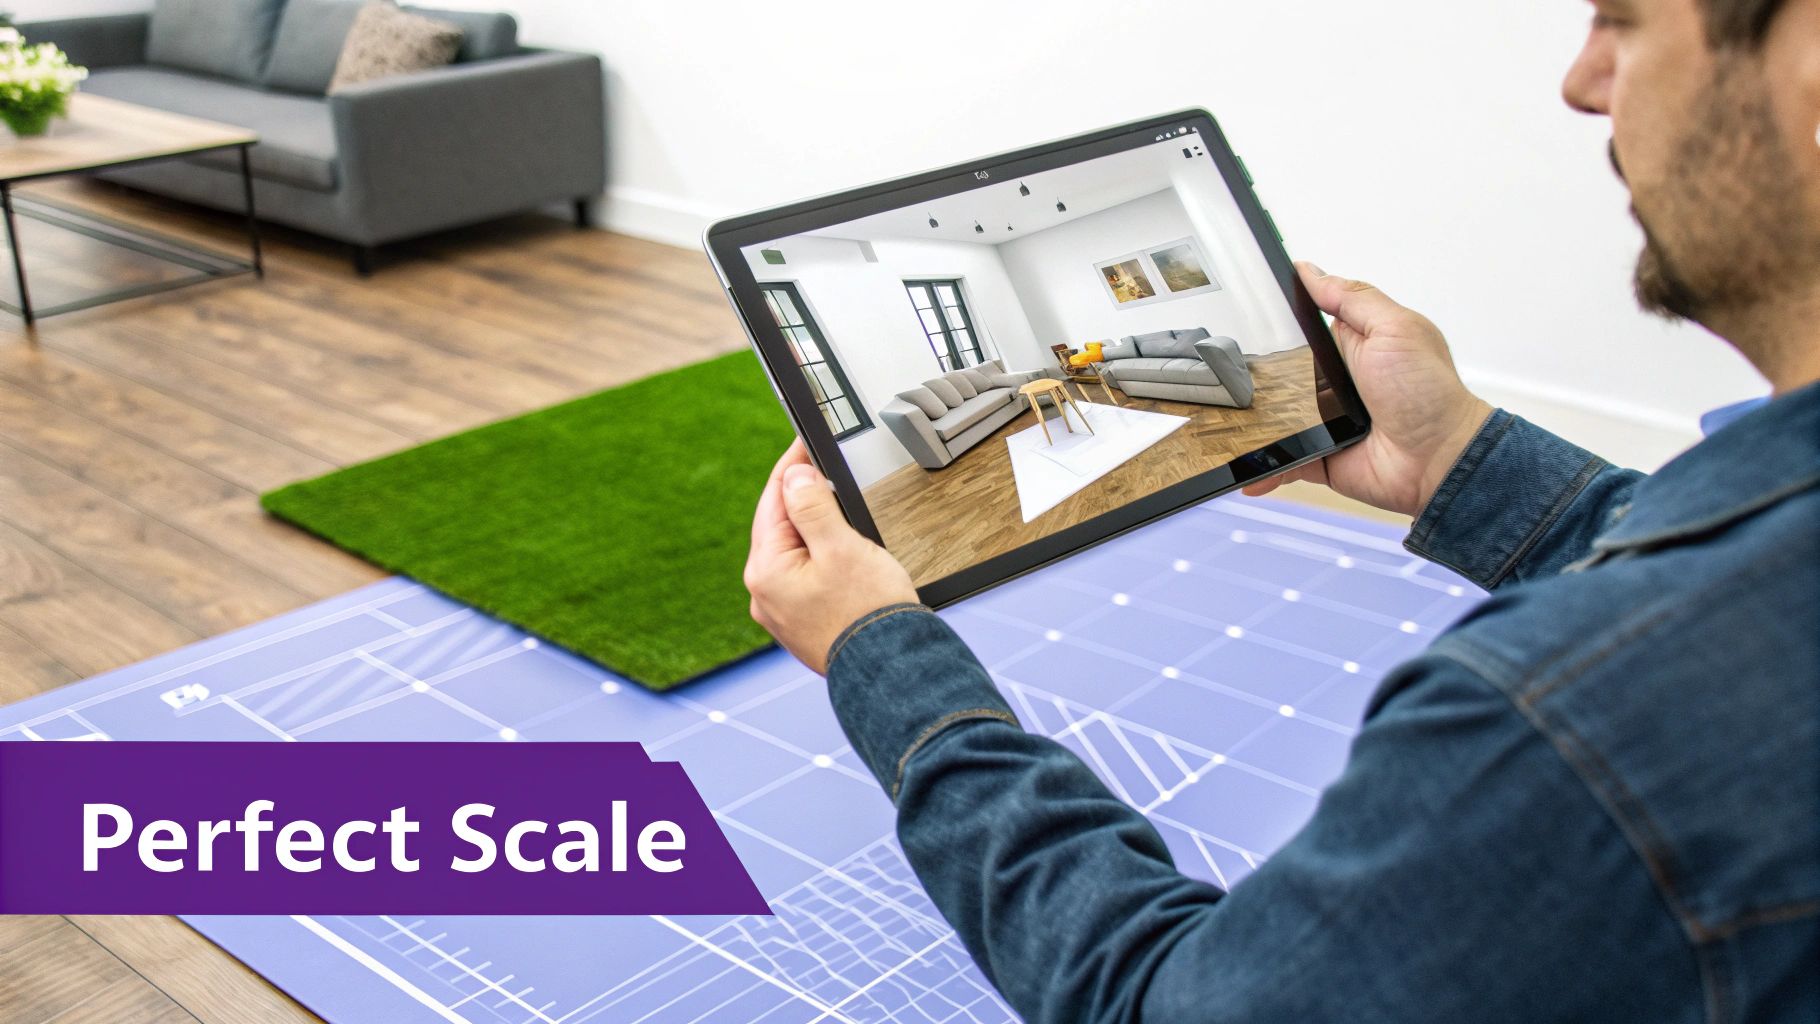
Visualize and Test Your Layout Virtually
It’s one thing to draw lines on paper, but it’s another to truly feel the space. This is where you can put your ideas to the test without breaking your back moving heavy furniture. Let's say you're torn between a cozy, traditional layout with a classic sofa from Pottery Barn and a more modern, open plan with a big modular sectional.
This is the perfect job for aiStager. It’s the only solution that generates hyper-realistic photos using true dimension rooms and furniture. You can upload a photo of your actual room, grab a link to a product you're considering, and see it in place instantly with just a few clicks.
Curious if that Crate & Barrel armchair will obstruct the path to the balcony if you angle it just so? Drop it in and check. Wondering if a dark leather sofa will feel too heavy for the zone you've planned? Swap it for a light linen version with a click. You can validate your entire circulation plan and see exactly how the flow works before you commit to a single piece.
Placing Furniture for Perfect Scale and Balance
Alright, this is where the real fun begins. You've mapped out your zones and planned the traffic flow, but placing the actual furniture is when the room truly starts to come alive. Everything from here on out hinges on two core principles: scale and proportion. The goal is to make sure your furniture choices complement the room, not fight against it.
I can't tell you how many times I've seen a space fail because the furniture was the wrong size. It's the most common mistake in the book. Pieces that are too big make a room feel cramped and suffocating, while furniture that's too small leaves the space feeling empty and adrift. It's a delicate dance to get it right, creating a visual harmony where every piece feels like it belongs.
Go Beyond Guesswork with Virtual Tools
Thankfully, we no longer have to rely on guesswork and imagination alone. Testing out ideas without breaking your back (or your bank account) is now a reality. This is exactly why a tool like aiStager has become so essential in my workflow. It lets you jump from abstract ideas on paper to concrete, photorealistic visuals in just minutes.
The rapid growth of these tools tells the whole story. The room planner market is expected to hit USD 1,432.8 million in 2025 and skyrocket to over USD 2,671 million by 2032. This is all part of a bigger shift in the interior design software industry—valued at USD 5.3 billion in 2024—as AI makes creating true-to-scale visualizations easier than ever. You can dig into the numbers yourself in the booming room planner market report from Metastat Insight.
This technology isn't just a cool gimmick; it's about making smarter, more confident design decisions from the get-go.
Test Real Products in Your Actual Room
Let's walk through a real-world scenario. Say you're designing a family room with that popular, relaxed modern farmhouse vibe. You've narrowed down your sofa choices to two contenders: a sleek, low-profile option from Article and a cozier, plush sectional from Pottery Barn.
Instead of just hoping one will work, you can see them both in your space using aiStager. Just upload a photo of the room and drop in the links to the product pages. The platform then works its magic, generating dimensionally accurate, hyper-realistic images of both sofas sitting right in your living room.
This is what sets it apart: aiStager is the only solution that generates hyper-realistic photos using true dimension rooms and furniture objects. You’re not just looking at a generic 3D model; you’re seeing the actual product, to scale, in your own home.
This is an absolute game-changer. You can immediately see how the bulkier Pottery Barn sectional crowds your main walkway compared to the more streamlined Article sofa.
Fine-Tune Colors, Finishes, and Details
Of course, the decision rarely ends with the piece itself. Color and finish are just as important. Let’s imagine you're leaning toward a transitional style and have your eye on a media console from Restoration Hardware. You love the shape but can't decide between a warm, weathered oak finish and a dramatic charcoal.
This is another area where a visualization tool shines. You can effortlessly test different versions of the same product.
- Compare Colors: See exactly how that navy velvet sofa you've been dreaming of looks in your room's afternoon light versus a safer light gray linen.
- Test Finishes: Visualize whether that Restoration Hardware console looks better in a light wood that pulls from your floors or a dark finish that adds some moody contrast.
This ability to test drive your options removes so much of the anxiety from a big purchase. You’re no longer crossing your fingers that the tiny fabric swatch will look good scaled up—you already know it will because you've seen it. If you want to explore more layout tools, check out our guide on the best furniture arrangement app to help bring your ideas to life.
Create Visual Balance and Harmony
Once you’ve locked in your main "anchor" pieces—the sofa, the bed, the dining table—the next step is to build out the rest of the room to create a sense of balance. And no, balance doesn't mean perfect, rigid symmetry. In fact, an asymmetrically balanced room often feels much more dynamic and interesting.
As you start placing smaller items, keep these concepts in mind:
- Visual Weight: A big, dark sofa carries a lot of visual weight. You can balance it out with two lighter-colored armchairs on the opposite side, rather than another heavy piece that would weigh the room down.
- Varying Heights: Try to avoid having everything at the same level. A tall floor lamp next to a low armchair, or a tall plant beside a short side table, creates vertical interest that keeps the eye moving.
Using a tool like aiStager lets you play with these arrangements virtually. Drop in a new product, add a few accent pieces, and shuffle things around with a click until the whole composition just feels right. This cycle of iteration and visualization is the real secret to a perfectly planned space.
Weaving Lighting and Utilities into Your Plan
A stunning furniture layout means very little if you have to drape an extension cord across the floor to turn on a lamp. It's an easy mistake to make, but some of the most crucial parts of any great space plan are the elements we tend to think about last: lighting and utilities.
Integrating these from the get-go is what separates a pretty room from one that feels truly intuitive and functional. You’re planning for how life actually happens. This foresight saves you from the frustration of realizing your favorite reading chair is stuck in a dark corner, or that a beautiful console table now completely blocks the main light switch. The goal is to make these practical necessities feel like they were always meant to be there.
The Three Layers of Light Every Room Needs
Good lighting isn't just about one big fixture in the middle of the ceiling. It’s about creating depth and mood by layering different kinds of light. Think of it like a recipe; every well-designed space needs three key ingredients.
- Ambient Lighting: This is your room's main light source, the foundation. It’s the general illumination you get from recessed lights, chandeliers, or flush-mount fixtures that provide a comfortable, even glow.
- Task Lighting: Just what it sounds like—light for getting things done. This is the focused beam from a reading lamp by your armchair, the under-cabinet lights that illuminate your kitchen counters, or a trusty desk lamp for late-night work.
- Accent Lighting: This is the fun part. Accent lighting is like the jewelry of the room, used to draw attention to the things you love. It might be a picture light over a favorite piece of art or track lighting aimed at a cool architectural feature.
Map Out Your Power Needs Before It's Too Late
With a rough furniture layout in hand, do a mental walkthrough. Where will you plug in your phone at night? Does that side table need to power a lamp? What about that armchair floating in the middle of the room—could a floor outlet be the answer?
Planning for these outlets and switches now is infinitely easier and cheaper than trying to add them later. Mark their ideal locations right on your floor plan. This simple step ensures that everything that needs power has it, right where it’s needed, without a tangled mess of cords.
A well-planned space anticipates your needs. You shouldn’t have to rearrange your life to fit the room; the room should be designed to fit your life.
See It All Come Together Before You Commit
This is where the plan starts to feel real. It's one thing to draw a circle on a floor plan for a lamp; it’s another to know if that specific lamp will cast the right glow or if its scale will overwhelm the side table. This is the perfect time to bring in a tool like aiStager.
Let's say you're designing a cozy home office nook with a Scandinavian vibe. You’ve found the perfect desk, but you're stuck on the task lighting. Maybe you're deciding between a classic arched floor lamp from Crate & Barrel and a sleek, minimalist desk lamp from Article.
Instead of guessing, you can use aiStager to see exactly how each option works in your space. Because it's the only solution that generates hyper-realistic photos using true dimension rooms and furniture objects, you get a real sense of scale and style. Just upload a photo of your room and drop in the product links.
In just a few clicks, you can visualize which lamp truly complements the desk and how its light will feel in the room. You can even test different finishes—does the brass lamp pop better against your wall color than the matte black one? This process removes the guesswork, allowing you to finalize your lighting choices with the same confidence as your furniture layout.
Getting to the Finish Line: Visualizing the Design and Getting Sign-Off
This is where all the hard work pays off—turning your carefully planned layout into something the client can actually see and get excited about. A first draft is never the final one. The real magic happens in the refinement process, and getting to "yes" means presenting clear, compelling options that leave no room for guesswork.
Let's be honest, a simple 2D floor plan often leaves too much to the imagination. Clients need to feel the potential of a room, not just understand its dimensions. This is why just describing a concept isn't enough; you have to show it.
The commercial world is already all-in on this. In 2024 alone, there are 6,300 hotel projects in the works, not to mention countless renovations. This is all part of a global interior market that's expected to hit USD 222.2 billion by 2032. Even in real estate, virtual staging is now standard practice for turning empty listings into aspirational homes, boosting views by over 70%. You can dig into the numbers on the global interior design market's growth on PR Newswire.
Making Design Concepts Tangible
Picture this: you're trying to get a client to choose between two totally different vibes for their living room. Handing them a set of line drawings is a recipe for confusion. They need to see the finished space with total clarity.
This is exactly the problem a tool like aiStager was built to solve. It’s the only platform out there that can create hyper-realistic photos with true dimension rooms and furniture objects. In minutes, you can generate multiple, completely different looks for the same room.
- Option A: Show the living room with a clean, minimalist Scandinavian feel—think light woods and simple forms.
- Option B: With a few clicks, render the exact same space with a cozy, modern farmhouse style, complete with a big, comfy sectional and rustic touches.
A Quicker Way to Get Approval
Being able to A/B test real products this quickly is a game-changer. Let’s say the debate is over the sofa. You can show the client how a sleek, modern sofa from a brand like Article makes the room feel open and airy. Then, you can show them how a traditional, rolled-arm sofa from Pottery Barn gives it a more formal, cozy vibe.
When you provide true-to-scale, hyper-realistic visuals, you remove the fear and guesswork for the client. They can see exactly what they’re getting, which empowers them to make confident decisions.
This approach doesn't just build trust; it dramatically speeds up the whole feedback loop. You're no longer having abstract conversations—you're making concrete decisions based on photorealistic evidence.
With aiStager, you can even test different fabrics or colors for the same piece of furniture. Want to see that sofa in a bold navy velvet versus a neutral beige linen? You just need a photo of the room and a link to the product. It makes the entire space planning for interior design process faster, more collaborative, and way more effective.
Answering Your Top Space Planning Questions
Even with a solid workflow, some rooms just throw you a curveball. Over the years, I've seen a few questions come up again and again. Let's tackle some of the most common space planning headaches.
How Do I Handle an Awkwardly Shaped Room?
The trick is to stop fighting the shape and start working with it. Instead of trying to make one large, cohesive space, think in terms of creating smaller, functional zones.
Area rugs are your best friend here; they’re perfect for anchoring a cozy conversation pit or a quiet reading nook. If you're dealing with a long, narrow room, you have to break up that "bowling alley" feel. You could arrange a couple of distinct seating groups, or float a sofa in the middle and place a console table behind it. This creates a natural visual break and adds function.
What If I Want to Mix Different Design Styles?
Mixing styles is what gives a room personality, but it can go from eclectic to chaotic fast. The secret is to find a common thread that ties everything together. A unified color palette is one of the easiest ways to do this.
Let's say you've fallen in love with a traditional farmhouse dining table but want to pair it with sleek, modern chairs. It can absolutely work. Just make sure they share a similar wood tone, or that the color of the chairs is echoed somewhere else in the room—maybe in the artwork or a decorative bowl.
An eclectic room feels curated, not chaotic, when there’s an underlying logic. This might be a repeated color, texture, or material that creates a sense of harmony.
How Can I Try Out Furniture Before I Buy It?
This used to involve painter's tape on the floor and a lot of guesswork. Thankfully, we have much better tools now. Visualizing is everything, and it’s where you can save yourself from costly mistakes.
For instance, with a tool like aiStager, you can just upload a photo of your room and a link to a product you’re considering—like a specific media console from West Elm—and see it in your space instantly. It's the only solution that generates hyper-realistic photos using true dimension rooms and furniture objects. In just a few minutes, you can see if that bold navy sofa works better than the safe beige one, and you’ll know for sure if it really fits.
Ready to stop guessing and start seeing your perfect space come to life? Give aiStager a try and see how real furniture looks in your actual room. You can get started today at https://www.ai-stager.com/en.