Master How to calculate area of room in 2026
Learn to calculate area of room, from rectangles to irregular spaces. Get pro tips for accurate measurements that power photorealistic interior design in 2026.
You’re usually not searching for how to calculate area of room because you love math. You’re doing it because a decision is waiting. A new rug. A sofa you’ve been eyeing. A bedroom layout that feels cramped but shouldn’t. A listing photo that looks empty, and you need to know what can fit without guessing.
Good design starts before color palettes and fabric samples. It starts with dimensions you can trust. When the numbers are right, everything downstream gets easier: furniture planning, flooring estimates, layout options, and realistic visualization.
Why Accurate Room Area Is Your Design Superpower
A room can look generous in a photo and still fight you in real life. That’s why area matters, but not as a dry number on paper. It tells you whether the room can support the life you want in it.
If you’re choosing between a deep sectional and a lighter seating plan, area gives you the first reality check. If you’re pricing new flooring, it keeps your budget grounded. If you’re comparing finishes, it helps you understand where cost and scale meet. That’s also why it helps to compare hardwood floor refinishing expenses before you lock in a broader redesign. Floor scope and room size always affect the conversation.
Manual measurement also carries a greater risk than often perceived. Manual measurement introduces 5-15% dimensional errors that compound when furniture is staged to scale in photos, which is especially problematic for real estate agents and interior designers using visualization tools because even small errors can make furniture look misaligned or incorrectly sized, undermining client confidence, according to this measurement context.
Practical rule: If you’re using room dimensions to make a buying decision, “close enough” usually isn’t close enough.
The best teams treat area as a design control, not a paperwork step. It informs circulation, furniture size, rug placement, and whether a room will feel composed or crowded. It also supports better digital planning. If you want a good overview of how room data feeds modern design workflows, this guide to interior design visualization software is a useful starting point.
What accurate area actually gives you
- Confidence before purchase. You know whether a sofa, dining table, or bed belongs in the room.
- Better layout decisions. A room can be large on paper and still be awkward in shape.
- Cleaner client communication. Accurate numbers reduce revisions and avoid preventable surprises.
Essential Tools and Measurement Best Practices
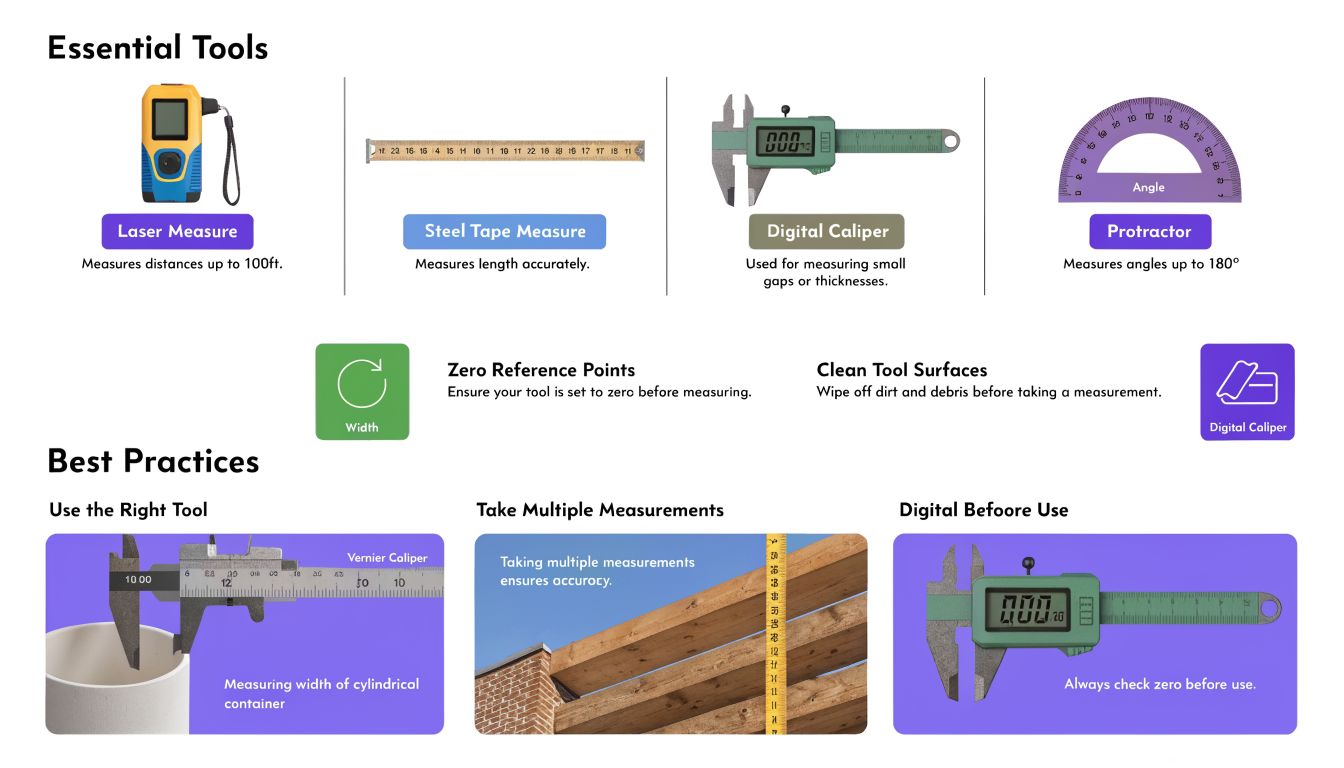
Professionals don’t start with formulas. They start with clean measurements. Most calculation errors come from the measuring step, not the math.
Choose the right tool
A tape measure still works well for smaller rooms and quick checks. It’s inexpensive, familiar, and fine for a basic rectangle. But if you’re working alone, measuring a larger living room, or documenting multiple spaces, a laser distance measurer is usually the better tool.
The reason is simple. It’s faster, easier to repeat, and more consistent when you need clean wall-to-wall dimensions.
A room measured carefully with the wrong process can still produce the wrong result.
Technical practice matters here. Industry guidance notes that laser distance measurers are preferred over tape measures for accuracy and should be calibrated and used perpendicular to walls to reduce distortion, as explained in this overview of measurement precision and square footage accuracy.
Non-negotiable habits
Use this short checklist every time:
- Stick to one unit system. Don’t mix imperial and metric in the same calculation.
- Convert inches before multiplying. If a wall measures 10 feet 6 inches, use 10.5 feet, not “10.6.”
- Record carefully. Write dimensions down immediately. Don’t trust memory between rooms.
- Measure architectural interruptions. Alcoves, chimneys, columns, and recessed areas all matter.
- Re-check the longest wall. That single dimension often anchors the whole room plan.
A related issue is scale accuracy in digital planning. For AI-powered staging platforms, measurement precision directly affects how believable the rendering feels. A 1-foot measurement error in a 12×10 room represents an 8.3% area variance, which can make furniture appear out of proportion in the final image, according to this article on a scale factor calculator for room planning.
Quick tool comparison
| Tool | Best for | Watch out for |
|---|---|---|
| Tape measure | Small rooms, spot checks | Sag, angle drift, solo measuring frustration |
| Laser measure | Larger rooms, repeated use, cleaner notes | Needs proper alignment and calibration |
| Notebook or floor plan sketch | Recording dimensions clearly | Incomplete notes cause rework later |
Calculating Area for Squares and Rectangles
A square or rectangular room gives you the cleanest starting point in space planning. Measure the length, measure the width, then multiply them. The formula is simple. The payoff is not. That number drives furniture sizing, rug selection, flooring estimates, and the scale settings you feed into AI staging tools such as aiStager so the rendered room reads as believable instead of slightly off.
If a room measures 12 feet by 15 feet, the math is straightforward:
12 × 15 = 180 square feet
That 180-square-foot footprint tells you more than the room’s size. It tells you whether a full sectional will crowd the circulation path, whether an 8×10 rug will sit correctly under the front legs of the seating, and whether your digital layout should show a larger coffee table or keep the center open. In practice, basic math translates into design control.
A short visual walk-through can help if you prefer to see the math in action.
Simple process for regular rooms
- Measure the full length of one wall.
- Measure the adjacent wall for the width.
- Convert inches to decimals before multiplying.
- Multiply length by width.
- Mark the result as square feet or square meters.
For example, a room that measures 10 feet 6 inches by 14 feet should be calculated as 10.5 × 14, not 10.6 × 14. That small correction matters. I see this mistake often when someone is sketching quickly, and it can throw off a floor plan enough to cause trouble later, especially if the measurements are being used to generate dimension-true visualizations.
For regular rooms, careful measurement matters more than complicated math.
This method works well only when the room is square or rectangular. If a space has a chimney bump-out, angled wall, bay, or side leg, record those features separately instead of forcing the whole room into one clean rectangle.
How to Measure L-Shaped and Irregular Rooms
A room with a jog, bay, chimney breast, or angled wall does not need complicated math. It needs a clean sketch and disciplined measuring.
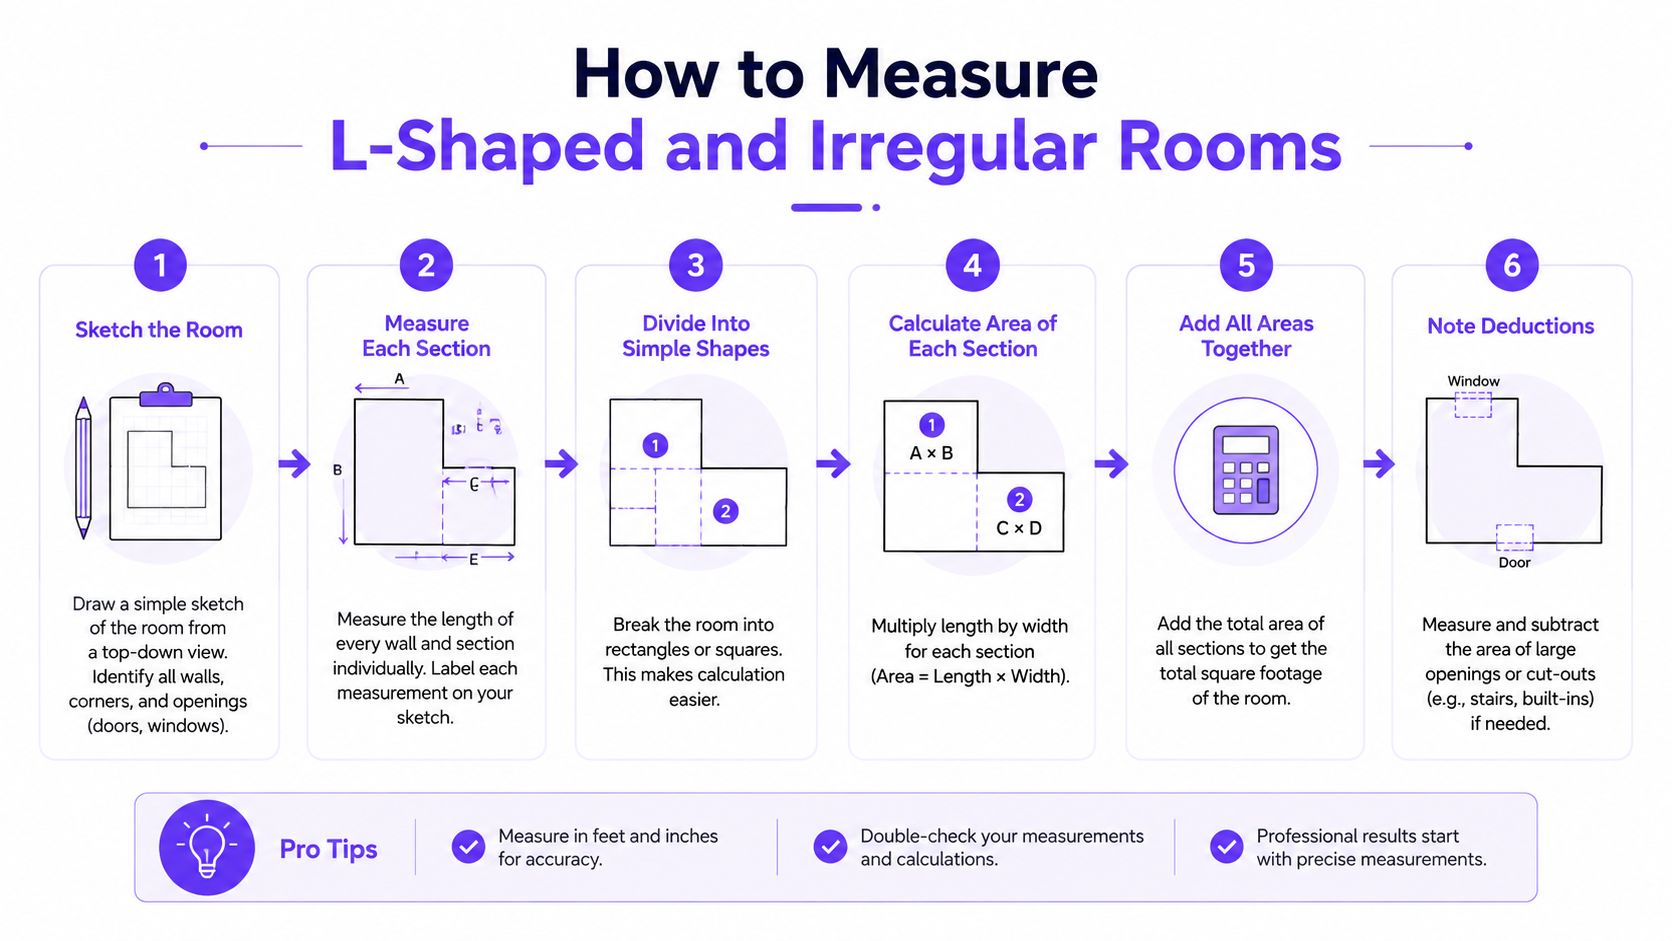
For design work, irregular rooms matter more than they first appear. A total square-foot number may be correct, but if the shape is recorded poorly, the layout will still fail. Sofas end up crowding a passage, rugs sit off-center, and any dimension-based rendering tool will produce a room that looks plausible but fits badly. That is why I measure these spaces by parts, then rebuild the room on paper before making any styling decisions.
Start by dividing the room into simple shapes
The working method is straightforward. Turn the room into rectangles, and add triangles or curves only where you need them.
For an L-shaped room, draw the main block first. Then draw the side leg as its own rectangle. For a room with a bay or angled corner, keep the rectangular body separate and isolate the odd section. If you want a quick way to verify the totals after your sketch is done, this room size calculator for irregular layouts can help check your math.
Keep each section labeled on your sketch. That prevents one of the most common field mistakes: mixing dimensions from two different parts of the room and creating an area that does not exist.
A practical L-shaped example
Suppose the main part of the room measures 12 ft by 14 ft, and the side leg measures 6 ft by 8 ft.
- Main rectangle: 12 × 14 = 168 sq ft
- Side rectangle: 6 × 8 = 48 sq ft
- Total room area: 216 sq ft
That gives you the total floor area. It also gives you something more useful for design: two distinct zones. One zone may suit the seating group. The other may be better for a desk, breakfast table, or storage piece. If you plan to stage accurately, pair room dimensions with furniture measurement guidelines for layout planning so the placement reflects real clearances.
How to handle common irregular features
Different shapes call for different treatment. The goal is consistency, not mathematical heroics.
| Room feature | How to measure it |
|---|---|
| L-shaped leg | Measure as a second rectangle and add it |
| Bay window | Measure as a rectangle, or split into rectangles and a triangle |
| Angled corner | Use a triangle formula: base × height ÷ 2 |
| Curved nook | Approximate as part of a circle only if the curve affects layout |
| Fireplace bump-out or column | Measure it separately and subtract it from usable floor area if furniture cannot occupy that footprint |
One note from practice. I track both total area and usable area in irregular rooms. A chimney breast may barely affect the final square footage, but it can remove the only wall that could have held a media console or full dresser. For budgeting on spaces that connect to renovation planning, tools like a kitchen remodeling cost calculator are useful only after the room dimensions are grounded in an accurate plan.
Record the shape, not just the number
Professionals do not stop at the final square-foot figure. They record where the offsets happen, how deep each recess runs, and which corners are clean enough for furniture.
That extra detail is what makes modern visualization tools valuable instead of misleading. Platforms like aiStager work best when the room dimensions match the actual envelope of the space. If the side leg is overstated or an angled wall is squared off for convenience, the visualization may look polished while showing furniture that cannot fit in the actual room.
Measure the shape accurately. The design will be better for it.
Turning Measurements into Design Decisions
Area tells you how big a room is. Proportion tells you what that size means. Those are not the same thing.
A room can have generous square footage and still be awkward for furniture placement. Existing room area calculators often stop at total square footage, but they miss the design context. A 250 sq ft room that is 12×21 ft needs a different staging strategy than a 250 sq ft room that is 16×15.6 ft, as noted in this explanation of irregular floor area and spatial context.

Same area, different room
Take a bedroom with enough square footage for a king bed. On paper, that sounds easy. In reality, a narrow room may force the bed onto one wall and leave poor clearance on one side. A squarer room with the same total area usually gives you more balanced options for nightstands, bench placement, and visual symmetry.
That’s why I never look at square footage alone. I also look at:
- Room width, because it controls large furniture placement
- Door swing and window location, because they interrupt ideal layouts
- Long versus square proportions, because they change how the room feels
- Architectural features, including radiators, columns, and alcoves
Product decisions get easier when dimensions are clear
Once measurements are accurate, specification work gets much faster. You can compare a Crate & Barrel bed against a slimmer West Elm frame. You can test whether a dark walnut finish will visually anchor the room or make it feel heavy. You can decide whether a Pottery Barn dresser belongs on the long wall or whether the better move is a lower-profile piece with more breathing room.
Furniture measuring deserves the same discipline as room measuring. This practical guide on how to measure furniture is useful when you’re pairing product dimensions with room dimensions instead of eyeballing fit.
Area affects budget planning too
Room size also ties directly to renovation planning. If the layout discussion moves into cabinetry, flooring, lighting, or appliance changes, budgeting tools become part of the process. For kitchen projects in particular, a kitchen remodeling cost calculator can help frame the spending side while your room measurements keep the spatial side realistic.
Good measurement doesn’t just tell you what fits. It tells you what makes sense.
When clients feel stuck, it’s usually because they’re trying to make style choices without enough spatial clarity. Once the measurements are solid, the room starts answering back.
Common Mistakes to Avoid When Measuring
Most bad room calculations come from a few repeat mistakes. The good news is that they’re easy to avoid once you know where people slip.
The errors I see most often
- Mixing units mid-calculation. Feet, inches, and meters can’t float around in the same math.
- Forgetting decimal conversion. Inches need to become decimal feet before multiplication.
- Counting unusable floor area as fully usable. Door swings, closets, fireplaces, and deep trim can distort planning.
- Taking one measurement and trusting it blindly. Rooms aren’t always as square as they look.
- Ignoring the room’s shape. A total area number doesn’t fix a bad proportion.
A final check before you trust the number
Use this quick review before ordering furniture, flooring, or finishes:
- Reconfirm your longest and shortest dimensions.
- Make sure every note uses the same unit system.
- Check whether alcoves, offsets, or projections were included.
- Review whether the final number reflects total area or usable layout area.
- Match the room dimensions against the actual product dimensions, not just a photo.
Keep the goal in view
If you’re a homeowner, getting the area right helps you buy with less stress. If you’re a designer, it keeps your proposal grounded. If you’re preparing a listing, it helps the room read accurately and attractively.
Calculating area isn’t the glamorous part of design work. It’s the part that keeps everything else from going wrong.
If you want to turn room measurements into realistic design previews without rebuilding the space in CAD, aiStager is built for that workflow. Upload a room photo and a product link, then test different furniture pieces, brands, colors, and finishes in just a few clicks. It’s the only solution designed to generate hyper-realistic, true-dimension rooms and furniture objects, which makes it especially useful when you need to compare options like different sofa brands or wood finishes in the same space before buying or presenting.