Home Exterior Visualizer: Design Trends for 2026
Discover how a home exterior visualizer transforms your 2026 renovation plans. Learn tech benefits & compare basic tools to AI leaders.
You’re standing in the driveway, phone in one hand, paint chips in the other, wondering how a color that looked calm in the store suddenly looks too cold, too dark, or just wrong on your house.
That hesitation makes sense. Exterior updates are expensive, visible to everyone, and hard to undo gracefully. A home exterior visualizer exists for this exact moment. It lets you test ideas on a screen before you commit on-site.
Your Guide to Home Exterior Visualizers
You pick a warm gray in the store, hold it up to your house the next day, and it suddenly reads blue against the roof, flat beside the stone, and much darker under the porch shadow.
That disconnect is the primary problem exterior planning tools try to solve.
Outside materials behave differently than they do on a sample board. Sun shifts color through the day. Roof lines add weight. Trim can sharpen a facade or make it feel busy. A front elevation works like a composition, not a collection of isolated products.

A home exterior visualizer helps you test those relationships before you pay for labor and materials. The basic idea is simple. You use a photo of your house, or a close model, and apply digital changes to siding, trim, roofing, shutters, stone, and doors so you can compare directions on screen.
The value is not just convenience. It is risk reduction.
Advanced interior AI tools such as aiStager have raised expectations for what visualization software can do. Indoors, the best systems can generate highly realistic rooms, respect spatial dimensions, and make design changes feel close to a finished photograph. Exterior tools are useful, but many still fall short of that benchmark. They may struggle with complex shadows, irregular surfaces, accurate masking around plants and features, or true-to-life material depth. That gap matters because it shows both what current software can handle and where exterior visualization is likely headed next.
A good visualizer still gives you a much better starting point than paint chips, product thumbnails, or guesswork. If you want a wider view of how these tools fit into planning a facade update, this guide to exterior home design adds helpful context.
A simple rule helps here. If a decision would be expensive, hard to reverse, or visible from the street every day, it should be previewed before it is purchased.
That shift changes the conversation. Instead of asking whether a design might work, you can compare versions and choose the one that fits your house best.
What Exactly Is a Home Exterior Visualizer
A home exterior visualizer is a digital design tool that shows how exterior changes might look on a house before construction or painting begins.
That sounds technical, but the idea is simple. It’s a virtual fitting room for your home’s outside surfaces. Instead of trying on jackets, you’re trying on siding, shingles, trim colors, stone, shutters, and doors.
What it does in plain language
You start with one of two things:
- A photo of your own home
- A sample house that looks similar to yours
The tool then lets you apply design changes to visible surfaces. Depending on the platform, you may be able to swap wall colors, test roofing materials, adjust trim, or compare multiple product combinations.
Some tools focus on a single manufacturer’s catalog. Others let you explore broader looks such as cottage, traditional, or modern farmhouse palettes. The purpose is the same. Reduce uncertainty before real money and labor enter the picture.
How it differs from a normal photo editor
A lot of readers assume this is just Photoshop with a nicer interface. It isn’t.
A general image editor lets you paint over a photo. A home exterior visualizer is built for architectural surfaces. It tries to respect where the roof ends, where siding begins, and how trim wraps around windows and doors. Better tools also account for texture and perspective, so a cedar-look siding option doesn’t look flat like a sticker.
That’s why these platforms are popular with homeowners, contractors, and product manufacturers. They turn a vague idea into something specific enough to discuss.
A good visualizer doesn’t just make the house look prettier on screen. It makes the next decision easier.
Why people use one before they buy
Most exterior choices aren’t isolated. A roof color changes how the siding reads. White trim looks different against warm stone than it does against cool gray lap siding. Front doors, garage doors, and shutters can shift the whole style.
A visualizer helps you see those relationships together, which is much harder to do from separate product samples laid on a table.
Understanding Exterior Visualization Technology
A home exterior visualizer works a lot like a pair of glasses. If the lens is flat and slightly warped, the house still looks recognizable, but small judgments become unreliable. Roof lines feel a little off. Stone texture looks pasted on. Window trim stops feeling attached to the wall behind it.
That difference in realism usually comes from how the software understands the house itself.
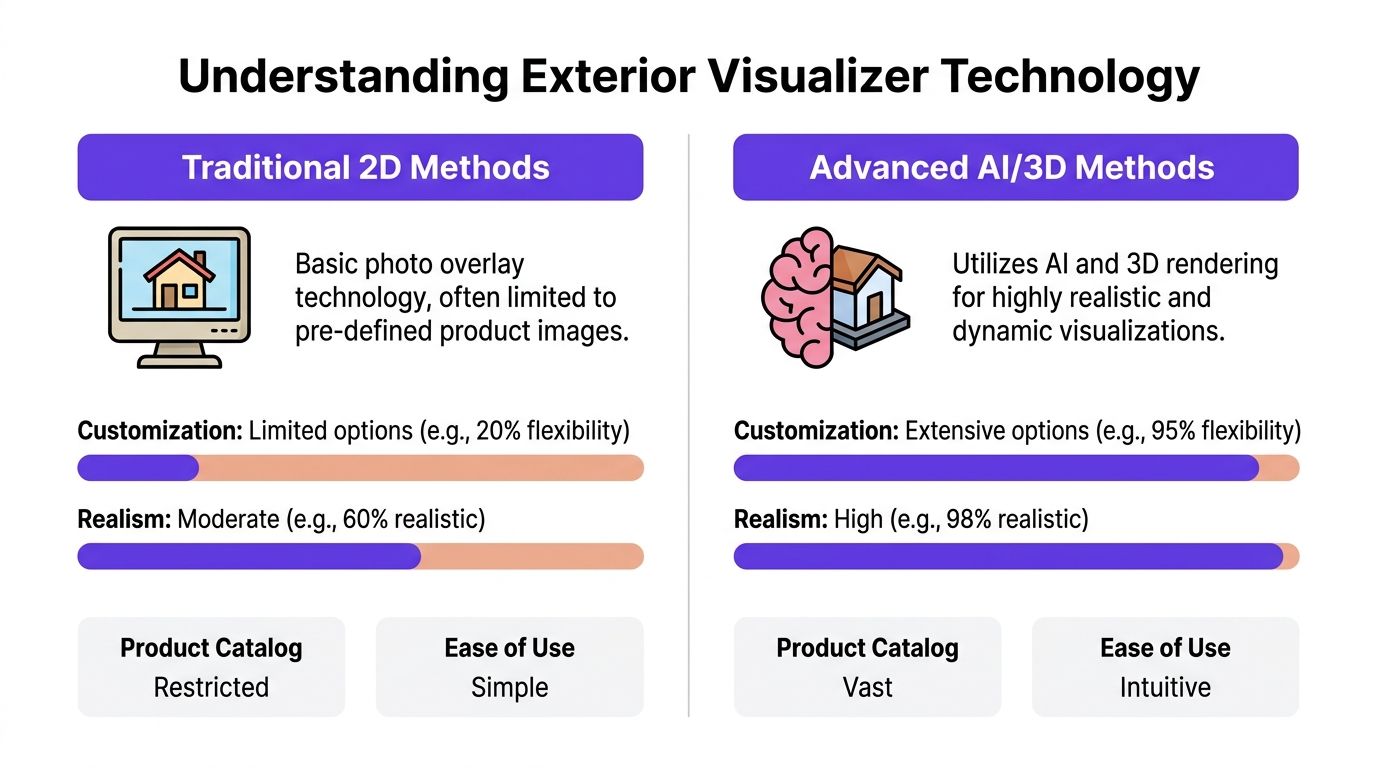
Traditional 2D photo overlay
Many exterior tools still start with a single photo. You upload an image, mark the siding, roof, or trim, and the software lays new finishes over those areas.
This method is fast. It is also easy to misunderstand.
A 2D overlay treats the house mainly as a picture, not as an object with measurable depth. If the photo is straight-on and the lighting is clean, the result can be useful for testing broad directions. Once the angle becomes more complex, the tool has to guess more. ProVia explains this contrast in its overview of 2D versus 3D workflows, noting that flat-photo methods can introduce visible perspective drift while measured 3D reconstruction aims for sub-inch accuracy in the generated model (ProVia Envision).
That helps explain a common frustration. The mockup may look fine in a quick glance, then feel wrong when you study the siding scale near a corner or the way trim wraps around a window.
3D modeling and measured reconstruction
More advanced systems build a dimensional version of the home first, then apply materials to that model.
That changes the job completely.
Instead of coloring inside the lines of a photo, the software tries to understand planes, edges, depth, and alignment. A wall becomes a surface with orientation. A roof becomes a pitched form, not a colored shape. Once that structure exists, materials can follow the house more naturally.
You usually see the improvement in four places:
- Perspective stays more believable across angled views
- Material scale looks closer to real product proportions
- Light and shadow sit on surfaces with better consistency
- Doors and windows feel placed in the façade, not pasted over it
Interior AI tools already show how powerful this model-first approach can become. If you have seen advanced room visualizers produce dimension-aware, photoreal results, the gap becomes obvious. Exterior software is still catching up. For a broader technical view, this guide to rendering a house with realistic architectural detail shows the kind of visual accuracy people increasingly expect.
Why some mockups look fake
Most weak exterior previews break for the same technical reasons:
| Issue | What you see | Why it happens |
|---|---|---|
| Flat overlays | Siding or stone looks pasted on | The tool maps color but does not model texture depth well |
| Distorted proportions | Materials seem stretched or compressed | The software is forcing a flat photo to stand in for angled geometry |
| Weak edge handling | Colors bleed into trim, gutters, or plants and features | Surface boundaries are being segmented loosely or by hand |
If you compare this with high-end interior AI, the limitation becomes clearer. Tools like aiStager set a higher bar inside the home by preserving scale, respecting room geometry, and producing imagery that feels close to a real photograph. Exterior visualizers often stop earlier in the process, which is why many still feel like mockups instead of previews.
The trade-off most users face
Simpler 2D systems are easier to start with and often work well for rough exploration. 3D systems usually give a more dependable preview, especially when the home has depth changes, layered materials, or complex rooflines.
For homeowners, the practical lesson is simple. Use a basic visualizer to test direction. Use a dimension-aware workflow when the decision gets expensive enough that small visual errors can change what you buy.
The AI Revolution From Interiors to Exteriors
Current exterior tools are useful, but they still have a narrow view of what visualization should be.
Many major brand visualizers ask you to work inside a closed system. You choose from their product library, mask surfaces manually, and accept that the result is an approximation. As Hover’s category page highlights, existing exterior tools mainly rely on manual selection and proprietary catalogs, and they don’t support AI-powered, true-to-scale rendering of any product from an arbitrary URL (Hover siding visualizer overview).
That limitation matters more than many realize. Exterior decisions are rarely confined to one brand. A homeowner might like one company’s siding color, another company’s door style, and a third company’s window look. Current tools often force the project into one product ecosystem even when the actual purchase decision won’t happen that way.
Interiors already show what better looks like
The clearest analogy comes from interior visualization.
In the interior world, advanced AI tools have changed the expectation. Instead of manually outlining every wall and dragging generic furniture into a room, newer systems can place specific products into a real space with much less setup.
That shift is important because it changes the question from “Can I mock this up?” to “Can I see my exact options in my actual space?”
Take a normal shopping decision. You’re comparing a Crate & Barrel sofa with a West Elm sofa. You want to see each one in different fabrics, maybe one in a warm boucle and one in a darker performance weave. You also want to know whether the proportions work with your rug, your coffee table, and the distance to the media console.
The most advanced interior workflows now handle that kind of comparison far better than older room planners. The strongest example is aiStager, which the publisher describes as the only solution that generates hyper-realistic photos with true-dimension rooms and furniture objects from a room photo plus a product URL. In practical terms, that means a user can upload a room image, paste in a product link, and test different versions of the same product family without rebuilding the room manually.
Why exterior software feels behind
Exterior software still tends to ask for more labor from the user.
You may need to:
- Outline surfaces by hand
- Work only with limited brand libraries
- Accept rough scale instead of dimension-true placement
- Settle for early-stage concept images rather than polished visuals
That gap becomes obvious if you compare interior and exterior use cases side by side. In an interior workflow, a shopper may want to test a sectional, a dining chair, or a lighting finish from different brands in just a few clicks. Exterior users want the same freedom. They want to know whether a specific front door model, a particular siding profile, or a non-standard window proportion will look right on their own house.
Later in the design process, seeing this kind of workflow in motion helps. This video gives a useful visual reference point:
What the next generation should deliver
The future home exterior visualizer will likely borrow from the best interior systems.
The benchmark is no longer “Can this tool recolor my siding?” The benchmark is “Can this tool show my exact product choices at believable scale with almost no setup?”
That means readers should expect more from exterior platforms over time:
- Photo-based automation instead of tedious masking
- Flexible product input instead of locked catalogs
- More realistic placement and scale
- Better handling of mixed materials across one facade
- Cleaner exports for client presentations and approvals
The technology path is already visible. Interiors got there first. Exteriors are catching up.
Key Benefits for Homeowners and Professionals
A good home exterior visualizer changes the conversation before it changes the house.
If you are a homeowner, that means fewer expensive guesses. If you are an agent, it means a stronger story for a listing. If you are a builder or architect, it means clients react to something concrete instead of trying to decode material names and finish samples.
The easiest way to understand the benefit is to compare exterior tools with advanced interior AI systems such as aiStager. Interior tools are already teaching users to expect realistic previews, believable proportions, and fast experimentation. Exterior software still helps, but it often stops at broad color swaps or simplified mockups. That gap matters because people make better decisions when the preview feels close to the finished result.
For homeowners
Homeowners usually start with uncertainty, not design language.
A paint chip can look calm in your hand and overpowering across a full facade. A darker front door can appear refined in one context and heavy in another. A visualizer helps translate those abstract choices into something visible on your own home.
That lowers decision anxiety. It also reduces the back-and-forth that happens when one person says, "I want something warmer," and another person pictures a completely different result.
There is also a practical benefit. Exterior updates are expensive enough that even one avoidable mistake matters. As noted earlier, repainting or replacing visible exterior materials is not a small test purchase. Seeing combinations in advance helps homeowners narrow options before ordering samples, scheduling crews, or committing to a style direction.
For agents and listing teams
Real estate teams often sell possibility as much as present condition.
A plain listing photo asks buyers to do a lot of mental work. They have to look past faded trim, an outdated color scheme, or mismatched materials and picture what the home could become. Many buyers cannot do that easily. A visual mockup acts like a translation layer between the current photo and the upgraded version a buyer hopes to create.
That is especially helpful for homes with solid structure but weak first impressions. Agents can show how new siding colors, sharper trim contrast, or a revised entry treatment may change the home's appearance. For inspiration, this collection of modern curb appeal and design ideas is useful because it shows how contemporary exteriors combine materials, lines, and entry details.
For listing teams, the benefit is not just visual. Mockups support pricing discussions, seller recommendations, and pre-renovation planning.
For builders, remodelers, and architects
Professionals use visualizers to shorten the distance between an idea and client approval.
Clients rarely respond well to a list of terms such as lap siding, standing seam roofing, or fiber cement trim in a spreadsheet. They respond to images. A preview gives the project team a shared reference point, which makes early meetings more productive and proposals easier to understand.
It also helps expose the limits of current exterior tools. With an advanced interior platform like aiStager, users are beginning to expect dimension-aware placement and more convincing realism. Exterior software often still struggles with exact product representation, subtle material changes, and mixed-surface accuracy. That means professionals should treat many exterior visualizers as alignment tools first, not final design proof.
Used that way, they still provide real value:
- Faster early approvals: Clients can react to visual directions sooner.
- Clearer scope discussions: Material combinations are easier to document and compare.
- Stronger proposals: A concept image makes the bid feel more concrete.
- Fewer interpretation errors: Teams spend less time correcting assumptions about trim, color contrast, and style.
There is a related pattern in adjacent home design software too. Work in outdoor planning is improving, but it still shows many of the same growing pains. This overview of AI tools for outdoor planning and site design helps show how quickly visualization expectations are rising across the broader design field.
One category, three kinds of value
Homeowners want reassurance. Agents want a more persuasive listing story. Builders and architects want alignment before detailed work begins.
A home exterior visualizer can support all three. The best ones reduce guesswork today, and they also hint at where the category is headed. If exterior tools keep following the path set by advanced interior AI visualizers, future versions will feel less like rough mockups and more like true decision-grade previews.
Essential Features in a Modern Visualizer
Not every home exterior visualizer deserves your time. Some are handy for quick color play. Others are strong enough to support a real project decision.
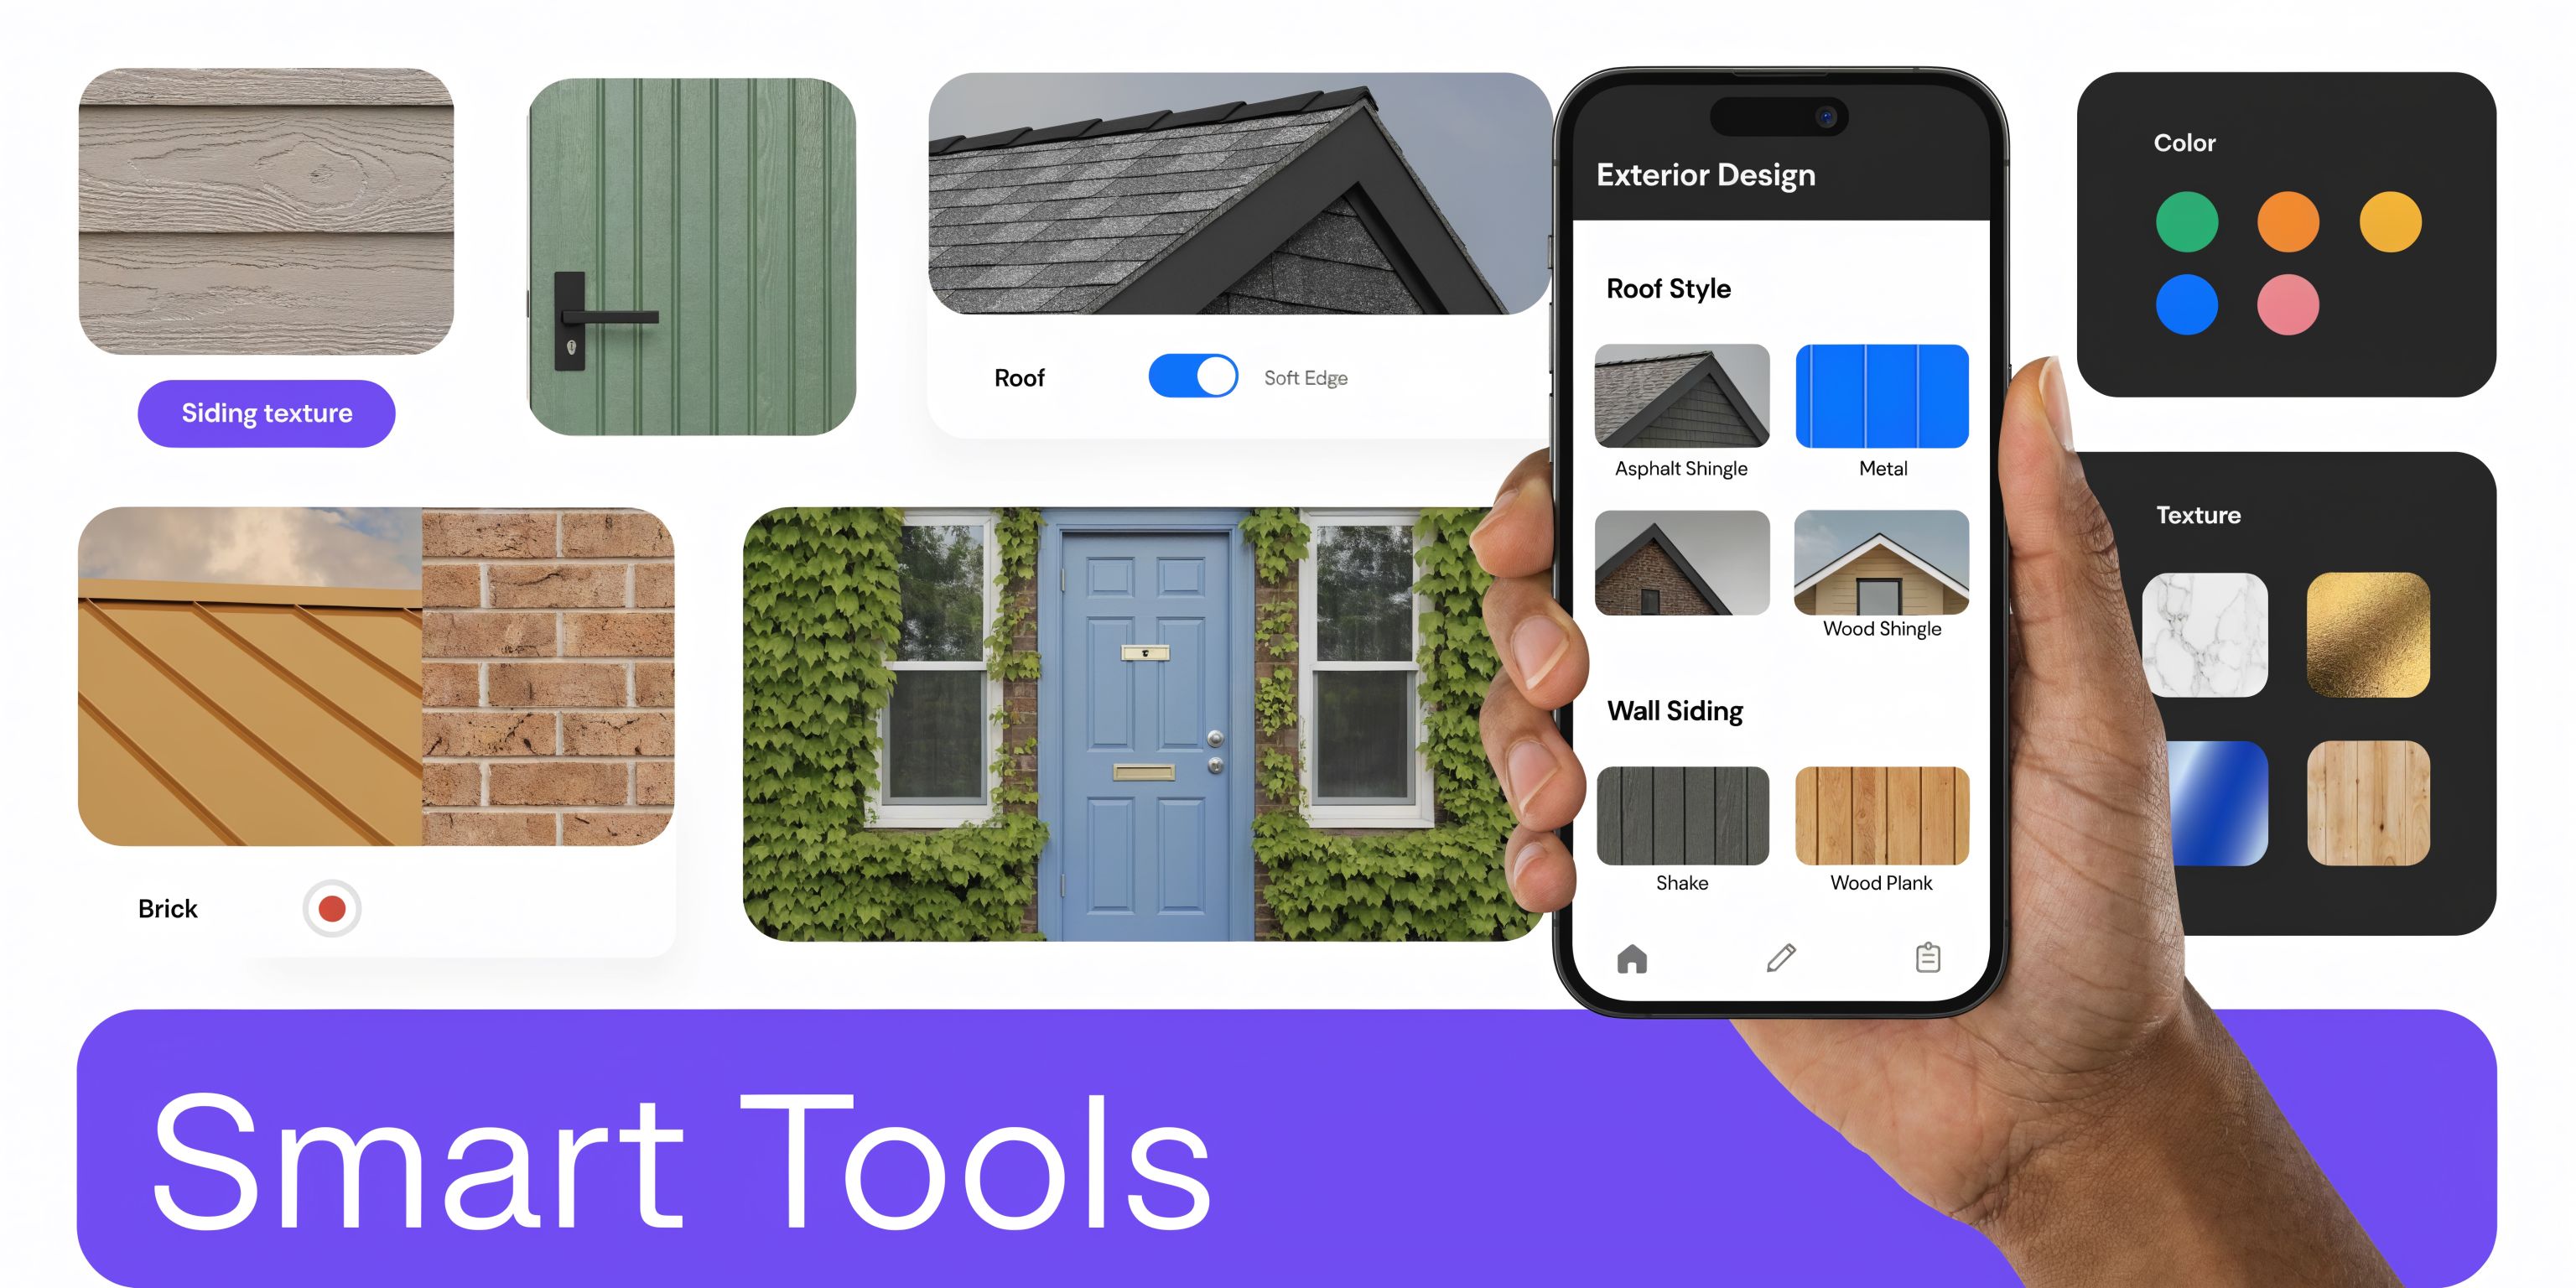
Start with image quality and surface detection
If the tool struggles to understand your photo, everything after that gets weaker.
Advanced visualizers use convolutional neural networks trained on millions of facade images and can reach 98% color fidelity to PANTONE standards while preserving 99.5% of original structural lines, which helps reduce the fake look common in older mockups (DreamYard exterior visualizer overview). In plain language, better detection means cleaner edges around trim, rooflines, windows, and mixed materials.
Look for:
- High-resolution uploads: A blurry phone photo limits the result.
- Clean edge recognition: Gutters, fascia, and window trim should stay distinct.
- Material separation: Brick, siding, roofing, and painted trim shouldn’t bleed into one another.
Check the product flexibility
Many tools fall short in this area.
Some platforms are excellent if you already know you want one brand’s roofing or siding system. They’re less useful if you’re still comparing across brands or trying to recreate a more custom look.
A stronger visualizer should offer one of these paths:
| Feature | Why it matters |
|---|---|
| Broad product library | Helps you explore beyond one narrow style family |
| Real finish options | Lets you compare textures, not just colors |
| Before-and-after view | Makes subtle changes easier to judge |
| Export capability | Useful for sharing with family or contractors |
Watch for realism, not just variety
A huge menu doesn’t help if every result looks flat.
Good rendering should handle texture, color balance, and the relationship between surfaces. If you’re refreshing the exterior as part of a broader property update, it also helps to review modern yard design trends so the outdoor design direction matches the architecture you’re previewing.
Quick test: Zoom in on corners, trim transitions, and roof edges. That’s usually where weak visualizers reveal themselves.
Don’t ignore scale and sharing
Some readers focus only on colors. That’s a mistake.
Scale affects whether siding courses, shutters, windows, and entry features feel correct. Sharing also matters. You’ll likely want to send options to a spouse, contractor, architect, or client.
The best practical feature set includes:
- Accurate proportions
- Simple comparison views
- Easy exports
- A workflow that doesn’t require design software training
If a tool checks those boxes, it’s doing more than making pretty mockups. It’s helping you make a decision you can trust.
Common Questions About Home Visualization Tools
A common frustration shows up fast. You upload a photo of your house, try a few options, and realize the tool keeps steering you back to the same small set of products or looks. That happens because many exterior visualizers were built by siding, roofing, paint, or trim brands. They work well as product selectors. They are less useful as open-ended design labs.
Why do so many exterior visualizers limit me to certain brands
The software often reflects the business model behind it.
If a manufacturer pays to build the tool, the catalog usually centers on that manufacturer’s products. That can be helpful when you are already deciding between two shingle colors from one brand. It is less helpful if you want to compare one company’s siding, another company’s windows, and a third company’s door color in the same mockup.
Interior AI tools make the limitation easier to spot. Platforms like aiStager show what a broader workflow can look like. You start with a real photo, reference real products, and generate a result that aims to stay true to scale and placement. Exterior tools are not there yet in most cases, but that comparison shows where the category still falls short.
Can these tools help with style decisions, not just color
Yes. In many cases, style testing is more useful than color swapping.
Color is only one layer. The larger question is whether your home reads better as cottage, traditional, modern farmhouse, Tudor-inspired, or contemporary. Analysts at brick&batten found that cottage was the most popular style in their U.S. house-style study, at 11% of respondents (brick&batten house styles study). Popularity alone should not drive your choice, though. A style has to fit the shape of your roof, the spacing of your windows, and the proportions of the facade.
A good visualizer helps you test that fit before you spend money. A weak one just changes surface color and leaves the architectural character fuzzy.
Why does my mockup sometimes look slightly off
Exterior software has to make educated guesses from a flat photo.
That sounds simple until you notice what the tool is dealing with. Shadows hide detail. Trees cover trim lines. Wide-angle phone lenses distort proportions. Manual masking can miss edges around gutters, railings, and rooflines. If the software also has a basic rendering engine, the result may feel a little artificial even when the color choice is correct.
Interior AI has made faster progress here because rooms are easier to model with clear planes, repeatable lighting patterns, and known furniture dimensions. Exteriors are messier. They involve weather, site design, depth, reflective windows, and irregular forms. That is one reason current home exterior visualizers often look helpful but not fully convincing.
Can I use interior-style AI thinking for spaces like porches or covered outdoor areas
Yes, especially for transitional spaces.
A covered porch works a lot like a small room without four full walls. You still need to judge scale, finish harmony, furniture fit, and lighting. The same logic used in advanced interior visualization applies here. Test real objects in a real photo, then compare how the space feels as a whole.
That benchmark matters. If an interior tool can place products in a dimension-aware, photo-real scene, readers can start to see what future exterior software should do for porches, entries, and outdoor living zones.
What should I do before I upload a photo
Start with the cleanest image possible.
Use a straight-on shot if you can. Include the full front facade. Avoid parked cars, deep shadows, holiday decor, and branches covering the siding or roofline. Morning or late-afternoon light often creates strong contrast, which can confuse masking and material rendering. Bright, even daylight usually works better.
A good photo gives the software better raw material. That does not guarantee a perfect mockup, but it raises the odds that what you see is close enough to support a real design decision.