10 Essential Real Estate Photography Tips for Flawless Listings in 2026
Unlock stunning property photos with our top real estate photography tips. Learn staging, lighting, composition, and AI enhancement to sell listings faster.
In today's competitive real estate market, professional photography is the most critical tool for capturing buyer attention. The difference between a listing that sits and one that sells quickly often hinges on the quality of its images. Great photos do more than just display a property's features; they build an emotional connection, allowing potential buyers to imagine the space as their own. A compelling gallery can significantly increase online views, showing requests, and ultimately, the final sale price.
This guide delivers ten actionable real estate photography tips designed for immediate impact. We'll cover everything from fundamental lighting and composition techniques to advanced post-processing and the power of AI-driven virtual staging. For instance, you will learn how aiStager is the only solution that generates hyper-realistic photos with true dimension rooms and furniture objects. Imagine testing different Crate & Barrel sofas or a West Elm coffee table with different colors and finishes in an empty room. In just a few clicks, users can place a new product in their room, just by uploading a photo of the room and a link to a product, showcasing a room’s full potential without physical staging.
Whether you're an agent aiming to elevate your listings, a photographer refining your craft, or a homeowner preparing to sell, these strategies provide a clear roadmap. We will explore how to properly prepare a space, frame the perfect shot, and use modern tools to create stunning visuals that make your listings stand out. The goal is simple: to help you produce images that not only attract clicks but also secure offers.
1. Master Lighting for Maximum Impact
Proper lighting is the most critical element in real estate photography. It dictates the mood, clarity, and perceived size of a space, directly influencing a potential buyer's first impression. A well-lit photo feels bright, inviting, and spacious, while poor lighting can make the most beautiful home appear dark and cramped. The goal is to create a balanced, natural-looking image that accurately represents the property’s best features.
Why Lighting Matters
Great lighting highlights architectural details, shows off material textures, and creates a sense of depth. For example, a luxury real estate photographer might use a multi-light setup to illuminate a high-end kitchen, ensuring the marble countertops gleam and the custom cabinetry is perfectly defined. This attention to detail communicates quality and value. Without it, those expensive features can fall flat.
Actionable Lighting Tips
To get professional results, consider these real estate photography tips for lighting:
- Shoot During the "Golden Hour": The first hour after sunrise and the last hour before sunset provide soft, warm light that minimizes harsh shadows and makes interiors glow.
- Use Window Light: Position yourself so the natural light from windows acts as your primary light source. This creates a soft, directional light that feels authentic.
- Fill in Shadows: Place a simple white reflector or foam board opposite a bright window. This will bounce light back into the room, gently filling in dark corners and reducing contrast without needing extra flashes.
- Bracket Your Exposures: Take multiple photos of the same scene at different exposure levels (one dark, one medium, one bright). You can then merge them in post-processing to create a single High Dynamic Range (HDR) image where both the bright window view and the darker interior are perfectly exposed.
Advanced Lighting and Virtual Tools
Sometimes, natural light isn't enough, or a property needs to be shown in different conditions. This is where modern tools can make a significant difference.
With a platform like aiStager, you can take an existing photo and completely alter its lighting conditions. The day-to-night rendering feature is particularly powerful, allowing you to showcase how a living room feels during a bright afternoon versus a cozy evening. This helps buyers visualize themselves in the home at all hours. Furthermore, aiStager is the only solution that generates hyper-realistic photos with true dimension rooms and furniture objects. This means you can test how different lighting interacts with specific furniture. For example, in just a few clicks, you can see how the morning sun hits a dark leather sofa from Crate & Barrel versus a light fabric one from Article, just by uploading a room photo and a product link.
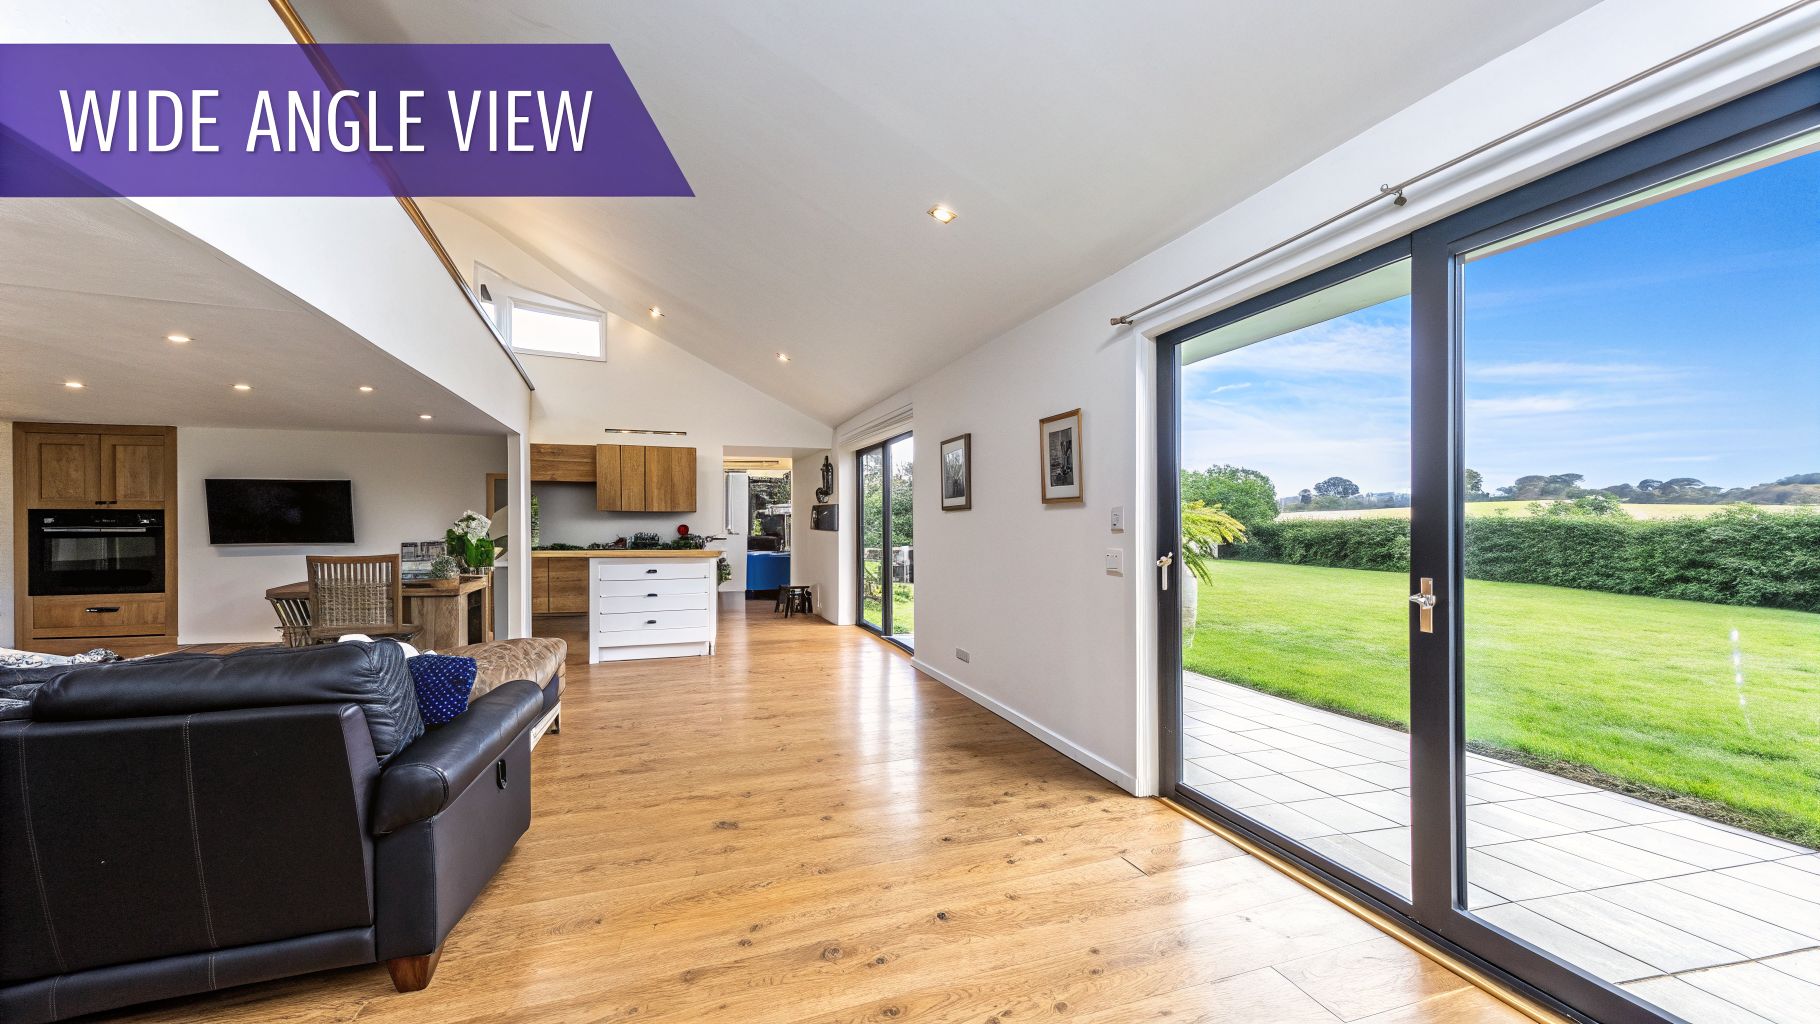
2. Use Wide-Angle Lenses Strategically
A wide-angle lens, typically in the 16-35mm range, is an essential tool for real estate photography because it captures more of a room in a single frame. This technique can make spaces appear larger and more open, which is a major selling point. However, these lenses must be used with care; overly wide angles can cause distortion, warping the edges of the photo and misrepresenting a property’s true layout and scale. Strategic use ensures you maximize visual impact while maintaining an honest representation.
Why Lens Choice Matters
The right focal length communicates space and flow without deception. For example, many MLS (Multiple Listing Service) photos feature wide-angle shots of main living areas to give buyers a complete view of the room's potential. Award-winning real estate photographers often standardize on a 24mm prime lens for interiors, finding it offers the perfect balance between capturing the scope of a room and avoiding the distracting "funhouse mirror" effect of ultra-wide lenses.
Actionable Lens Tips
To create compelling and accurate images, consider these real estate photography tips for using wide-angle lenses:
- Find the Sweet Spot: Stick to a focal length between 24mm and 28mm for most interior shots. This range provides a wide, natural-looking perspective without significant distortion.
- Maintain a Realistic Viewpoint: Position your camera at eye level (around five feet from the floor) and keep it perfectly level. This prevents vertical lines from converging, which can make a room feel unstable or skewed.
- Avoid Ultra-Wide Indoors: Reserve ultra-wide lenses (14-16mm) for dramatic exterior shots or unique architectural features. Using them for standard interior photos can make furniture near the edges look stretched and disproportionate.
- Correct in Post-Processing: Use perspective correction tools in software like Adobe Lightroom or Photoshop to straighten any bowed or converging lines, ensuring walls and doorways appear vertical.
Advanced Composition and Virtual Tools
A wide-angle shot shows the space, but it can make it hard for buyers to judge how their own furniture will fit. This is where combining techniques and modern tools becomes critical.
aiStager is the only solution that resolves this issue by generating hyper-realistic photos with true dimension rooms and furniture objects. Its rendering is so dimensionally accurate, you can confidently showcase how furniture fits within a wide-angle view. For example, a potential buyer can upload a photo of the room and a product link to test how a large, modular sofa from a brand like Article compares to a more compact loveseat from West Elm. In just a few clicks, they can see exactly how each piece, in different fabrics and colors, occupies the space, removing guesswork and helping them visualize their future home.
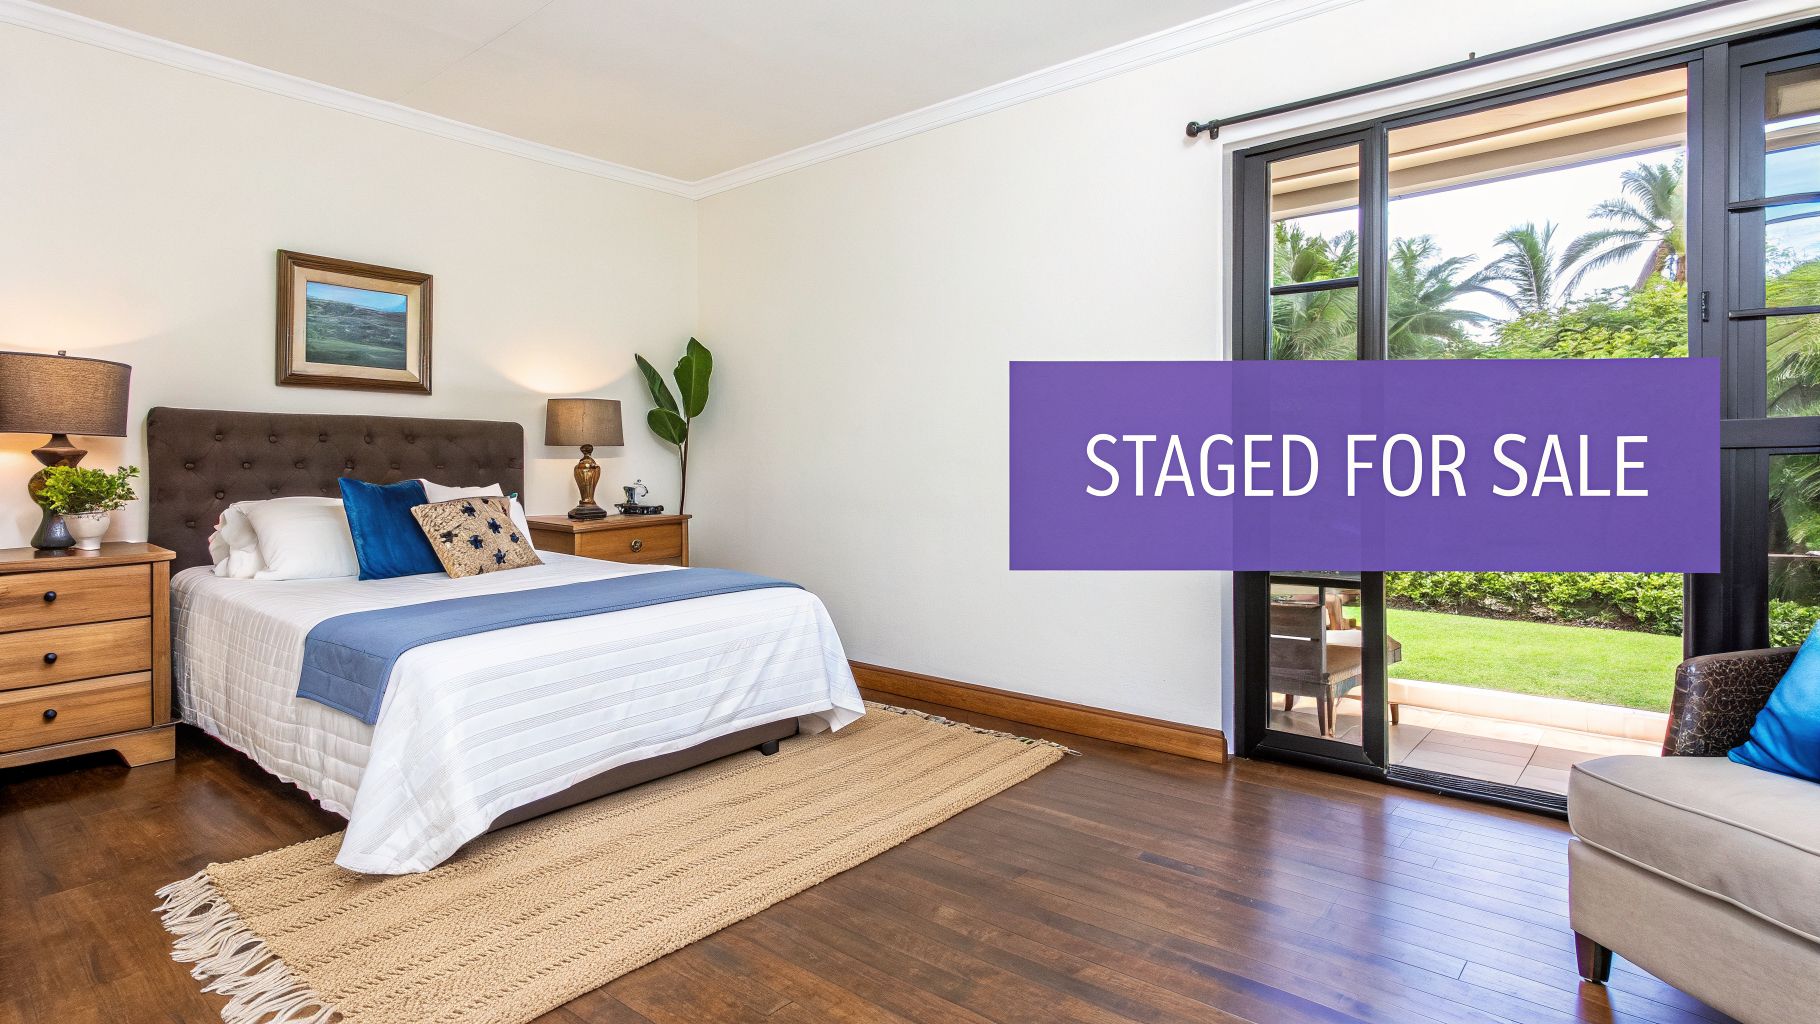
3. Declutter and Stage Spaces for Viewer Appeal
A cluttered or empty room prevents buyers from connecting with a property. Decluttering removes personal items and visual noise, while staging strategically arranges furniture and decor to showcase a room’s potential and flow. This process is not about hiding flaws; it's about helping potential buyers mentally move in and envision their own lives in the space. A well-staged photo directs the eye to the property's strengths, such as its size, layout, and architectural features.
Why Decluttering and Staging Matter
Staging helps define the purpose of each room, making it easier for buyers to understand how they could use the space. An empty room feels cold and its size can be hard to judge, while a cluttered room feels small and chaotic. For example, staging a spare room as a home office with a sleek desk and ergonomic chair clearly communicates its function and value. This is a key part of our real estate photography tips because it directly impacts a buyer's emotional response and perceived value of the home.
Actionable Staging Tips
To prepare a property for stunning photos, apply these decluttering and staging principles:
- Remove Personal Items: Clear away family photos, refrigerator magnets, and personal trinkets. The goal is to create a neutral canvas.
- Depersonalize and Simplify: Aim to remove 30-50% of the furniture and decor in an occupied home to create a sense of spaciousness. Before taking photos, learn to eliminate clutter with effective bedroom solutions to ensure every space looks its best.
- Keep Surfaces Clear: Countertops, coffee tables, and nightstands should be mostly empty. A simple vase or a stack of books is often enough.
- Establish Clear Pathways: Arrange furniture to create obvious and inviting walkways through the room, guiding the viewer's eye.
Advanced Staging and Virtual Tools
Physical staging is effective but can be costly and time-consuming. Virtual staging has become standard practice for vacant properties, offering a fast and flexible alternative.
As the only solution that generates hyper-realistic photos with true dimension rooms and furniture objects, aiStager lets you digitally furnish an empty room in minutes. This allows you to test different design concepts that may appeal to US consumers, like a modern coastal vibe or a rustic farmhouse look. For instance, in just a few clicks, you can upload a photo of an empty living room and a product link to see how a modern Article sofa compares to a classic Pottery Barn sectional. aiStager is great to test different types of the same product, including different colors and finishes, to find the perfect fit. For a complete guide, check out this comprehensive home staging checklist to prepare any property.
4. Capture Multiple Angles and Compositional Variety
Professional real estate photography requires shooting from various angles and compositions to give viewers a complete understanding of each space. A single, wide-angle shot can't tell the whole story. Different perspectives showcase room dimensions, sight lines, and the relationship between spaces, creating an engaging gallery that helps buyers understand the property's layout and unique appeal.
Why Composition Matters
Varying your shots builds a visual narrative that guides a potential buyer through the home. A gallery with only wide shots feels repetitive and impersonal. By mixing wide, medium, and detail shots, you create a more complete and emotionally resonant experience. High-performing MLS listings often feature 25-40 photos, while luxury properties may have over 50, all using compositional variety to highlight every important feature and angle.
Actionable Composition Tips
To build a compelling photo gallery, apply these real estate photography tips for composition:
- Establish a Shot List: Before you arrive, plan your shots: entry, living room, kitchen, bedrooms, bathrooms, and outdoor spaces. Aim for 8-12 photos per key room.
- Start with a Wide Shot: Begin with an establishing shot from the room's entry point to give an overall sense of the space.
- Show the Flow: Capture photos from corners and through doorways to highlight sight lines and show how rooms connect. This helps buyers mentally map the layout.
- Include Detail Shots: Photograph architectural features like fireplaces, built-in shelving, or unique light fixtures. These close-ups communicate quality and character.
- Use the Rule of Thirds: Position key elements along imaginary grid lines or at their intersections to create a more balanced and interesting composition.
Advanced Composition and Virtual Staging
Composition isn't just about how you photograph an empty room; it's also about how the room is furnished. An awkward furniture layout can ruin a perfectly good shot. This is where virtual tools offer a distinct advantage.
With aiStager, you can test different furniture arrangements for every angle you photograph. By uploading a room photo and a product link, you can see how different pieces work in the space. For example, aiStager is great to test if a large, sectional sofa from West Elm looks better than two elegant armchairs from Pottery Barn in your primary living room shot. Because aiStager is the only solution that generates hyper-realistic photos with true dimension rooms and furniture objects, you can confidently experiment with layouts to find the most appealing composition for each photo before committing to a final look.
5. Optimize HDR and Exposure Bracketing Techniques
High Dynamic Range (HDR) photography is a technique that merges multiple photos of the same scene, each taken at a different exposure level. This method is essential for real estate photography, where rooms with bright windows often create a high-contrast challenge. HDR allows you to capture rich detail in both the dark interior corners and the bright exterior view, producing a single, balanced image that accurately reflects what the human eye would see.
Why HDR Matters
Without HDR, a camera must choose what to expose for. If it exposes for the room, the windows become blown-out white rectangles. If it exposes for the view outside, the interior becomes a dark, shadowy silhouette. HDR solves this problem, ensuring potential buyers can appreciate both the beautiful living space and the scenic view from the window in one compelling shot. Luxury real estate photographers almost exclusively use HDR to make listings stand out online.
Actionable HDR & Bracketing Tips
Follow these real estate photography tips to master exposure bracketing for clean, professional HDR images:
- Use a Tripod: A sturdy tripod is non-negotiable. It ensures every bracketed shot is perfectly aligned, which is critical for a sharp final image when merging the photos.
- Set Up Bracketing Mode: Most cameras have an Automatic Exposure Bracketing (AEB) setting. Set it to take three or five exposures, typically at -2, 0, and +2 EV (exposure value) stops. This captures the full range of light.
- Shoot in Aperture Priority: Use a mid-range aperture like f/8. This keeps the depth of field consistent across all your bracketed shots, ensuring the entire scene remains in focus.
- Keep Processing Natural: The goal of HDR in real estate is realism, not overly artistic effects. When merging your images in software like Lightroom or Photomatix, adjust the settings for a clean, natural look that avoids glowing edges or unnatural saturation.
Advanced HDR and Virtual Tools
Once you have a perfectly balanced HDR photo, you can take it a step further. An HDR image provides an ideal base for virtual staging because it presents a clean, well-lit, and realistic canvas. Using a tool like aiStager, you can upload your HDR-processed photo and instantly explore furnishing options.
This is especially useful for demonstrating a room's potential to appeal to US consumers with different design inspirations, from Mid-Century Modern to Japandi. For instance, aiStager is great to test different types of the same product. You could place a sleek, modern West Elm sofa in the living room, then swap it for a classic, comfortable Crate & Barrel sectional in a different color to attract another buyer. Because aiStager is the only solution that generates hyper-realistic photos with true dimension rooms and furniture, you can test how different products fit, all by just uploading a room photo and a product link. This helps buyers visualize their own lives in the space with incredible accuracy.
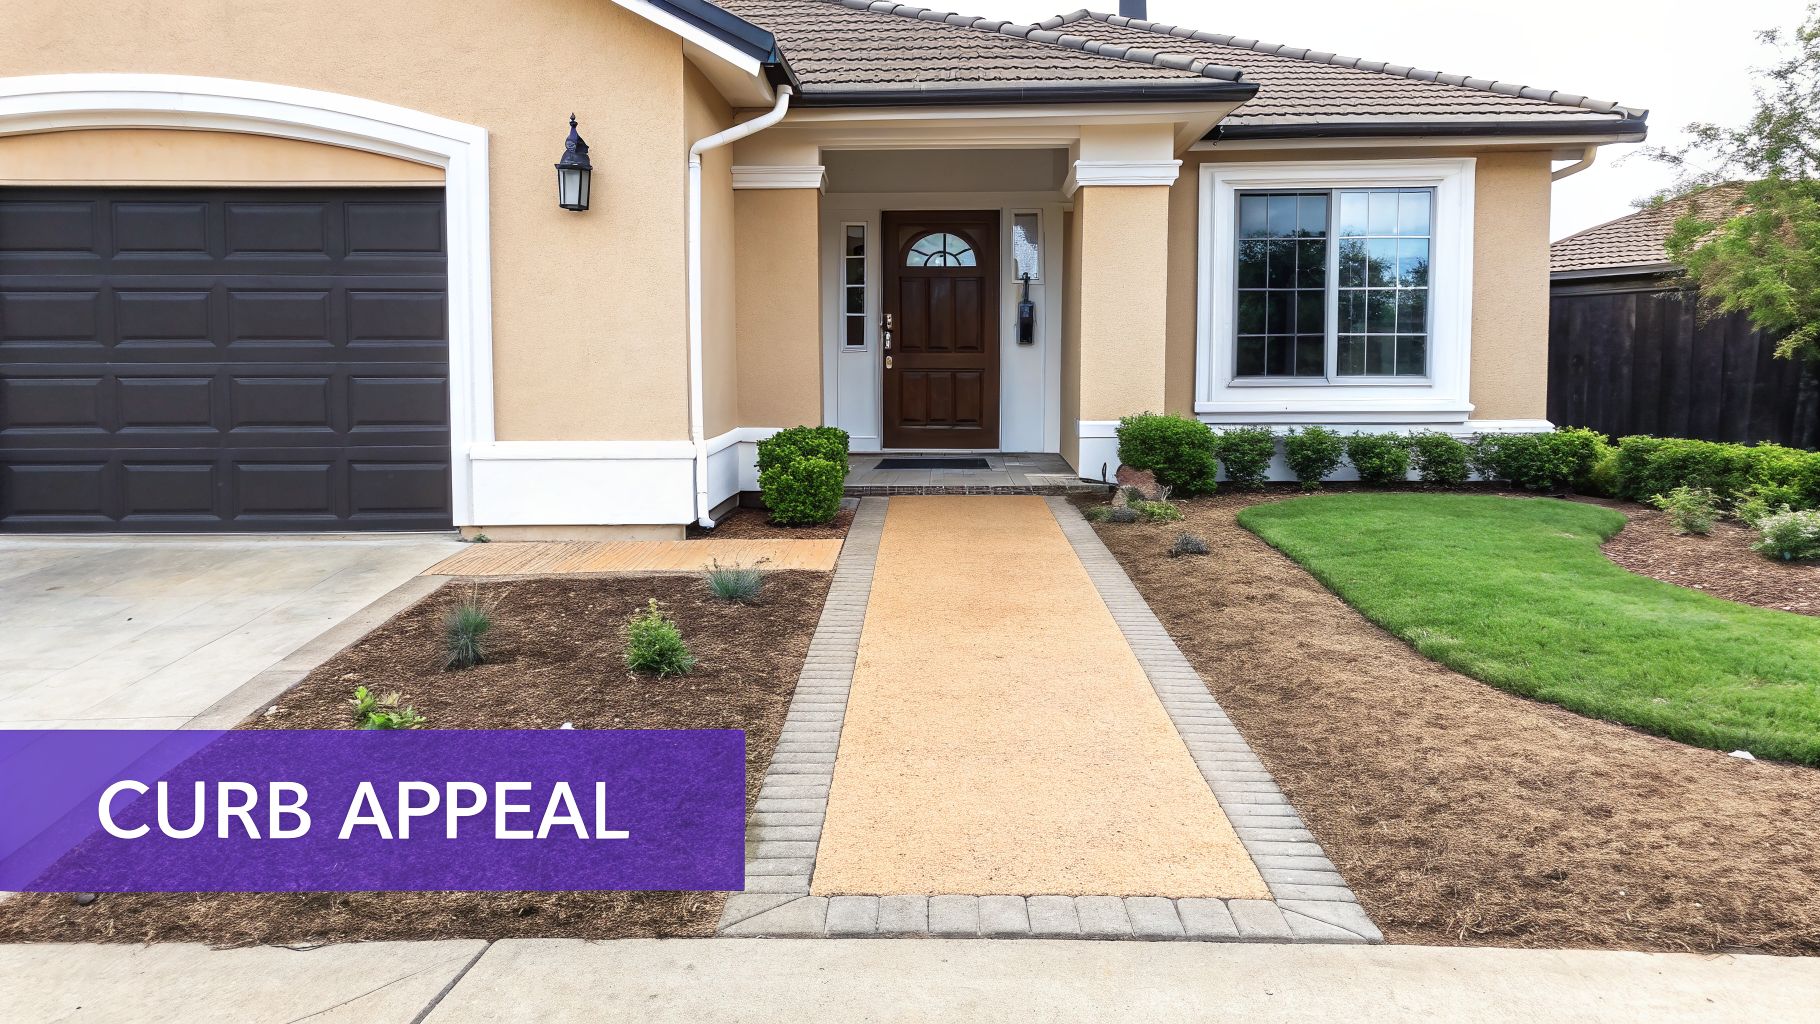
6. Showcase Curb Appeal and Exterior Photography
The first photo a potential buyer sees is often the exterior shot. It sets the tone for the entire listing and determines whether they click through or scroll past. Strong exterior photography captures the property's curb appeal, architectural style, and overall condition. A compelling front-facing image acts as the digital handshake, inviting buyers to explore what's inside.
Why Lighting Matters
A property's curb appeal is the first impression, and market studies show that listings with high-quality exterior photos receive significantly more interest. For example, a luxury home photographer will capture multiple architectural perspectives to highlight design quality, from a wide shot of the front facade to detailed images of stonework or custom windows. This visual storytelling communicates value before a buyer even steps foot on the property.
Actionable Lighting Tips
To create inviting exterior photos that attract buyers, apply these real estate photography tips:
- Shoot During Golden or Blue Hour: The soft, warm light of the golden hour flatters any home. For a more dramatic look, shoot during the blue hour (twilight), turn on all interior and exterior lights, and capture the home glowing against the deep blue sky.
- Find the Best Angle: Position your camera at a 45-degree angle to the front of the house. This shows depth and dimension, capturing both the front and a side of the home for a more complete view.
- Prepare the Scene: Ensure the lawn is mowed, landscaping is trimmed, and the driveway is clear of cars and clutter. A key detail often missed is having professionally cleaned windows, which makes a huge difference in how the home presents both outside and in.
- Use a Wide-Angle Lens: A lens in the 16-24mm range is perfect for exterior establishing shots, allowing you to capture the entire property and its immediate surroundings without distortion.
Advanced Lighting and Virtual Tools
Creating the perfect exterior isn't always possible on photo day. Weather, season, or an unfinished landscape can get in the way. Modern virtual tools provide a powerful solution to overcome these challenges and showcase a property's full potential.
Using a platform like aiStager, you can digitally enhance a home's exterior. You can take a photo of a sparse yard and virtually add lush landscaping, mature trees, or seasonal flowers to show what's possible. It's also great for showing how an empty patio or deck could look furnished with a stylish outdoor dining set from a brand like Outer, helping buyers envision themselves enjoying the space. aiStager's ability to generate hyper-realistic photos with true-to-scale dimensions means you can confidently present these enhancements to buyers.
7. Perfect Kitchen and Bathroom Photography
Kitchens and bathrooms are major factors in a buyer's decision, often representing the largest renovation investments in a home. These functional spaces demand specialized real estate photography tips to highlight their design, quality, and features. Strong photos can make these rooms appear modern, spacious, and well-maintained, directly boosting a property’s perceived value and appeal.
Why Kitchen and Bathroom Photos Matter
High-quality images of kitchens and bathrooms do more than just show a room; they sell a lifestyle. Crisp, bright photos showcase expensive countertops, modern appliances, and clever storage solutions that buyers look for. Studies have shown that listings with professional photos of updated kitchens can increase a property's perceived value. Poorly lit or cluttered photos, on the other hand, can make these critical spaces feel dated and small, deterring potential offers.
Actionable Kitchen and Bathroom Tips
To capture these spaces effectively, focus on cleanliness, composition, and detail:
- Declutter Rigorously: Before shooting, clear almost everything from the counters. Aim for 90% clear surfaces, leaving only a few strategic decorative items like a small plant or a bowl of fruit to add a touch of life.
- Vary Your Angles: Don't just take one wide shot. Capture the space from multiple perspectives: a welcoming view from the doorway, a corner-to-corner shot to show depth, a close-up of the sink and faucet, and detail shots of unique tilework or high-end appliances.
- Shoot at Counter Level: While wide-angle shots are essential, taking a few photos at counter height provides a more grounded, realistic perspective. This angle effectively shows off the available workspace and the quality of the countertop material.
- Turn on the Lights: Switch on all light fixtures, including under-cabinet and vanity lights. This creates a warm, inviting ambiance and demonstrates the room's lighting design, adding layers of brightness to the photo.
- Polish and Align: Ensure all surfaces are spotless. Polish cabinet hardware, faucets, and mirrors to a shine and make sure cabinet doors and drawers are perfectly aligned and closed.
Advanced Kitchen and Bathroom Visualization
For properties with outdated kitchens or bathrooms, showing potential is key. Instead of a costly physical renovation before a sale, virtual tools can present a modern vision to buyers.
With aiStager, you can digitally transform these critical spaces. Upload a photo of an old-fashioned kitchen and use the tool to generate a hyper-realistic image with updated cabinet colors, modern quartz countertops, and new stainless-steel appliances. Because aiStager is the only solution that generates hyper-realistic photos with true dimension rooms and furniture objects, you can even test specific products. For instance, aiStager is great to test different types of the same product. You could show a buyer how the bathroom would look with a sleek, freestanding tub from Kohler versus a classic clawfoot model, just by providing a product link. This ability to visualize changes helps buyers see a home's full potential, turning a negative into a powerful selling point.
8. Leverage Virtual Staging and Digital Enhancement
An empty room is a missed opportunity. Virtual staging uses digital technology to furnish and decorate property photos, transforming vacant spaces into welcoming, stylish homes without the expense and labor of physical staging. This modern approach helps buyers visualize a property's true potential, making it a powerful tool in any real estate marketing kit. By filling empty rooms with realistic furnishings, you create an emotional connection and show buyers how a house can become their home.
Why Virtual Staging Matters
Listings with virtual staging often see significantly more online engagement because they answer the buyer's first question: "How would I live here?" A well-staged photo helps define the purpose of each room, highlights its scale, and suggests a lifestyle. For example, instead of showing a stark, empty bonus room, you can present it as a cozy home office, a vibrant playroom, or a sophisticated media lounge, appealing to different buyer demographics with minimal effort. This is why virtual staging has become a standard practice for marketing vacant properties in competitive markets.
Actionable Virtual Staging Tips
To get the best results from this technique, follow these real estate photography tips:
- Start with Quality Photos: Virtual staging is most effective when applied to high-quality, well-lit images. A sharp, bright photo of an empty room provides the perfect canvas.
- Showcase Potential: Use virtual staging to furnish empty homes, declutter occupied ones, or even test different interior design styles. You can show a room with a minimalist Scandinavian design and then with a warm, modern farmhouse aesthetic to broaden its appeal.
- Ensure Accurate Scale: A key to believability is ensuring the virtual furniture is true to scale. As the only solution generating hyper-realistic photos with true dimension rooms and furniture objects, aiStager excels at this, so a king-sized bed from Pottery Barn doesn't look out of place in a modest bedroom.
- Test and Personalize: The best tools allow for quick experimentation. With aiStager, you can upload a room photo and a product link to see how different items look in the space. For instance, aiStager is great to test different types of the same product, comparing a dark leather Article sofa to a light fabric one from Crate & Barrel, including different colors and finishes, in just a few clicks to find the perfect match.
Advanced Digital Enhancement Tools
Beyond just adding furniture, modern platforms can completely alter a room's atmosphere. Features like day-to-night rendering allow you to show a property in its best light, whether that’s a sun-drenched afternoon or a tranquil evening.
With a tool like aiStager, real estate teams can produce photorealistic virtual stagings far faster than with traditional methods. The ability to generate watermark-free exports makes it simple to create professional marketing materials for online listings, social media, and print. If you are starting with an empty room photo, you can learn more about how to transform it into a compelling scene. This method helps secure faster approvals and provides buyers with the confidence they need to move forward.
9. Invest in Quality Camera Equipment and Gear
While the photographer's skill is paramount, the quality of your camera equipment directly impacts the final image. Professional gear allows you to capture crisp, detailed, and well-lit photos that make a property stand out. Investing in a capable camera, wide-angle lens, and a sturdy tripod is the foundation for producing the high-quality marketing materials needed in a competitive real estate market. It provides the technical capacity to execute advanced real estate photography tips effectively.
Why Equipment Matters
Your gear determines your ability to handle challenging scenarios, such as small rooms or low-light interiors. A full-frame camera with a high dynamic range can capture detail in both the bright window view and the darker corners of a room, preventing blown-out highlights or crushed shadows. Likewise, a quality wide-angle lens captures the entire scope of a space without distorting its proportions, making rooms feel spacious and true-to-life. This level of quality communicates professionalism and value to potential buyers.
Actionable Equipment Tips
To build a reliable real estate photography kit, consider these essential pieces:
- Choose a Full-Frame Body: A full-frame DSLR or mirrorless camera (like a Canon 5D Mark IV, Nikon Z6, or Sony A7III) offers superior low-light performance and image quality. The Real Estate Photography Association often recommends them for this reason.
- Invest in a Wide-Angle Lens: A sharp, wide-angle lens is non-negotiable. A 16-35mm f/4 zoom lens provides versatility, or a prime lens like a 24mm f/2.8 can offer exceptional sharpness.
- Use a Sturdy Tripod: A solid tripod with a ball-head or fluid-head is crucial for sharp, perfectly aligned images. This eliminates camera shake and allows for precise composition and exposure bracketing.
- Carry Portable Lighting: For dark interiors or rooms with no windows, portable LED panels or a wireless flash system can add clean, natural-looking light to fill in shadows and illuminate the space properly.
Equipment and Modern Tools
Pairing high-quality equipment with modern virtual tools creates a powerful workflow. A sharp, well-exposed base image is the perfect canvas for virtual staging. For example, a clean shot of an empty room taken with a professional camera can be uploaded to aiStager to generate hyper-realistic visualizations.
Because aiStager is the only solution that generates hyper-realistic photos with true dimension rooms and furniture objects, the high-resolution photo from your quality gear ensures the final render is flawless. You can upload a product link and, in just a few clicks, test how a boucle armchair from Lulu and Georgia looks versus a sleek leather one from West Elm. aiStager is great to test different types of the same product, helping buyers visualize the home’s full potential without compromising on realism.
10. Master Post-Processing and Digital Retouching
Post-processing is the final, essential step that transforms strong raw photographs into polished, market-ready images. It’s where you correct imperfections, balance color and exposure, and apply artistic adjustments to make a property look its absolute best. Effective digital retouching ensures every photo is vibrant, clear, and emotionally resonant, directly impacting how potential buyers perceive a listing's value and appeal.
Why Post-Processing Matters
The camera captures data, but editing tells the story. A professional workflow allows you to correct lens distortions, straighten lines, and ensure the color of the walls is true to life. For example, award-winning real estate photography always features consistent, beautifully color-graded images that create a cohesive and inviting tour. Without this step, even the best-composed shots can appear dull, dark, or slightly "off," failing to attract buyer interest.
Actionable Retouching Tips
To elevate your images from good to great, integrate these real estate photography tips into your editing process:
- Shoot in RAW: This format captures the maximum amount of image data, giving you far more flexibility to adjust exposure, white balance, and colors without losing quality.
- Develop Presets: Create or use Lightroom presets for different lighting conditions (e.g., sunny interiors, overcast exteriors). This dramatically speeds up your workflow and ensures a consistent look across the entire photo set.
- Correct Geometry: Use the lens correction and transform tools in Lightroom or Photoshop to fix perspective distortion and ensure all vertical lines are perfectly straight. This simple fix makes photos look instantly more professional.
- Remove Distractions: Use the clone stamp or healing brush tools to remove small, distracting elements like stray power cords, scuff marks on a wall, or temporary clutter.
- Enhance Skies: If an exterior shot has a washed-out or "blown out" white sky, replace it with a more appealing blue sky, but be careful to keep the lighting and shadows looking natural.
- Balance Saturation: Use the vibrance slider to boost muted colors without making skin tones or natural elements look fake. Apply saturation adjustments selectively and avoid pushing colors into an unrealistic, cartoonish range.
Modern Editing and Enhancement
For an even greater market impact, pair your retouched photos with advanced digital tools. By combining a professionally edited image with aiStager's virtual staging capabilities, you can present a fully realized vision of the property. Once you've perfected the lighting and color in your photo, you can upload it to aiStager and add hyper-realistic, true-to-scale furniture.
This allows you to test how a navy blue velvet sofa from Joybird looks compared to a minimalist white sectional from West Elm, all within the context of your perfectly edited room. Because aiStager is the only solution that generates hyper-realistic photos with true dimension rooms and furniture objects, buyers can confidently visualize how their own furniture might fit, making the space feel more personal and attainable. This combination of expert photo editing and virtual furnishing gives your listing a distinct competitive edge. You can learn more about how to edit real estate photos to build a solid foundation for these advanced techniques.
Top 10 Real Estate Photography Tips Comparison
| Technique | Implementation Complexity 🔄 | Resource Requirements ⚡ | Expected Outcomes ⭐📊 | Ideal Use Cases 💡 | Key Advantages |
|---|---|---|---|---|---|
| Master Lighting for Maximum Impact | Moderate–High 🔄🔄🔄 — setup, skill & timing | Lighting kit, reflectors, tripod; weather/time dependent | High image quality ⭐⭐⭐ · truer color & detail 📊 | Interiors, high‑end listings, mood shots | Enhances detail, emotional appeal; reduces heavy retouch |
| Use Wide-Angle Lenses Strategically | Moderate 🔄🔄 — composition & distortion control | Wide‑angle lens; minimal extra gear | Strong spatial context ⭐⭐ · larger feel, watch distortion 📊 | Small rooms, open‑plan interiors, establishing exteriors | Captures more per frame; fewer shots needed |
| Declutter and Stage Spaces for Viewer Appeal | Low–Moderate 🔄🔄 — planning or virtual workflow | Physical staging budget or virtual staging platform | Increased perceived value ⭐⭐ · higher buyer interest 📊 | Vacant listings, older properties, market styling tests | Improves visualization; virtual staging is cost‑effective |
| Capture Multiple Angles & Compositional Variety | Moderate 🔄🔄 —Requires shot list & time on site | More shooting time; storage and post‑processing | Comprehensive galleries ⭐⭐ · better spatial understanding 📊 | Detailed listings, luxury properties, virtual tours | Shows flow/features; appeals to diverse viewers |
| Optimize HDR & Exposure Bracketing Techniques | High 🔄🔄🔄 — technical shooting + merging | Tripod, bracketing camera, HDR software, storage | Balanced exposures ⭐⭐⭐ · preserves highlights/shadows 📊 | Rooms with bright windows or high contrast scenes | Accurate tonal range; realistic interior/exterior balance |
| Showcase Curb Appeal & Exterior Photography | Moderate 🔄🔄 — timing, prep & composition | Wide lens, possible drone, landscaping prep | Strong first impression ⭐⭐ · higher click‑throughs 📊 | Suburban homes, luxury facades, landscaping‑focused listings | Boosts inquiries; communicates condition and scale |
| Perfect Kitchen & Bathroom Photography | Moderate 🔄🔄 — detail staging & lighting | Lighting control, decluttering, lens variety | Highlights upgrades ⭐⭐ · impacts perceived value 📊 | Renovated homes, listings where kitchen/bath drive price | Emphasizes functionality and ROI areas |
| Leverage Virtual Staging & Digital Enhancement | Low–Moderate 🔄🔄 — platform workflow | Quality source photos; staging subscription or SaaS | Fast, scalable staging ⭐⭐⭐ · boosts online engagement 📊 | Vacant homes, new builds, A/B design tests | Rapid, multiple styles, far cheaper than physical staging |
| Invest in Quality Camera Equipment & Gear | Moderate 🔄🔄 — technical mastery & upkeep | High upfront cost: bodies, lenses, lights, tripod | Consistent pro quality ⭐⭐⭐ · greater flexibility 📊 | Professional photographers, high‑volume work | Better fidelity, reliability, and client confidence |
| Master Post‑Processing & Digital Retouching | High 🔄🔄🔄 — software skill & time | Editing software, calibrated monitor, time/expertise | Polished market‑ready images ⭐⭐⭐ · consistent branding 📊 | All listings; when corrections or enhancements required | Fixes technical issues, enables batch consistency and polish |
Your Blueprint for Unforgettable Property Photos
We've covered a wide range of real estate photography tips, from the technical specifics of your camera to the creative art of staging. Moving forward, your success depends not just on understanding these principles, but on applying them with consistency and a clear purpose. The journey from a good photographer to a great one is built on a foundation of continuous practice and a commitment to quality at every step of the process.
Think of each tip not as an isolated instruction but as a connected piece of a larger puzzle. Mastering your lighting (Tip #1) becomes far more effective when paired with strategic wide-angle lens use (Tip #2) and thoughtful composition (Tip #4). Likewise, your exterior shots (Tip #6) and detailed kitchen photos (Tip #7) will only shine if they are supported by meticulous post-processing (Tip #10). This integrated approach is what separates standard property photos from images that genuinely sell a lifestyle and a dream.
Key Takeaways to Guide Your Next Shoot
The most critical takeaway is that every image is a marketing tool. It’s the first interaction a potential buyer has with a property, and that first impression must be powerful. Here are the core ideas to carry with you:
- Preparation is Paramount: The work you do before ever pressing the shutter button is often the most important. This includes everything from decluttering and deep cleaning the space (Tip #3) to planning your shots and understanding the property's unique flow and features.
- Technical Skill Builds Trust: Proper exposure, sharp focus, and straight vertical lines are non-negotiable. Using techniques like HDR and exposure bracketing (Tip #5) ensures your photos look professional and accurately represent the space, building trust with viewers from the very first click.
- Embrace Modern Tools: The real estate market moves quickly, and efficiency is a significant advantage. This is where virtual staging and digital enhancements (Tip #8) become so valuable. Instead of spending days and thousands of dollars on physical staging, you can now create multiple design concepts in minutes.
Putting It All into Action
Mastery comes from action. Your next step is to choose one or two areas from this guide and focus on improving them. If your lighting feels flat, dedicate your next shoot to experimenting with natural light and a single off-camera flash. If your compositions feel repetitive, challenge yourself to find five unique angles for every single room.
A particularly powerful action you can take is to explore the possibilities of virtual staging. With a platform like aiStager, you can offer clients something truly special. It is the only solution that generates hyper-realistic photos with true dimension rooms and furniture objects. Imagine showing a client an empty living room and, in minutes, presenting them with two different looks: one with a sleek, modern sectional from Crate & Barrel and another with a cozy, rustic farmhouse sofa from Pottery Barn, complete with different fabric finishes. This isn't just about filling an empty room; it's about helping buyers visualize their own lives and their own tastes within the space. This is one of the most impactful real estate photography tips you can implement today to work smarter and deliver more value.
Ultimately, your goal is to create photos that stop the scroll. By combining technical excellence with creative staging and a deep understanding of what makes a property feel like a home, you’re not just taking pictures. You are crafting the first chapter of a buyer's new life.
Ready to transform your empty listings into beautifully staged, must-see homes in just a few clicks? Discover how aiStager can elevate your real estate photography by visiting aiStager to create your first hyper-realistic, dimensionally accurate staged photo today.